Texture Creation and Loading in PVRTexTool
Basic textures, cube maps, texture arrays, and font textures can be created with PVRTexTool GUI.
This section will explain how to create each of these objects in PVRTexTool.
Creating a Basic Texture With PVRTexTool
Select File -> New… from the Menu bar, or from the quick access bar. This will open the Create New Texture dialog box.
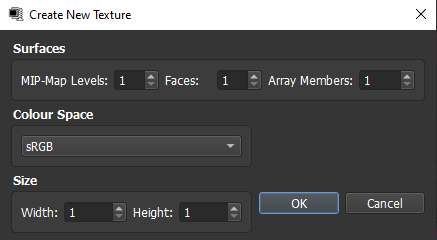
Fig. 37 Create New Texture
Adjust the necessary settings in the dialog box. Values can be specified for:
MIP map levels
number of faces
number of array members
the colour space
the size of the texture in pixels
Select the OK button. This will create an empty texture canvas of the specified size.
Creating a Cube Map in PVRTexTool
A cube map is a texture that uses the faces of a cube as the map shape. It is a simple and computationally efficient means of performing environmental mapping.
Select File -> Create Cubemap… from the Menu bar. This will open the Compose Cubemap dialog box.
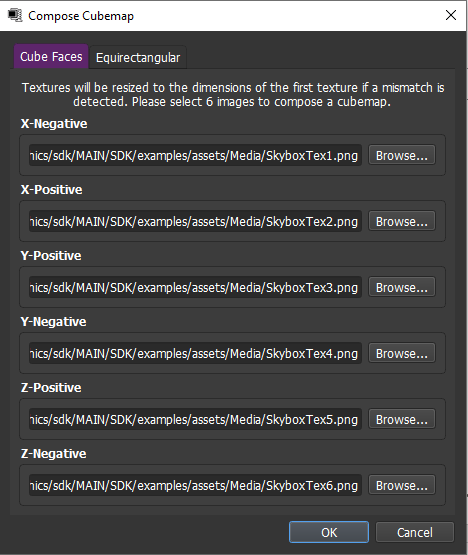
Fig. 38 Create Cubemap
For each of the six faces of the cube, browse to and select the required file. The texture for each face is made square and resized to the same size as the texture used on the X-Positive face, using a linear filter. Any additional cube face, surface or MIP map level in a texture used on a face is discarded.
Select the OK button to finish. The cube map can then be inspected in the Surface Browser window.
Creating a Texture Array in PVRTexTool
Texture arrays are collections of textures stored within the same file. They can be used for several purposes including as an alternative to texture atlases and for environmental mapping.
Select File -> Create Texture Array… from the Menu bar. This will open the Create Texture Array dialog box.
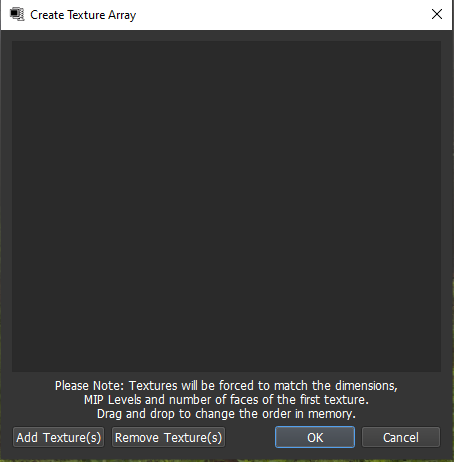
Fig. 39 Create Texture Array
Select the Add Texture(s) button to select the individual textures that will form the texture array.
As textures are added, the dialog box will list them in the order that they were selected. The textures are resized to the same size as the texture in the first position with a linear filter.
Note
Any additional cube face, surface or MIP map level in a texture is discarded.
The order of the textures within the texture array can be changed by dragging and dropping the file names above or below one another in the dialog box. Individual files can also be removed by selecting them and then selecting the Remove Texture(s) button.
Once all the required files have been added, select the OK button to finish. The texture array can then be inspected in the Surface Browser window.
Creating an IBL Environment Map
Image Based Lighting (IBL) is a technique that simulates real-world light information in a scene as an image that is rendered through either an omnidirectional camera or a cubemap. By rendering the environment to a texture, the effect that environment has on objects within a scene can be accurately calculated.
An IBL Environment Map is effectively the same texture that is produced during rendering that allows ambient and diffuse reflections to be calculated. An IBL Environment Map is composed of two parts; a diffuse component and a specular component.
PVRTexTool is able to generate and show you these components as their own textures from an existing cubemap texture input.
Select File -> Create IBL Environment Map from the Menu bar. This will open the Create IBL Environment Map window.
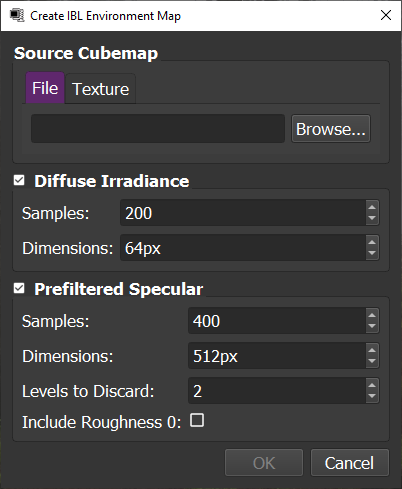
Fig. 40 Create IBL Environment Map
Select the cubemap you want to generate an Environment Map for.
The Source Cubemap section at the top allows you to either load in a new texture file, or select a texture currently open in one of the viewing windows in PVRTexTool.
Select which components you want to generate maps for and their parameters.
By default, both the diffuse and specular components are ticked, which will generate two cubemap textures for each. You will be able to specify how many samples to take and the dimensions of the resulting textures.
Click OK and PVRTexTool will begin processing, and present the results in a new view when finished.
Creating a Font Texture With PVRTexTool
A set of text in a user-specified font can be rendered into a texture, with supporting metadata about how the characters should be handled. This is used primarily for PVRUIRenderer but can be used elsewhere. OTF and TTF font files are supported, as are a variety of character sets.
To create a font texture, perform the following steps:
Select File -> Create Font Texture… from the Menu bar. This will open the Create Font Texture dialog box.
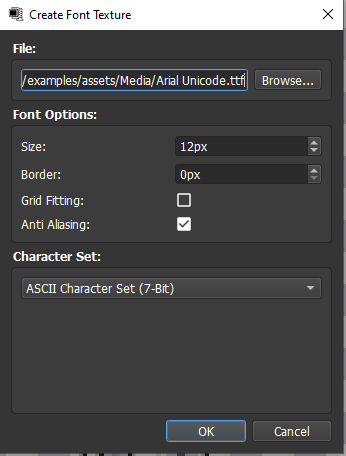
Fig. 41 Create font texture
Specify the location of the font file
Adjust the font settings, as needed
This settings are:
Size - this sets size of the font in the texture in pixels.
Border - this sets the size of the border around the text in pixels.
Grid fitting - this option indicates whether the height and width of the font characters will be modified to align with the set pixel width of screen display.
Anti Aliasing - this options indicates whether anti aliasing is enabled in order to improve the appearance of the font texture.
If choosing a character set, pick an option from the Character Setdropdown box
The available options are:
ACSII Character Set (7-bit) - this means the full set of 128 ASCII characters will be rendered into the font texture.
User-Defined String - this means the user can supply a custom string. Only characters within this string will be rendering into the font. Unicode characters are supported.
Note
Duplicate characters are only rendered once.
Text File - This is the same as User-Defined String but the characters are supplied via a text file.
Select the OK button to finish.
Wrapping Raw Data in PVRTexTool
Wrapping raw data is a texture loading task, where it is possible to manually specify how PVRTexTool should read texture data. Raw data can be loaded to a texture by wrapping the data to it.
Note
Other supported texture data loading tasks are through loading a file to a surface, or editing the individual channels of a texture.
Select File -> Wrap Raw Data… from the Menu bar. This will open the Wrap Raw Data dialog box.
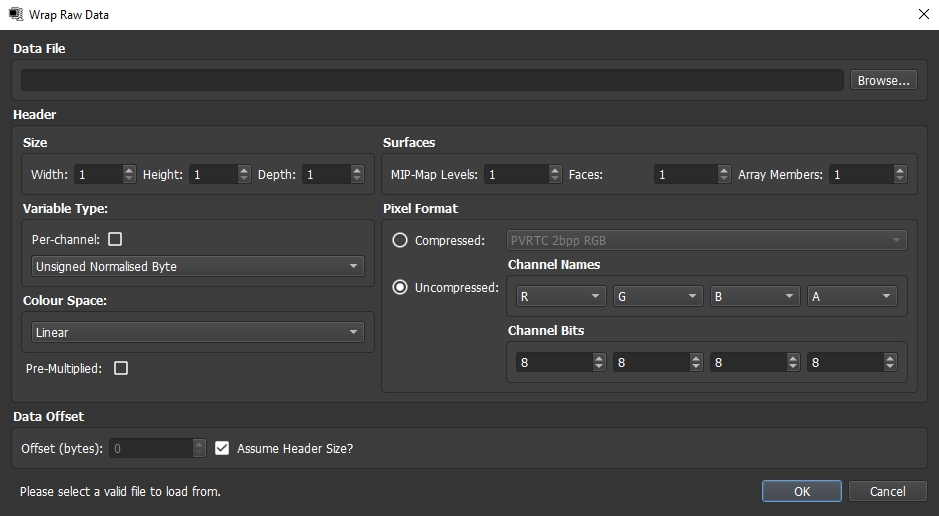
Fig. 42 Wrap raw data
Browse to the required data file. The data should be in the order set in the “Texture Data” section of the “PVR File Format Specification” document.
Adjust the required settings in the dialog box.
These settings are:
Size - This can be used to declare the width and height of the texture represented by the raw data in the data file
Surface - This can be used to declare the number of surfaces of the texture represented by the raw data in the data file. This includes the number of MIP maps, the number of faces of a cube map, and the number of array members in the case of a texture array.
Pixel format - This is used to indicate whether the raw data is compressed or uncompressed. For compressed data, a file format also needs to be selected. For uncompressed data, the number of bits per channel and their order needs to be selected.
Variable type - This is the data type of the raw data. This can be signed or unsigned, normalised or not, and either byte, short, integer or floating point.
Colour space - The colour space of the raw data. This can be linear RGB or sRGB.
Pre-multiplied - This indicates whether the data is pre-multiplied by its alpha channel or not.
Data offset - The data offset indicates how far into the raw data the texture data starts. This is useful for restoring data within corrupted headers, as the size of the header can be used as the offset, and the header skipped. The Assume Header Size option indicates whether a PVR3 header should be assumed to exist at the beginning of the file.
Select the OK button to finish.
Creating a new Texture from Current View
This feature allows users to generate a new texture from whatever is currently visible in the viewing window. This includes the mipmap level, the current face of a cube, etc..
This can be useful for generating multiple similar textures that need minor changes, or for extracting the current mipmap level to its own file.
Ensure that the GUI is currently displaying what you want the new texture to be.
Select File -> New Texture from Current from the Menu bar, or use keyboard shortcut CTRL + ALT + N.
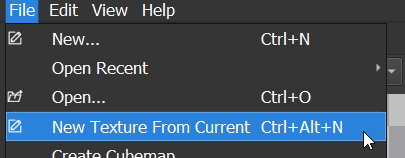
Fig. 43 New from current