Texture Pre-Processing with PVRTexTool
The PVRTexTool GUI provides a set of tools for performing pre-processing tasks on textures and images. The tools can be accessed from the Toolbox (D) window. The options displayed underneath the Tools will vary depending on the selected tool.
Note
Ensure the required file is selected before choosing a tool.

Fig. 23 Toolbox blank
Resize the Image
This tool is used to resize a texture to a given size.
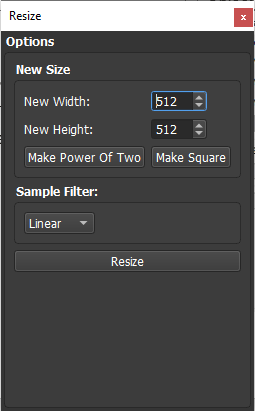
Fig. 24 Resize
The resizing settings for this tool are shown below.
Setting |
Description |
|---|---|
New Width |
Sets the desired resized width in pixels. |
New Height |
Sets the desired resized height in pixels. |
Make Square |
Sets the new width and height values to be the same, giving a square texture. |
Make Power Of Two |
Sets the new width and height values to be the next largest power of two. |
Sample Filter: Nearest |
Sets the filtering method to Nearest. |
Sample Filter: Linear |
Sets the filtering method to Linear. |
Sample Filter: Cubic |
Sets the filtering method to Cubic. |
Rotate by 90 Degrees
This tool is used to rotate a texture around a given axis. Currently only the Z axis is supported, providing a standard 2D rotate.
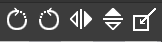
Fig. 25 Rotate
The settings for this tool are shown below.
Setting |
Description |
|---|---|
Rotate Clockwise |
Rotates the texture clockwise by 90 degrees. |
Rotate Anti-Clockwise |
Rotates the texture anti-clockwise by 90 degrees. |
Add a Mirrored Border
The purpose of adding a small mirrored border is to improve the quality of compressed textures whose compression algorithm assumes that the texture wraps. This technique should be used for non-tiling textures. The UV coordinates of these textures should be adjusted to not use the border.
Note
If possible, PVRTC2 should be used instead of PVRTC1 as it is designed to better handle non-tiling textures. This avoids having to add a mirrored border to the texture.
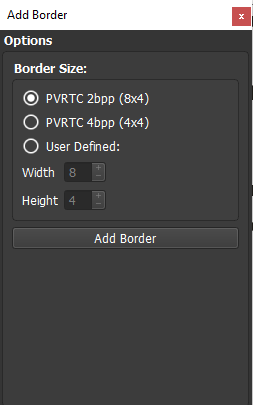
Fig. 26 Border
The settings that can be applied to add a mirrored border to a texture are given below.
Setting |
Description |
|---|---|
Border Size: PVRTC 2bpp (8x4) |
This is a pre-defined border size specifically designed to improve the quality of non-wrapped PVRTC 2 bits per pixel. |
Border Size: PVRTC 4bpp (4x4) |
This is a pre-defined border size specifically designed to improve the quality of non-wrapped PVRTC 4 bits per pixel. |
Border Size: User Defined |
This allows a user-defined border to be specified for other texture compression formats. The width and height of the border can be adjusted. |
Create a MIP Map chain
This tool is used to generate MIP maps for the current texture.
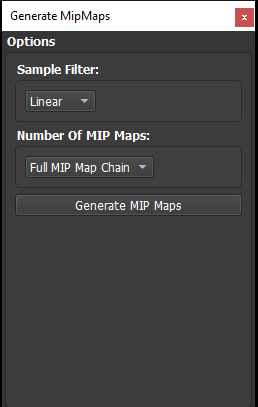
Fig. 27 Generate Mipmaps
The settings for this tool are shown below.
Setting |
Description |
|---|---|
Sample Filter: Nearest |
Sets the filtering method to Nearest. |
Sample Filter: Linear |
Sets the filtering method to Linear. |
Sample Filter: Cubic |
Sets the filtering method to Cubic. |
Number Of MIP maps |
This dropdown box allows the number of generated MIP maps to be adjusted. The default setting is that of Full MIP Map Chain. |
Resize the Canvas Without Changing the Image
This tool is used to resize a texture to a given size.
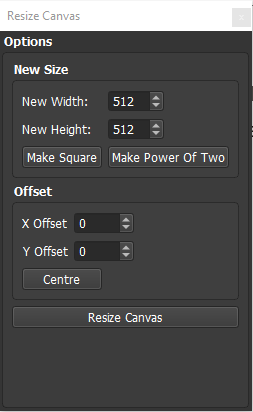
Fig. 28 Resize canvas
The resizing settings for this tool are shown below.
Setting |
Description |
|---|---|
New Width |
Sets the desired resized canvas width in pixels. |
New Height |
Sets the desired resized canvas height in pixels. |
Make Square |
Makes the canvas square by increasing the smallest height or width value to equal the largest height or width value. |
Make Power Of Two |
Increases the new height or width values to the next power of two, e.g., 256 pixels, 512 pixels, 1024 pixels, etc. |
X Offset |
Offsets the current texture from the top left of the new canvas. The offset amount is a value, in pixels, in the positive X-axis direction. |
Y Offset |
Offsets the current texture from the top left of the new canvas. The offset amount is a value, in pixels, in the negative Y-axis direction. |
Centre |
Centres the texture within the new canvas. |
Bleed Colours into Transparent Areas
The quality of opaque areas can be improved by bleeding their colours channels into the unused colour channels of transparent areas. This improves both compression quality and any bilinear filtering pass done on the texture. If the textures being used have no useful data in their alpha channel, it is strongly recommended that this tool be used.
Pre-Multiply Colours by Alpha
Run-time optimisation of a texture can be achieved by pre-multiplying the colour channels of its pixels by its alpha channel. To multiply colours by the alpha channel, select this tool and then “Pre-Multiply Alpha”.
Edit the Channel Colours
The contents of a colour channel (alpha, red, green and blue) within a texture can be set based on either a channel within the current image, another image, an integer, or a float.
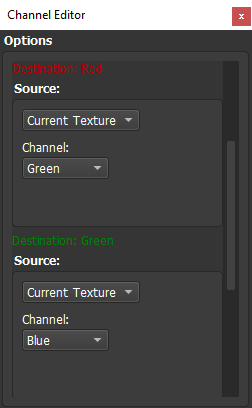
Fig. 29 Channel editor
The source settings that can be applied to edit the individual channels of a texture are shown below.
Setting |
Description |
|---|---|
Source: Current Texture |
Sets the current texture as the source. The required channel can then be chosen from the Red, Green, Blue, Alpha, Luminance or Intensity options in the Channel dropdown box. |
Source: File |
Sets another texture as the source by allowing the user to browse to the file. The required channel can then be chosen from the Red, Green, Blue, Alpha, Luminance or Intensity options in the Channel dropdown box. |
Source: Integer |
Sets an integer value as the source value. Integer values can be in the range 0 to 255. |
Source: Float |
Sets a float value as the source value. Float values can be in the range 0 to 1. |
For example, the red channel of a texture can be set the same as its blue channel by following these steps:
Select the Edit Individual Channels tool
Identify the Destination: Red section
Choose the Current Texture from the Source dropdown box
Select the Blue option from the Channel dropdown box
Colourise Different MIP Map Levels
It is possible to colourise the MIP map levels of a texture using false colouring in order to aid the visual inspection of a texture. This is mostly useful for testing, so that MIP map levels can be spotted easily.
To colourise MIP map levels, select this tool and then “Colour MIP Map Levels”.
Convert a Height Map into a Normal Map
A normal map can be created for a texture by assuming that it is a height map, based on the intensity of its RGB channels.
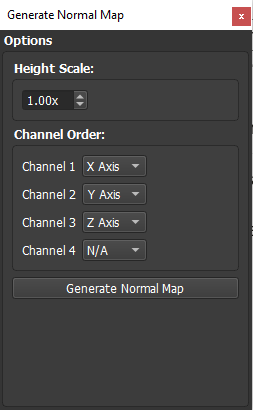
Fig. 30 Create normal map
The settings for this tool are shown below.
Setting |
Description |
|---|---|
Height Scale |
Sets the scaling of the height map from which the normal map is generated. |
Channel Order |
Sets which channel should map to which axis in the normal map. Optionally, a fourth channel can be used which can contain the original height map. Channel values are X Axis, Y Axis, Z Axis and N/A. |