PVRTexTool Command Line
Much like the GUI (graphical user interface), the CLI (command line interface) can be used to transcode and compress textures, as well as perform many different transformations such as; resizing, rotating, channel swapping and generating MipMaps. The CLI can also easily be executed from a script to batch process many files.
The CLI can be found in:
<SDK_ROOT>\PowerVR_Tools\PVRTexTool\CLI\
Within this directory the appropriate OS and its version can then be selected to find the correct version of the CLI.
A summary of the command line syntax is found in Command Line Options.
Some examples of using the CLI are shown below.
Example: Overriding a Colour Channel using PVRTexTool CLI
This is a simple example which demonstrates how easy it is to perform fairly complex operations with a single line using PVRTexTool CLI.
This example is partially taken from the PowerVR SDK example ImageBasedLighting which is focussed around implementing physical-based rendering with image-based lighting. The details of this SDK example are not particularly relevant but the important part is that at a certain point the channel values from two different textures need to be combined in a final output texture.
There are two initial textures, DefaultMetalRoughness.jpg, which only stores information in its blue and green channels, and DefaultAO.jpg, which is black and white, so stores the same information in all of its channels.
DefaultMetalRoughness:
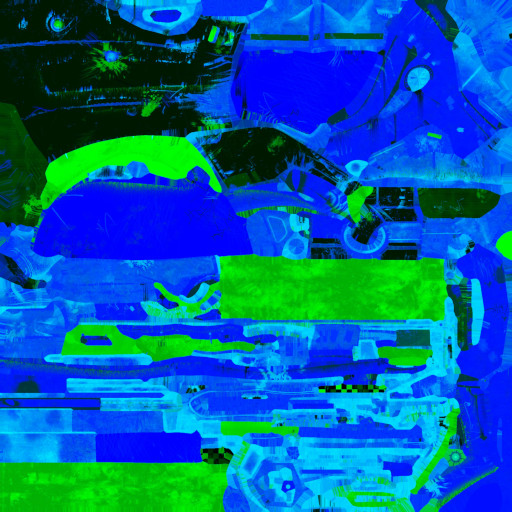
Fig. 44 DefaultMetalRoughness
Default_AO:

Fig. 45 DefaultAO
The simplest solution is to create an output texture which has green and blue channel information from the DefaultMetalRoughness texture and red channel information from the DefaultAO texture. This can be achieved using only one command in the PVRTexTool CLI.
PVRTexToolCLI -i DefaultMetalRoughness.jpg -f PVRTC2_4 -q pvrtcbest -red DefaultAO.jpg,r -o DefaultOcclusionRoughnessMetallic.pvr
This command sets the input file as DefaultMetalRoughness.jpg using the
-iparameter, chooses an output encoding format of PVRTC2 with 4-bits per pixel using the-fparameter, and sets the encoding quality to best using the-qparameter. The-redparameter overrides the red channel of the input texture with the channel value specified. In this case it is the red channel of DefaultAO.jpg. Finally, the output file destination of DefaultOcclusionRoughnessMetallic.pvr is set using the-oparameter.
The final output texture of this command is:
DefaultOcclusionRoughnessMetallic:
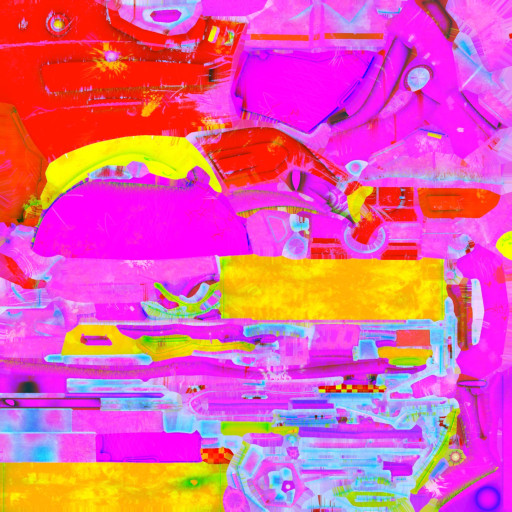
Fig. 46 DefaultOcclusionRoughnessMetallic
Example: Creating Cube Maps using the CLI
A cube map can be generated by including the -cube option and selecting the six texture files that will make up the faces of the cube, using the -i option. In the example command below these input texture are called skybox1.bmp, skybox2.bmp, and so on. The final cube map is encoded into PVRTC1 4bpp with the -f option, and saved as a data structure in a Direct Draw Surface, called skybox.dds, using the -o option.
The CLI command is shown below.
PVRTexToolCLI –i skybox1.bmp,skybox2.bmp,skybox3.bmp,skybox4.bmp,skybox5.bmp,skybox6.bmp –cube -m –f pvrtc1_4 –o skybox.dds
Additionally in this example, -m is used to generate a full chain of MIP maps.
Example: Generating MIP Maps using the CLI
In PVRTexTool CLI the -m option is used to generate MIP maps for the current texture. The number of MIP maps created can be set by adding an integer after -m. If nothing is set then it defaults to creating a full chain of MIP maps.
In this example, an image named Example.bmp is used to generate a full chain of MIP maps, encoded to ARGB 1555 by setting the -f option to alr5g5b5. The file Example.pvr is created.
PVRTexToolCLI -m –f a1r5g5b5 –i Example.bmp