Advanced Use
Advanced Use

PVRStudio attempts to meet your development needs, whether you are an experienced developer or a newcomer. When you install PVRStudio, the default configuration allows you to start coding, building, running and debugging applications with very little effort.
However, you can easily change or extend the default configuration, by choosing a different build system or integrating external tools.
You can also use special options to start PVRStudio from the command line and use it mainly from the keyboard.
-
You can install and run PVRStudio on several operating systems to create applications for multiple desktop and platforms.
-
PVRStudio is integrated with cross-platform systems for build automation: CMake, and Autotools. In addition, you can import generic projects that do not use those systems, and specify that PVRStudio ignores your build system.
-
You can start PVRStudio and specify some options for running it from the command line.
-
PVRStudio provides various keyboard shortcuts to speed up your development process. You can change the keyboard shortcuts, as well as import and export keyboard shortcut mapping schemes.
-
You can use external tools directly from PVRStudio. The default text editor for your system, and the
sorttool are preconfigured for use. You can change their default configurations and configure new tools.
Showing Task List Files in Issues Pane
You can load report files created by code scanning and analysis tools to the Issues output pane. You can navigate to the corresponding source code by clicking the error message or by using keyboard shortcuts.
Supported Platforms
You can install and run PVRStudio on several operating systems to create applications for multiple desktop, embedded, and mobile device platforms.
PVRStudio automatically runs scheduled checks for updates based on the settings specified in Tools > Options Environment > Update.
Development Platforms
PVRStudio is available in binary packages for the following operating systems:
Windows 7 or later
Note: Some PVRStudio plugins rely on Direct3D (part of DirectX). You might have to manually enable support for it if you are running Windows in a Virtual Machine. For more information, see Hardware 3D acceleration (OpenGL and Direct3D 8/9) and Prepare the Host System to Use DirectX 9 Accelerated Graphics.
(K)Ubuntu Linux 16.04 (64-bit) or later
To build applications using PVRStudio on Linux, you usually need the following:
g++
make
libglib2.0-dev
libSM-dev
libxrender-dev
libfontconfig1-dev
libxext-dev
libfreetype6-dev
libx11-dev
libxcursor-dev
libxfixes-dev
libxft-dev
libxi-dev
libxrandr-dev
libgl-dev and libglu-dev if you use OpenGL
macOS 10.12 or later with the following:
Xcode tools for your macOS version available on the Mac App Store.
Compiling from Source
To build PVRStudio from the source, see the requirements and instructions in the readme file that is located in the source repository.
Target Platforms
You can develop applications for the following platforms:
Desktop
Android
Embedded
Generic remote Linux
QNX
Universal Windows Platform (UWP)
Mobile Devices
The following table summarizes operating system support for developing applications for mobile device platforms.
Target Platform |
Development Platform |
||
|---|---|---|---|
Linux |
macOS |
Windows |
|
Android |

|

|

|
Generic Remote Linux |

|

|

|
QNX |

|

|

|
UWP |

|
* See Running on QNX Devices for limitations.
Using Other Build Systems
Most PVRStudio project wizards enable you to choose the build system to use for building the project. CMake is the default system and it is installed and configured when you install PVRStudio. To use one of the other supported build systems, you need to set it up, as described in the the following sections:
Setting Up an Autotools Project
PVRStudio can open projects that use the Autotools build system. You can build and run the projects directly from PVRStudio.
-
PVRStudio supports generic projects, so you can import existing projects that do not use CMake. This enables you to use PVRStudio as a code editor and to fully control the steps and commands used to build the project.
Setting Up CMake
CMake automates the configuration of build systems. It controls the
software compilation process by using simple configuration files,
called CMakeLists.txt files. CMake generates native build
configurations and workspaces that you can use in the compiler
environment of your choice.
You can use CMake from PVRStudio to build applications for the desktop and Android devices. You can also build single files to test your changes.
PVRStudio automatically detects the CMake executable specified in the
PATH. You can add paths to other CMake executables and use them
in different build and run
kits.
PVRStudio automatically runs CMake to refresh project information
when you edit a CMakeLists.txt configuration file in a project.
Project information is also automatically refreshed when you build
the project.
Adding CMake Tools
PVRStudio supports CMake version 3.0, or later. For best results you should use CMake version 3.7.2 with server-mode support, or later. Earlier versions provide less information to the code model, which will then fail to resolve includes and defines.
To specify paths to CMake executables:
Select Tools > Options > Kits > CMake > Add.
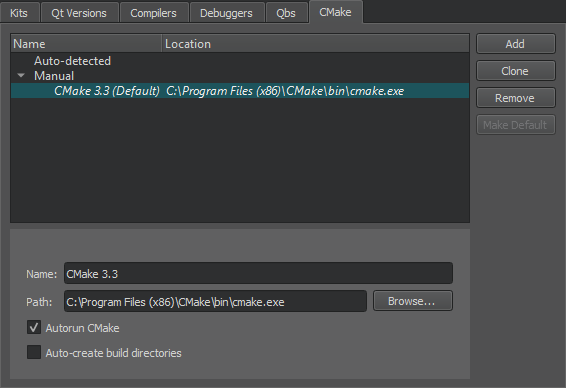
In the Name field, specify a name for the tool.
In the Path field, specify the path to the CMake executable.
Select the Auto-create build directories check box to automatically create build directories for CMake projects.
Select Apply to save your changes.
Note: When the Autorun CMake check box is enabled, PVRStudio
automatically runs CMake when you make changes to CMakeLists.txt
files. We recommend that you do not disable this check box, because
that would eventually make PVRStudio and the project disagree on what
the project information is.
Select the Kits tab to add the CMake tool to a build and run kit. The kit also specifies the CMake generator that is used for producing project files for PVRStudio and the configuration variables that are used:
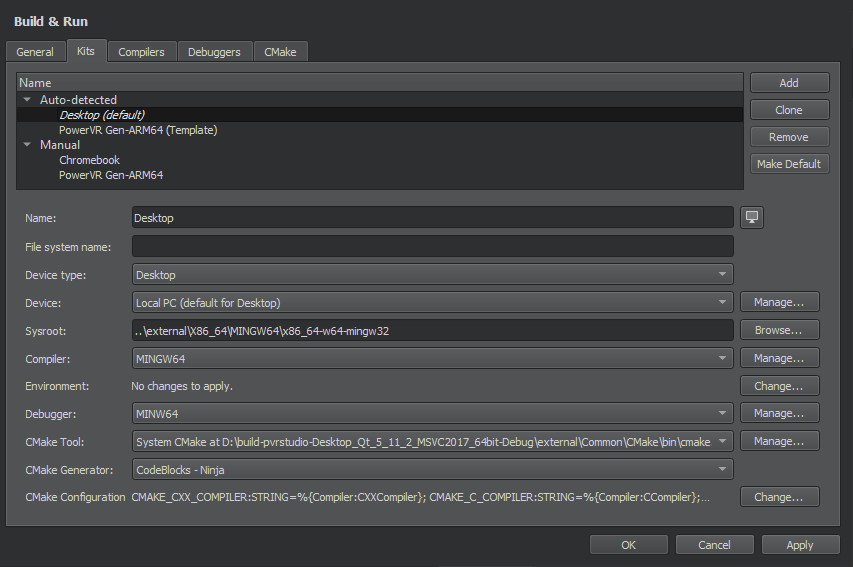
For more information, see Adding Kits.
Editing CMake Configuration Files
To open a CMakeLists.txt file for editing, right-click it in the Projects view and select Open with > CMake Editor.
The following features are supported:
Pressing F2 when the cursor is on a filename to open the file
Keyword completion
Code completion
Path completion
Auto-indentation
Matching parentheses and quotes
Adding External Libraries to CMake Projects
Through external libraries, PVRStudio can support code completion and syntax highlighting as if they were part of the current project.
PVRStudio detects the external libraries using the FIND_PACKAGE()
macro. Some libraries come with the CMake installation. You can find
those in the Modules directory of your CMake installation.
Note: If you provide your own libraries, you also need to provide
your own FindXXX.cmake file. For more information, see Writing
FindXXX.cmake
files.
Syntax completion and highlighting work once your project successfully builds and links against the external library.
Deploying CMake Projects to Embedded Linux Devices
Setting Up an Autotools Project
The AutotoolsProjectManager is a plugin for autotools support. It is disabled by default. To enable the plugin, select Help > About Plugins > Build Systems > AutotoolsProjectManager.
To use the plugin, restart PVRStudio.
To work with your Autotools project in PVRStudio:
Select File > Open File or Project.
Select the Makefile.am file from your project. This is the only way you can use the autotools plugin.
Select the build directory. Only in-source building is currently supported.
Select Finish. PVRStudio displays the project tree structure. The root node displays the project name. All project files are listed below it and you can open them from the list.

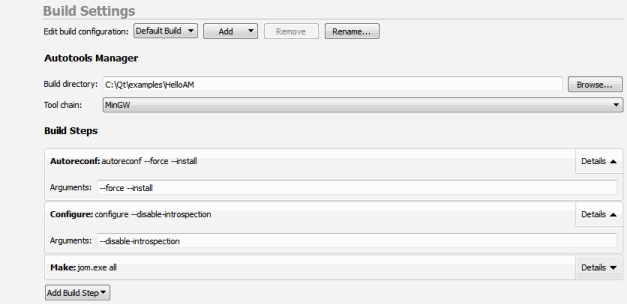
Select Run to build and run the application. The predefined build steps (autogen.sh or autoreconf, configure, and make) are executed.
The first time you run the application you must choose the executable.
To check and edit autotools build steps, select Projects > Build Settings.
You can add parameters to the predefined autotools build steps.
Setting Up a Generic Project
Generic project support allows you to use PVRStudio as a code editor.
You can change the way your project is built by modifying the
make command in the Projects mode under Build Settings.
When you import a project, PVRStudio creates the following files that
allow you to specify which files belong to your project and which
include directories or defines you want to pass to your compiler:
.files, .includes, and .config.
Importing a Generic Project
To import an existing generic project:
Select File > New File or Project > Import Project > Import Existing Project.
In Import Existing Project, enter the project name and select the location of the project file you want to import.
PVRStudio automatically generates the following files in the project directory:
When the project is successfully imported, PVRStudio creates the project tree in the sidebar.
After importing a generic project into PVRStudio, open it by
selecting the .creator file.
Working with Generic Project Files
For a generic project, you have to manually specify which files belong to your project and which include directories or defines you want to pass to your compiler.
Specifying Files
The list of files for a generic project is specified in the
.files file. When you first create a generic project, PVRStudio
adds any files it recognizes to your project.
To add or remove files, edit the .files file in PVRStudio. PVRStudio recreates your project tree when you save the .files
file. Alternatively, you can add and remove files using the context
menu in the project tree.
If you frequently need to update the .files file, you can do so
efficiently by using a script that updates the file for you. If the
file is modified externally, you have to restart PVRStudio for the
changes to take effect.
To update the .files on the Git repository use the following
script:
git ls-files "*.cpp" "*.h" > MyProject.files
Specifying Include Paths
The include paths are specified in the .includes file, one
include path per line. The paths can be either absolute or relative
to the .includes file.
Specifying Defines
The defines are specified in the .config file. The .config
file is a regular C++ file, prepended to all your source files when
they are parsed. Only use the .config file to add lines as in the
example below:
#define NAME value
Forwarding Flags to Clang Code Model
The .cxxflags and .cflags files contain command line flags
for the Clang code model on a single line.
For example, specify the -std=c++11 to set the language version
for parsing as C++11.
Providing Deployment Information
If you want to run your application on an embedded Linux device, you first need to deploy your executable and possibly other files. PVRStudio does that for you automatically if you provide the necessary information. This works the same way as explained for CMake here, except that you also need to include your application binary in the list.
Creating a Run Configuration
PVRStudio cannot automatically determine which executable to run.
In the Projects mode under Run Settings, define the executable file to run:
Click Add and select Custom Executable.
Define the configuration name, the location of the executable, any additional arguments and the working directory.
Using Command Line Options
You can start PVRStudio and specify some options from the command line. For example, you can open a file to any line and column.
To specify command line options, enter the following command in the PVRStudio installation or build directory:
pvrstudio [option] [filename[:line_number[:column_number]]]
Note: You can use either a colon (:) or a plus sign (+) as a separator between the filename and line number and the line number and the column number. You can also use a space between the separator and the line number.
For example, on Windows:
C:\pvrstudio\bin>pvrstudio -help-C:\pvrstudio\bin>pvrstudio C:\TextFinder\textfinder.cpp:100:2C:\pvrstudio\bin>pvrstudio C:\TextFinder\textfinder.cpp +100+2
On macOS:
PVRStudio.app/Contents/MacOS/PVRStudio -help
To open a project that is located in a particular folder, you can pass on the folder name as a command line argument. PVRStudio looks for a session that matches the folder name and loads it. Or it looks for a project file in the folder and opens it. For example:
pvrstudio .
The following table summarizes the available options:
Option |
Description |
|---|---|
-help |
Display help on command line options. |
-version |
Display PVRStudio version. |
-client |
Attempt to connect to an already running instance of PVRStudio. |
-pid |
Attempt to connect to an already running instance of PVRStudio with the specified process ID. |
-block |
Open files in editors in a running PVRStudio instance and block the command line until the first editor is closed. |
-load <plugin> |
Enable the specified plugin and
all plugins that it depends on.
You can combine |
-load all |
Enables all plugins. |
-noload <plugin> |
Disable the specified plugin and all plugins that depend on it. |
-noload all |
Disables all plugins. |
-profile |
Output plugin start up and shut down profiling data. |
-pluginpath <path> |
Add a path where PVRStudio looks
for plugins. To specify several
paths, add the |
-settingspath <path> |
Override the default path where user settings are stored. |
-installsettingspath <path> |
Override the default path from where user-independent settings are read (for example written by the installer). |
-temporarycleansettings |
Use clean settings for debug or testing reasons. The settings will be deleted when PVRStudio exits. |
-color <color> |
Core plugin: override the selected UI color. |
-presentationMode |
Core plugin: display keyboard shortcuts as popups when you press them. Mostly useful when presenting PVRStudio to someone else. |
-theme <default | dark> |
Core plugin: apply a dark color theme to PVRStudio, without using stylesheets. |
-notour |
Welcome plugin: Skip the UI tour on startup. |
-debug <pid> |
Debugger plugin: attach to the process with the given process ID. |
-debug <executable>[,kit=<kit>] |
Debugger plugin: launch and
debug the executable with the
name |
-debug [executa ble,]core=<corefile>[,kit=<kit>] |
Debugger plugin: load the core
file named |
-debug <executable>, server=<server:port>[,kit=<kit>] |
Debugger plugin: attach to a
debug server running on the port
|
-wincrashevent <event-handle:pid> |
Debugger plugin: Attach to crashed processes by using the specified event handle and process ID. |
-customwizard-verbose |
ProjectExplorer plugin: display additional information when loading custom wizards. For more information about custom wizards, see Adding New Custom Wizards |
-lastsession |
ProjectExplorer plugin: load the last session when PVRStudio starts. Open the projects and files that were open when you last exited PVRStudio. For more information about managing sessions, see Managing Sessions. |
<session> |
ProjectExplorer plugin: load the given session when PVRStudio starts. Open the projects and files that were open when you last exited PVRStudio. For more information about managing sessions, see Managing Sessions. |
Using Custom Styles
PVRStudio is a Qt application, and therefore, it accepts the command
line options that all Qt applications accept. For example, you can
use the -style and -stylesheet options to apply custom styles
and stylesheets. The styling is only applied during the current
session.
Exercise caution when applying styles, as overriding the existing styling may make some items difficult to see. Also, setting a stylesheet may affect the text editor color scheme and the styling of the integrated Qt Designer.
You can also switch to a dark theme to customize the appearance of widgets, colors, and icons without using stylesheets.
Keyboard Shortcuts
PVRStudio provides various keyboard shortcuts to speed up your development process. In addition, you can specify your own keyboard shortcuts for some functions that can be easily performed with a mouse, and therefore do not appear in menus or have default keyboard shortcuts. For example, selecting and deleting words or lines in an editor.
To view all functions available in PVRStudio and the keyboard shortcuts defined for them, select Tools > Options > Environment > Keyboard. The shortcuts are listed by category. To find a keyboard shortcut in the list, enter a function name or shortcut in the Filter field.
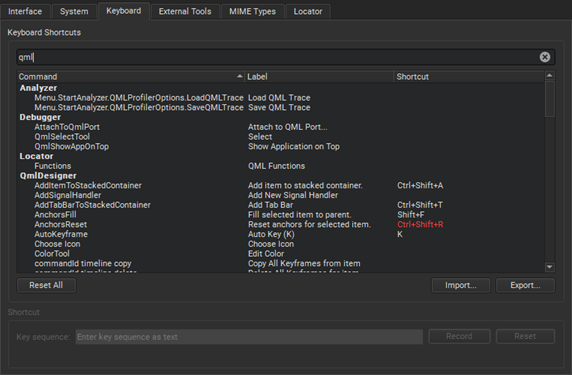
The shortcuts that are displayed in red color are associated with several functions. PVRStudio executes the function that is available in the current context. If several functions are available for the same shortcut at a time, there is a conflict and PVRStudio cannot execute any function.
A keyboard shortcut might also conflict with a shortcut that a Window manager uses for its own purposes. In that case, PVRStudio shortcuts do not work. Typically, you can configure the shortcuts in the window manager, but if that is not allowed, you can change the PVRStudio shortcuts. For example, Unity on Ubuntu 11.10 uses F10 in its window manager, and therefore the default PVRStudio keyboard shortcut F10 (Step Over) does not work on that system.
Configuring Keyboard Shortcuts
To customize a keyboard shortcut:
Select Tools > Options > Environment > Keyboard.
Select a command from the list.
In the Key Sequence field, you have the following options:
Enter the shortcut key you want to associate with the selected command.
Select Record, press the keys to use as the keyboard shortcut, and select Stop Recording when you are done.
To revert to the default shortcut, select Reset.
PVRStudio allows you to use different keyboard shortcut mapping schemes:
To import a keyboard shortcut mapping scheme, click Import and select the .kms file containing the keyboard shortcut mapping scheme you want to import.
To export the current keyboard shortcut mapping scheme, click Export and select the location where you want to save the exported .kms file.
Default Keyboard Shortcuts
The following tables list the default keyboard shortcuts. They are categorized by actions.
General Keyboard Shortcuts
Action |
Keyboard shortcut |
|---|---|
Open file or project |
Ctrl+O |
New file or project |
Ctrl+N |
Open in external editor |
Alt+V, Alt+I |
Select all |
Ctrl+A |
Delete |
Del |
Cut |
Ctrl+X |
Copy |
Ctrl+C |
Paste |
Ctrl+V |
Redo |
Ctrl+Y |
Ctrl+P |
|
Save |
Ctrl+S |
Save all |
Ctrl+Shift+S |
Close window |
Ctrl+W |
Close all |
Ctrl+Shift+W |
Close current file |
Ctrl+F4 |
Go back |
Alt+Left |
Go forward |
Alt+Right |
Go to line |
Ctrl+L |
Next open document in history |
Ctrl+Shift+Tab |
Go to other split |
Ctrl+E, O |
Previous open document in history |
Ctrl+Tab |
Activate Locator |
Ctrl+K |
Switch to Welcome mode |
Ctrl+1 |
Switch to Edit mode |
Ctrl+2 |
Switch to Design mode |
Ctrl+3 |
Switch to Debug mode |
Ctrl+4 |
Switch to Projects mode |
Ctrl+5 |
Switch to Help mode |
Ctrl+6 |
Toggle Issues pane |
Alt+1 (Cmd+1 on macOS) |
Toggle Search Results pane |
Alt+2 (Cmd+2 on macOS) |
Toggle Application Output pane |
Alt+3 (Cmd+3 on macOS) |
Toggle Compile Output pane |
Alt+4 (Cmd+4 on macOS) |
Toggle other output panes |
Alt+number (Cmd+number on macOS) Where the number is the number of the output pane. |
Activate Bookmarks pane |
Alt+M |
Activate File System pane |
Alt+Y |
Activate Open Documents pane |
Alt+O |
Maximize output panes |
Alt+9 |
Move to next item in output panes |
F6 |
Move to previous item in output panes |
Shift+F6 |
Activate Projects pane |
Alt+X |
Full screen |
Ctrl+Shift+F11 |
Toggle the sidebar |
Alt+0 (Cmd+0 on macOS) |
Undo |
Ctrl+Z |
Move to Edit mode In Edit mode:
|
Esc |
Exit PVRStudio |
Ctrl+Q |
Editing Keyboard Shortcuts
Action |
Keyboard shortcut |
|---|---|
Auto-indent selection |
Ctrl+I |
Collapse |
Ctrl+< |
Expand |
Ctrl+> |
Trigger a completion in this scope |
Ctrl+Space |
Copy line |
Ctrl+Ins |
Copy line down |
Ctrl+Alt+Down |
Copy line up |
Ctrl+Alt+Up |
Paste from the clipboard history |
Ctrl+Shift+V Subsequent presses move you back in the history |
Cut line |
Shift+Del |
Join lines |
Ctrl+J |
Insert line above current line |
Ctrl+Shift+Enter |
Insert line below current line |
Ctrl+Enter |
Decrease font size |
Ctrl+- (Ctrl+Roll mouse wheel down) |
Increase font size |
Ctrl++ (Ctrl+Roll mouse wheel up) |
Reset font size |
Ctrl+0 |
Toggle Vim-style editing |
Alt+V, Alt+V |
Split |
Ctrl+E, 2 |
Split side by side |
Ctrl+E, 3 |
Remove all splits |
Ctrl+E, 1 |
Remove current split |
Ctrl+E, 0 |
Select all |
Ctrl+A |
Go to block end |
Ctrl+] |
Go to block start |
Ctrl+[ |
Go to block end and select the lines between the current cursor position and the end of the block |
Ctrl+Shift+] |
Go to block start and select the lines between the current cursor position and the beginning of the block |
Ctrl+Shift+[ |
Select the current block The second press extends the selection to the parent block. To enable this behavior, select Tools > Options > Text Editor > Behavior > Enable smart selection changing. |
Ctrl+U |
Undo the latest smart block selection |
Ctrl+Alt+Shift+U |
Move current line down |
Ctrl+Shift+Down |
Move current line up |
Ctrl+Shift+Up |
Trigger a refactoring action in this scope |
Alt+Enter |
Rewrap paragraph |
Ctrl+E, R |
Enable text wrapping |
Ctrl+E, Ctrl+W |
Toggle comment for selection |
Ctrl+/ |
Visualize whitespace |
Ctrl+E, Ctrl+V |
Adjust size |
Ctrl+J |
Lay out in a grid |
Ctrl+G |
Lay out horizontally |
Ctrl+H |
Lay out vertically |
Ctrl+L |
Preview |
Alt+Shift+R |
Edit signals and slots |
F4 |
Toggle bookmark |
Ctrl+M |
Go to next bookmark |
Ctrl+. |
Go to previous bookmark |
Ctrl+, |
Fetch snippet |
Alt+C, Alt+F |
Paste snippet |
Alt+C, Alt+P |
Find references to symbol under cursor |
Ctrl+Shift+U |
Follow symbol under cursor Works with namespaces, classes, functions, variables, include statements and macros |
F2 |
Rename symbol under cursor |
Ctrl+Shift+R |
Switch between function declaration and definition |
Shift+F2 |
Open type hierarchy |
Ctrl+Shift+T |
Switch between header and source file |
F4 |
Turn selected text into lowercase |
Alt+U |
Turn selected text into uppercase |
Alt+Shift+U |
Run static checks on JavaScript code to find common problems |
Ctrl+Shift+C |
Find and replace |
Ctrl+F |
Find next |
F3 |
Find previous |
Shift+F3 |
Find next occurrence of selected text |
Ctrl+F3 |
Find previous occurrence of selected text |
Ctrl+Shift+F3 |
Replace next |
Ctrl+= |
Open advanced find |
Ctrl+Shift+F |
Record a text-editing macro |
Alt+( |
Stop recording a macro |
Alt+) |
Play last macro |
Alt+R |
Execute user actions in FakeVim mode |
Alt+V, n, where n is the number of the user action, from 1 to 9 |
Emacs Shortcuts
You can specify shortcuts for executing actions in a way that is familiar to Emacs editor users. The actions are not bound to any key combinations by default. The following actions are available:
Copy
Cut
Delete Character
Exchange Cursor and Mark
Go to File End
Go to File Start
Go to Line End
Go to Line Start
Go to Next Character
Go to Next Line
Go to Next Word
Go to Previous Character
Go to Previous Line
Go to Previous Word
Insert Line and Indent
Kill Line
Kill Word
Mark
Scroll Half Screen Down
Scroll Half Screen Up
Yank
Image Viewer Shortcuts
Action |
Keyboard shortcut |
|---|---|
Switch to background |
Ctrl+[ |
Switch to outline |
Ctrl+] |
Zoom in |
Ctrl++ |
Zoom out |
Ctrl+- |
Fit to screen |
Ctrl+= |
Original size |
Ctrl+0 |
Debugging Keyboard Shortcuts
Action |
Keyboard shortcut |
|---|---|
Start or continue debugging |
F5 |
Exit debugger |
Shift+F5 |
Step over |
F10 |
Step into |
F11 |
Step out |
Shift+F11 |
Toggle breakpoint |
F9 |
Run to selected function |
Ctrl+F6 |
Run to line |
Ctrl+F10 |
Reverse direction |
F12 |
Project Keyboard Shortcuts
Action |
Keyboard shortcut |
|---|---|
Build project |
Ctrl+B |
Build all |
Ctrl+Shift+B |
New project |
Ctrl+Shift+N |
Open project |
Ctrl+Shift+O |
Select the kit to build and run your project with |
Ctrl+T |
Run |
Ctrl+R |
Help Keyboard Shortcuts
Action |
Keyboard shortcut |
|---|---|
View context-sensitive help |
F1 |
Activate contents in Help mode |
Ctrl+T |
Add bookmark in Help mode |
Ctrl+M |
Activate index in Help mode |
Ctrl+I |
Reset font size |
Ctrl+0 |
Activate search in Help mode |
Ctrl+S |
Version Control Keyboard Shortcuts
Action |
Version control system |
|||||
|---|---|---|---|---|---|---|
Bazaar |
CVS |
Git |
Me rcurial |
P erforce |
Sub version |
|
Add |
Alt+C, Alt+A |
Alt+G, Alt+A |
Alt+P, Alt+A |
Alt+S, Alt+A |
||
Commit /Submit |
Alt+Z, Alt+C |
Alt+C, Alt+C |
Alt+G, Alt+C |
Alt+G, Alt+C |
Alt+P, Alt+S |
Alt+S, Alt+C |
Diff |
Alt+Z, Alt+D |
Alt+C, Alt+D |
Alt+G, Alt+D |
Alt+G, Alt+D |
Alt+S, Alt+D |
|
Diff project |
Alt+G, Alt+ Shift+D |
Alt+P, Alt+D |
||||
Blame/A nnotate |
Alt+G, Alt+B |
|||||
Log/ Filelog |
Alt+Z, Alt+L |
Alt+G, Alt+L |
Alt+G, Alt+L |
Alt+P, Alt+F |
||
Log project |
Alt+G, Alt+K |
|||||
Status |
Alt+Z, Alt+S |
Alt+G, Alt+S |
||||
Undo changes /Revert |
Alt+G, Alt+U |
Alt+P, Alt+R |
||||
Edit |
Alt+P, Alt+E |
|||||
Opened |
Alt+P, Alt+O |
Using External Tools
You can use external tools directly from PVRStudio. For example, the text editor for your system is preconfigured for use. You can change their default configurations and configure new tools.
To run the tools, select Tools > External, or use the x
filter in the locator.
Configuring External Tools
You can change the configuration of preconfigured tools and configure additional tools in PVRStudio Options.
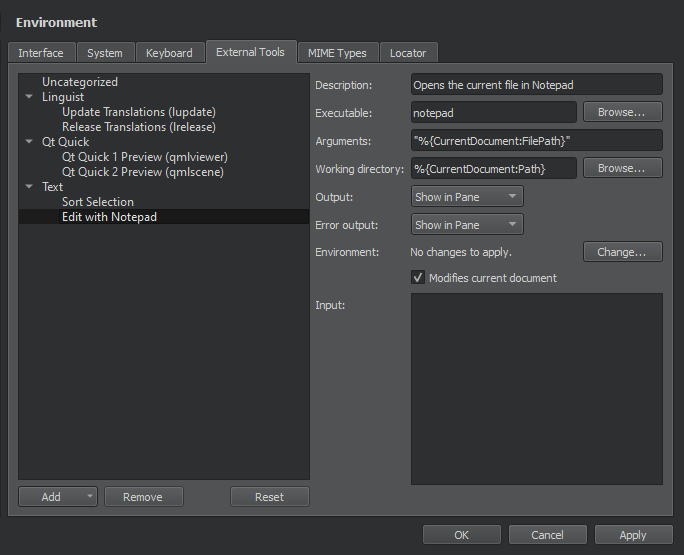
To configure external tools:
Select Tools > External > Configure.
Select Add > Add Tool to add a new tool. You can also select Add Category to add a new category.
In the Executable field, specify the executable to run. If the executable is found in your system PATH variable, do not specify the path to it.
In the Arguments field, specify optional arguments for running the executable.
In the Working directory field, specify the path to the working directory.
In the Output field, select how to handle output from the tool. You can ignore the output, view it in the General Messages output pane, or replace the selected text with the output in the code editor.
In the Error output field, select how to handle error messages from the tool.
In the Base environment field, select whether to run the tool in the system environment or the build environment or run environment of the active project. Select the build or run environment if the system environment does not contain the necessary PATH settings to find the tool chain, for example.
In the Environment field, select Change to modify environment variable values for build and run environments in the Edit Environment Changes dialog. For more information about how to add and remove variable values, see Batch Editing.
Select the Modifies current document check box to make sure that if the current document is modified by the tool, it is saved before the tool is run and reloaded after the tool finishes.
In the Input field, specify text that is passed as standard input to the tool.
The category and tool are added to the Tools > External menu.
If you change the configuration of preconfigured tools, you can later revert the changes by selecting the Reset button.
The tool configurations that you add and modify are stored in XML
format in the user configuration folder. For example,
~/config/QtProject/qtcreator/externaltools on Linux and macOS and C:\Users\username\AppData\Roaming\QtProject\qtcreator\externaltools
in Windows. To share a configuration with other users, copy an XML
configuration file to the folder.
Showing Task List Files in Issues Pane
You can use code scanning and analysis tools to examine source code. These tools report issues for you to fix. PVRStudio enables you to load lists of issues into the Issues pane for easier navigation.
PVRStudio expects tasks to be defined in a simple line-based file
format that is easy to generate using scripts. The scripts can either
convert reports from other tools or create lists of issues in the
task list format from
code. For an example of a script that checks new lines of code and
matches them against regular expressions to generate a task list, see
scripts\mytasks.pl in the PVRStudio repository.
Managing Task List Entries
To open task list files in the Issues pane, choose File > Open. Right-click a task list entry to open a context menu that contains commands for managing the entry. You can copy or remove task list entries or navigate to the corresponding source code.
PVRStudio monitors the loaded files and displays the changes in the Issues pane. To keep the current entries in a task list, but stop checking for changes, select Stop Monitoring.
Task List File Format
The filename extension must be .tasks for PVRStudio to recognize a file as a task list file.
Each line in a task list file is treated as a tab-separated list of
strings with \t, \n, and \\ used as escape characters.
The strings are used to create one task per line. The lines can have
one of the following formats:
description-type\tdescriptionfile\ttype\tdescription-file\tline\ttype\tdescription
The task type can have one of the following values:
A string starting with
err, which displays the error icon in the beginning of the lineA string starting with
warn, which displays the warning iconAny other value, which sets the task type to Unknown and does not display an icon
The values are not case sensitive.
Lines starting with the hash mark character (#) in the first column are ignored.
If the file path is given as a relative path, it is based on the parent directory of the task list file.
Using the Help Mode
PVRStudio comes fully integrated with documentation and examples using the Help plugin.
To view documentation, switch to Help mode.
To select and configure how the documentation is displayed in the Help mode, select Tools > Options > Help.
If the help HTML file does not use a style sheet, you can change the font family, style, and size in Tools > Options > Help > General.
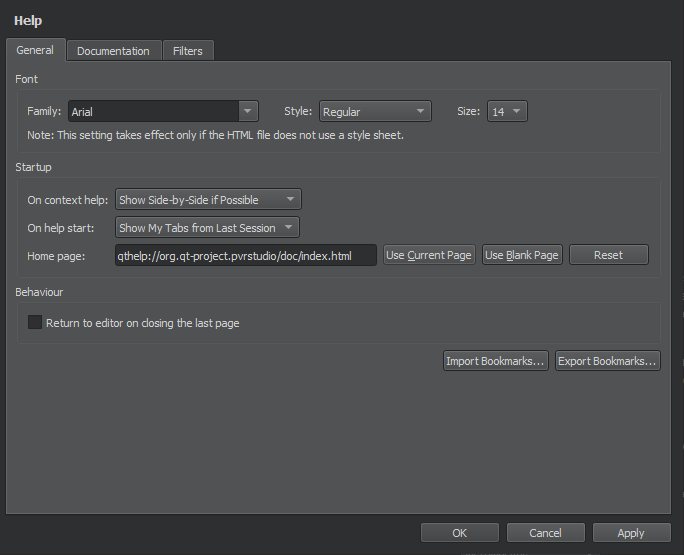
By default, you can use the mouse scroll wheel to zoom help pages. To disable this feature, deselect the Enable scroll wheel zooming check box.
To switch to the editor context when you close the last help page, select the Return to editor on closing the last page check box.
Viewing Function Tooltips
To hide function tooltips by default, select Tools > Options > Text Editor > Behavior > Show help tooltips using the mouse > On Shift+Mouseover. You can still view the tooltips by pressing and holding down the Shift key.
To use a keyboard shortcut for viewing help tooltips, select Show help tooltips using keyboard shortcut (Alt).
Finding Information in Documentation
PVRStudio, and other 3rd party deliverables contain documentation as .qch files. All the documentation is accessible in the Help mode.
To find information in the documentation, select:
Bookmarks to view a list of pages on which you have added bookmarks.
Contents to see all the documentation installed on the development PC and to browse the documentation contents.
Index to find information based on a list of keywords in all the installed documents.
Open Pages to view a list of currently open documentation pages.
Search to search from all the installed documents.
Adding Bookmarks to Help Pages
You can add bookmarks to useful help pages to easily find them later in the Bookmarks view. You can either use the page title as the bookmark or change it to any text. You can organize the bookmarks in folders in the view.
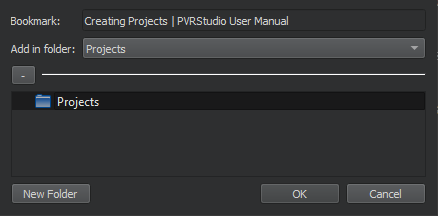
To add a bookmark to an open help page:
Click the image:: images/bookmark.png (Add Bookmark) button on the toolbar.
In the Add Bookmark dialog, click OK to save the page title as a bookmark in the selected folder.
To import and export bookmarks, select Tools > Options > Help > General > Import Bookmarks or Export Bookmarks.
Full-text Search
In the Search pane, you can use full-text search for finding a particular word in all the installed documents. Enter the term you are looking for, and select the Search button. All documents that contain the specified term are listed. The list is sorted by document version and the number of search hits that the documents contain. Select a document in the list to open it.
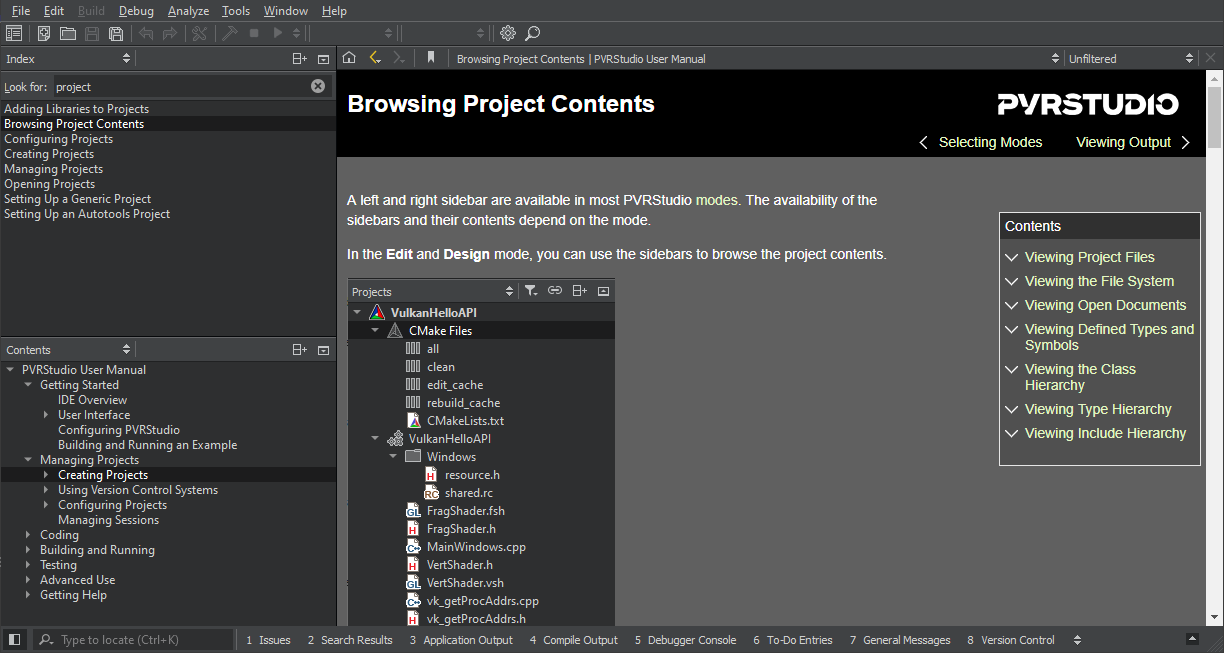
The following are examples of common search patterns:
deeplists all the documents that contain the worddeep. The search is not case sensitive.deep*lists all the documents that contain a word beginning withdeepdeep copylists all documents that contain bothdeepandcopy"deep copy"lists all documents that contain the phrasedeep copy
Full-text search is based on indexing all the installed documents the first time when you open the Search pane. If you add or remove documents, PVRStudio recreates the index.
If you cannot find words that you know are there, indexing might not have been completed for some reason. To regenerate the index, click image:: images/reload_gray.png (Regenerate Index).
Punctuation is not included in indexed terms. To find terms that
contain punctuation, such as domain names, use the asterisk as a wild
card. For example, to find Pastebin.Com, enter the search term Pastebin*.
Adding External Documentation
You can display external documentation in the Help mode. To augment or replace the documentation that ships with PVRStudio:
Create a .qch file from your documentation.
For information on how to prepare your documentation and create a .qch file, see The Qt Help Framework.
To add the .qch file to PVRStudio, select Tools > Options > Help > Documentation > Add.
Detaching the Help Window
By default, context-sensitive help is opened in a window next to the code editor when you press F1. If there is not enough vertical space, the help opens in the full-screen help mode.
You can specify that the help always opens in full-screen mode or is detached to an external window. Select Tools > Options > Help > General and specify settings for displaying context-sensitive help in the On context help field. To detach the help window, select Always Show in External Window.
Selecting the Start Page
You can select the page to display when you open the Help mode in the Tools > Options > Help > General > On help start field. To display the page and help panes that were open when you exited the mode, select the Show My Tabs from Last Session option. However, Web pages are not opened, because loading them would slow down opening the Help mode.
To display a particular page, select Show My Home Page, and specify the page in the Home Page field.
To display a blank page, select the Show a Blank Page option. You can also select the Use Blank Page button to set a blank page as your home page.
Using Documentation Filters
You can filter the documents displayed in the Help mode to find relevant information faster. Select a filter from a list of filters. The contents of the Index and Contents pane in the sidebar change accordingly.
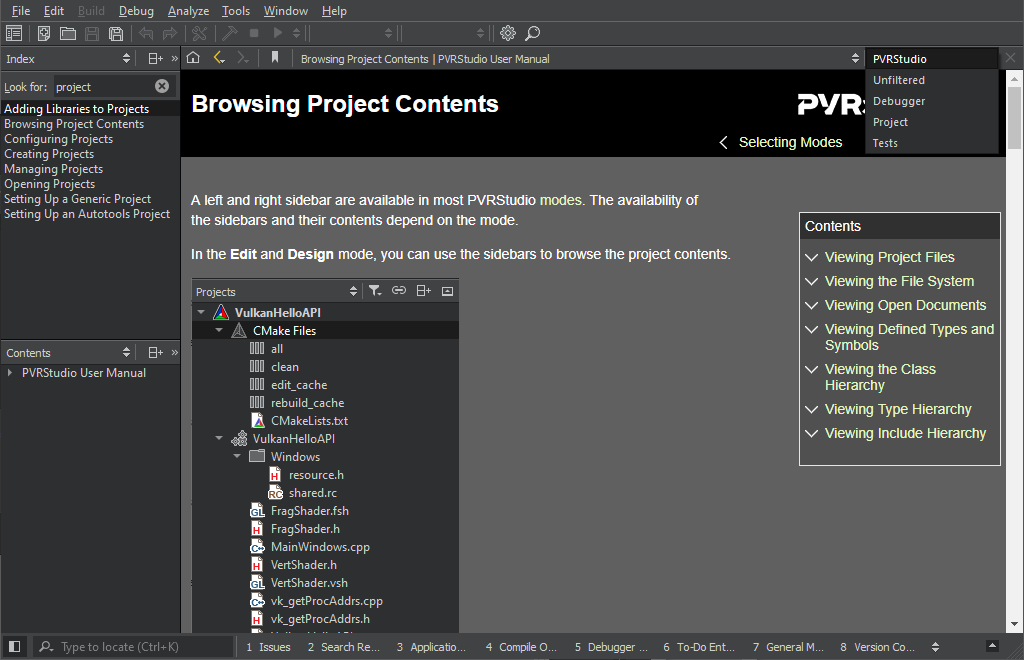
You can modify the filters to include external documentation, for
example, or you can define your own filters. To construct filters,
you can use the filter attributes that are specified in the
documentation. Each document contains at least one filter attribute.
If several documents contain the same filter attribute, such as
tools, you can use that attribute to include all those documents.
To add filters:
Select Tools > Options > Help > Filters > Add.
Enter a name for the filter and press OK.
In Attributes, select the documents that you want to include in the filter.
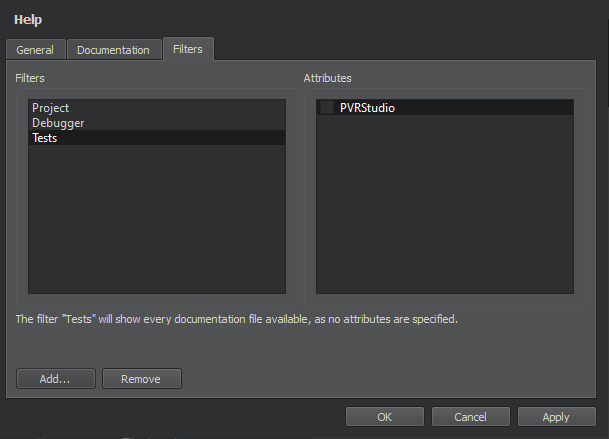
Click OK.
In the Help mode, select the filter in the list of filters to see the filtered documentation in the sidebar.
To modify filters, select a filter in Filters, select the attributes, and then click Apply.
To remove filters, select them in Filters, and click Remove.

