Connecting to Devices
Connecting Devices
You can connect devices to the development PC to run, debug, and analyze applications built for them from PVRStudio. When you install kits for a target platform, such as Android, QNX, or Universal Windows Platform (UWP), the build and run settings for the development targets might be set up automatically in PVRStudio.
You can connect the device to the development PC using a USB connection. Additionally, you can connect Linux-based devices by using a WLAN connection.
-
PVRStudio has built-in capabilities to compile, deploy and debugg applications directly on Android.
Connecting Embedded Linux Devices
If you have a tool chain for building applications for embedded Linux devices installed on the development PC, you can add it and the device to PVRStudio.
Connecting QNX Devices
You can connect QNX devices to the development PC to deploy, run and debug applications on them from within PVRStudio. This is currently only supported for QNX Neutrino devices, and requires the QNX SDK to be installed on the development PC.
Connecting Android Devices
You can connect Android devices to the development PC to run, debug, and analyze applications built for them from PVRStudio. Devices with Android version 4.1 (API level 16) or later are supported.
If you have a tool chain for building applications for Android devices installed on the development PC, you can add it to PVRStudio. You can then add a kit with the Android device type and the tool chain, to build applications for and run them on Android devices. You can also allow PVRStudio to automatically configure the kit.
The Android Debug Bridge (adb) command line tool is integrated to PVRStudio to enable you to deploy applications to connected Android devices, to run the applications on them, and to read logs from them. It includes a client and server that run on the development host and a daemon that runs on the emulator or device.
Requirements
To use PVRStudio to develop applications for Android, you need the following:
Java SE Development Kit (JDK) version 6, or later. You can also use OpenJDK on Linux.
Note: Android SDK Tools have issues with JDK versions later than 8.
Gradle for building application packages for Android devices (APK).
Note: Using Ant to build APKs is no longer supported.
A tool chain for building applications for Android devices provided by the Android NDK from Google.
-
The following Android SDK packages and tools are required for development:
Platform tools
Build tools
At least one SDK platform
On Windows, you also need the following:
Android Debug Bridge (ADB) driver on the Windows platform to enable USB debugging. The default USB driver on Windows does not allow debugging. For more information about obtaining the USB driver, see http://developer.android.com/sdk/win-usb.html.
After installing the driver, try running a few basic adb commands to check that your device responds to them.
Note: When using the command line tools instead of Android Studio, it is recommended to create an empty folder and extract the downloaded archive into this folder. The sdkmanager will install downloaded packages next to the
toolsfolder that contains all command line tools. You must specify the path to the folder where you extracted the files as Android SDK location inside the Android settings.
Setting Up the Development Environment
You must download and install the latest Android NDK and SDK, and then update or install the tools and packages needed for development.
The SDK tool used to update and install the other SDK tools and packages depends on the Android SDK Tools version that you have installed:
Android SDK Tools version 25.2.5, or earlier
Use the android tool that comes with the SDK Tools package. For example, on Ubuntu the following command starts the SDK update:
./android update sdk
Android SDK Tools version 25.3.0, or later
Use the sdkmanager command line tool for SDK package management and the avdmanager tool for Android Virtual Device (AVD) management.
Specifying Android Device Settings
To configure connections between PVRStudio and Android devices:
Select Tools > Options > Devices > Android.
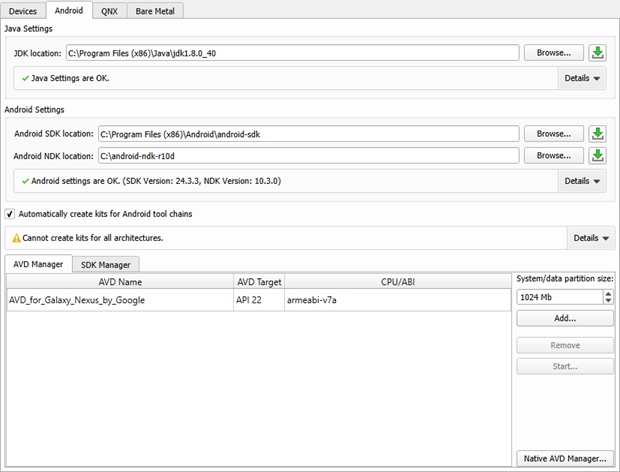
In the JDK location field, add the path to the JDK.
You can use the image:: images/download.png (Download) button to go to the site where you can download the JDK. PVRStudio checks the JDK installation and reports errors.
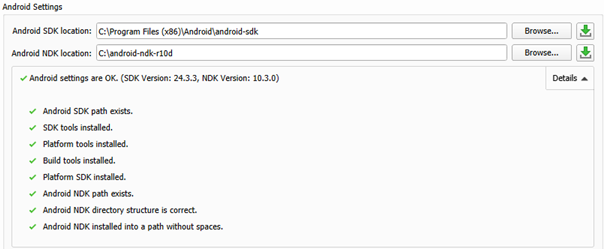
In the Android Settings group, add paths to the Android NDK and SDK.
You can use the image:: images/download.png (Download) buttons to go to the sites where you can download the Android NDK and SDK.
The SDK Manager checks the Android NDK and SDK installations, reports errors, and offers to install the necessary packages.
For more information, see Managing Android SDK Packages.
Select the Automatically create kits for Android tool chains check box to allow PVRStudio to create the kits for you.
Select File > New File or Project > Application > Android Application > Choose, and follow the instructions of the wizard.
To specify settings for deploying applications to Android, select Projects > Run for the Android kit, and then select Details to view the Deploy configurations. For more information about the options you have, see Deploying Applications to Android Devices.
Enable debugging on your Android device.
Debugging is enabled in different ways on different Android devices. Look for USB Debugging under Developer Options. On some devices Developer Options is hidden and becomes visible when you tap the Build number field in Settings > About several times.
Connect the Android device to the development PC with a USB cable. You might be asked to select a device in the Select Android Devices dialog.
Managing Android SDK Packages
Since Android SDK Tools version 25.3.0, only a command-line tool, sdkmanager, is provided by Android for SDK package management. To make SDK management easier, PVRStudio provides an SDK Manager for installing, updating, and removing SDK packages. You can still use sdkmanager for advanced SDK management.
When you add paths to the Anroid NDK and SDK in the device options, the SDK Manager checks that all the necessary SDK packages have been installed. If packages are missing or updates are needed, the SDK Manager offers to add and remove packages, as necessary. Before taking action, it prompts you to accept the changes it is about to make. In addition, it prompts you to accept Google licenses, as necessary.
To view the installed Android SDK packages, select Tools > Options > Devices > Android > SDK Manager.
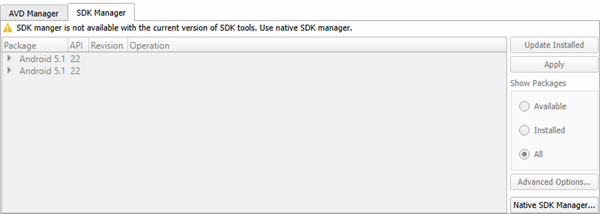
To filter the packages, select Available, Installed, or All in Show Packages.
To update the installed Android SDK packages, select Update Installed. Select the packages to update, and then select Apply.
To specify advanced sdkmanager settings, select Advanced Options and enter arguments in the SDK Manager arguments field. The available arguments are listed and described in Available arguments.
To manage packages installed from Android SDK Tools version 25.2.5, or earlier, you can use the native Android SDK Manager. The PVRStudio SDK Manager and the native SDK Manager are mutually exclusive, because they are used for different Android SDK Tools versions. If you have the native SDK Manager installed, you can open it by selecting Native SDK Manager.
Selecting Android Devices
When you deploy an application to an Android device with Android version 4.2 or later, the Select Android Devices dialog opens. It lists the devices that are connected to the development PC. and their status. You can select devices from the Compatible Devices list for deployment.
If PVRStudio determines that a device is not ready for deployment, it places the device in the Incompatible Devices list, with information about the issue. For example, you might need to authorize the connection on the device. After you authorize the connection on the device, select Refresh Device List. The device is moved to the Compatible Devices list and you can select it for deployment.
Other reasons for placing a device on the Incompatible Devices are that the Android version on the device is too old or that the tool chain used for building does not match the Android architecture on the device (for example, you cannot deploy an ARM build on an x86 device).
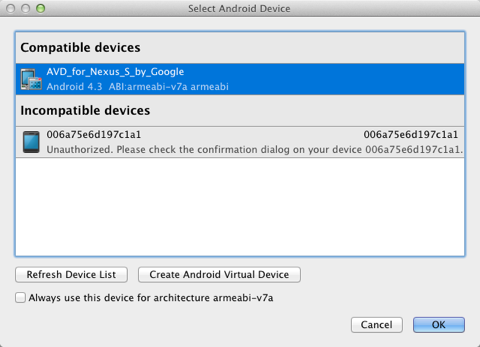
AVDs are also listed. To create new AVDs, select Create Android Virtual Device.
To set a device as the default device for a particular Android architecture, select the Always use this device for architecture check box. The Select Android Devices dialog will not appear until you switch to another project or restart PVRStudio.
Using the Android Emulator
To run your application on the Android Emulator, you must create Android virtual devices (AVD). Select Tools > Options > Devices > Android > Add. If you run an application without a device connected to the development PC and without an AVD specified, PVRStudio asks you to add an AVD.
To manage AVDs, select Start AVD Manager.
Note: The Android Emulator has a bug that prevents it from
starting on some systems. If the Android Emulator does not start, you
can try starting it manually by running the emulator-arm command
from the command line.
Debugging on Android Devices
Select a debug build configuration to build the application for debugging.
Note: PVRStudio cannot debug applications on Android devices if Android Studio is running. If the following message is displayed in the Output pane, close Android Studio and try again: Ignoring second debugger - accepting and dropping.
Connecting Embedded Linux Devices
You can connect embedded Linux devices to the development PC to run, debug, and analyze applications built for them from PVRStudio.
If you have a tool chain for building applications for embedded Linux devices installed on the development PC, you can add it to PVRStudio. You can then select a kit with Embedded Linux device type to build applications for and run them on embedded Linux devices.
To be able to run and debug applications on embedded Linux devices, you must add devices and select them in the PVRStudio kit.
You use a wizard to create the connections. You can edit the settings later in Tools > Options > Devices > Devices.
You can protect the connections between PVRStudio and a device by using an OpenSSH connection. OpenSSH is a connectivity tool for remote login using the SSH protocol. The OpenSSH suite is not delivered with PVRStudio, so you must download it and install it on the development PC. Then, you must configure the paths to the tools in PVRStudio. For more information, see Configuring SSH Connections.
You need either a password or an SSH public and private key pair for authentication. If you do not have an SSH key, you can use the ssh-keygen tool to create it in PVRStudio. For more information, see Generating SSH Keys.
To configure connections between PVRStudio and an embedded Linux device and to specify build and run settings for the device:
Make sure that your device can be reached via an IP address.
Select Tools > Options > Kits > Compilers > Add to add the compiler for building the applications.
To deploy applications and run them remotely on devices, specify parameters for accessing the devices:
Select Tools > Options > Devices > Devices > Add > Generic Linux Device > Start Wizard.
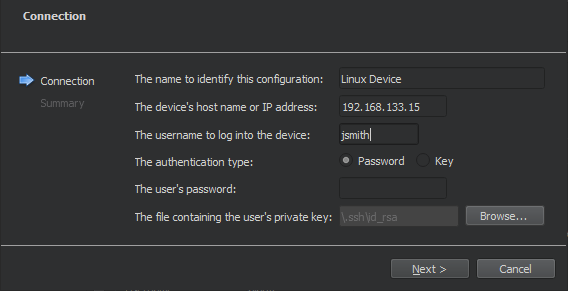
In the The name to identify this configuration field, enter a name for the connection.
In the The device’s host name or IP address field, enter the host name or IP address of the device. This value will be available in the variable
%{Device:HostAddress}.In the The username to log into the device field, enter the username to log into the device and run the application as. This value will be available in the variable
%{Device:UserName}.In the The authentication type field, select Default to use the currently displayed private key file for authentication. Select Specific Key to use some other key, and enter the path to the file that contains the private key in the field below. This value will be available in the variable
%{Device:PrivateKeyFile}.Click Next to create the connection.
All of these parameters can be edited later, as well as additional ones that the wizard does not show because there are sensible default values. One of these is the SSH port number, which is available in the variable
%{Device:SshPort}.Select Tools > Options > Kits > Add to add a kit for building for the device. Select the compiler, and device that you added above, and choose Generic Linux Device for the device type.
To specify build settings:
Open a project for an application you want to develop for the device.
Select Projects > Build & Run to enable the kit that you specified above.
Select Run to specify run settings. Usually, you can use the default settings.
When you run the project, PVRStudio deploys the application as specified by the deploy steps. By default, PVRStudio copies the application files to the device. For more information, see Deploying Applications to Embedded Linux Devices.
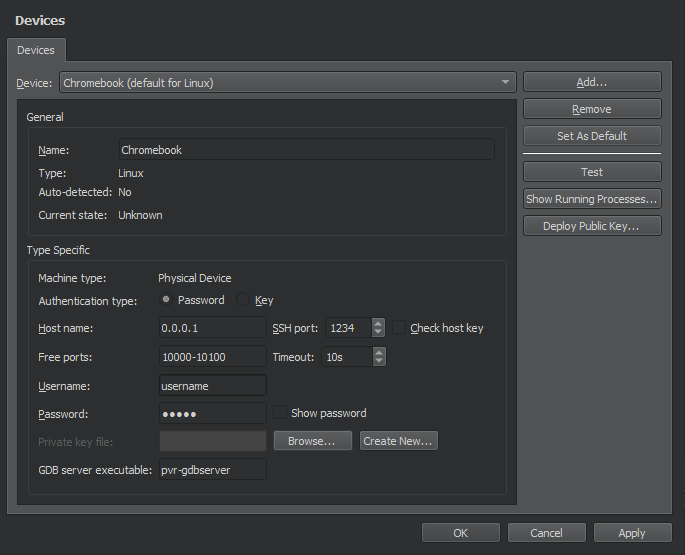
Managing Device Processes
You can view processes running on devices and kill them. Select Tools > Options > Devices > Devices > Show Running Processes.
You can filter the processes by name or ID in the List of Processes dialog.
To update the process list, select Update List.
To kill a process, select it in the list, and then select Kill Process.