Refactoring Code
Refactoring
Refactor code to:
Improve internal quality of your application
Improve performance and extensibility
Improve code readability and maintainability
Simplify code structure
Finding Symbols
To find instances of a specific symbol in your C++ project, place the cursor on the symbol in the editor and select Tools > C++ > Find References to Symbol Under Cursor or press Ctrl+Shift+U.
Note: You can also select Edit > Find/Replace > Advanced Find > C++ Symbols to search for classes, functions, enums, and declarations either from files listed as part of the project or from all files that are used by the code, such as include files.
Viewing Search Results
PVRStudio searches from the following locations:
Files listed as a part of the project
Files directly used by the project files (for example, generated files)
Header files of used frameworks and libraries
The Search Results pane shows the location and number of search hits in the current project.
You can browse the search results in the following ways:
To go directly to an instance, double-click the instance in the Search Results pane.
To move between instances, click the image:: images/next.png (Next Item) button and image:: images/prev.png (Previous Item) button in the Search Results pane.
To expand and collapse the list of all instances, click the image:: images/pvrstudio-expand.png (Expand All) button.
To clear the search results, click the image:: images/clean_pane_small.png (Clear) button.
To start a new search, click the image:: images/pvrstudio-new-search-icon.png (New Search) button.
Renaming Symbols
You can rename symbols in all files in a project. When you rename a class, you can also change filenames that match the class name.
To rename a specific symbol in a project, place the cursor on it and select Tools > C++ > Rename Symbol Under Cursor or press Ctrl+Shift+R.
The Search Results pane shows the location and number of instances of the symbol in the current project.
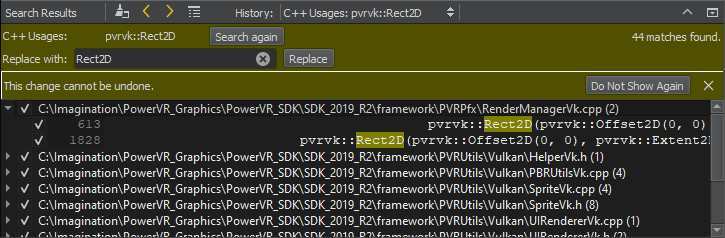
To replace all selected instances, enter the name of the new symbol in the Replace with text box, and select Replace. To omit an instance, deselect the check box next to the instance.
Note: This action replaces all selected instances of the symbol in all files listed in the Search Results pane. You cannot undo this action.
If the symbol is a class, select the Rename files check box to also change the filenames that match the class name.
Note: Renaming local symbols does not open the Search Results pane. The instances of the symbol are highlighted in code and you can edit the symbol. All instances of the local symbol are changed as you type.
Column Editing
To apply a change to several rows in a column simultaneously, press Alt, select the rows, and enter or remove text. The changes are made simultaneously at the cursor position on all the selected rows.
Applying Refactoring Actions
PVRStudio allows you to quickly and conveniently apply actions to refactor your code by selecting them in a context menu. The actions available depend on the position of the cursor in the code editor.
To apply refactoring actions to C++ code, right-click an operand, conditional statement, string, or name to open a context menu. In the context menu, select Refactoring and then select a refactoring action.
You can also press Alt+Enter to open a context menu that contains refactoring actions available in the current cursor position.
Refactoring C++ Code
You can apply the following types of refactoring actions to C++ code:
Change binary operands
Simplify if and while conditions (for example, move declarations out of if conditions)
Modify strings (for example, set the encoding for a string to Latin-1, mark strings translatable, and convert symbol names to camel case)
Create variable declarations
Create function declarations and definitions
The following table summarizes the refactoring actions for C++ code. The action is available when the cursor is in the position described in the Activation column.
Refactoring Action |
Description |
Activation |
|---|---|---|
Add Curly Braces |
Adds curly braces to an if statement that does not contain a compound statement. For example, rewrites .. code:: cpp
as if (a) {
b;
}
|
|
Move Declaration out of Condition |
Moves a declaration out of an if or while condition to simplify the condition. For example, rewrites .. code:: cpp
Type name = foo()) {} as Type name = foo;
if (name) {}
|
Name of the introduced variable |
Rewrite Condition Using || |
Rewrites the expression according to De Morgan’s laws. For example, rewrites: .. code:: cpp
as !(a || b)
|
|
Rewrite Using operator |
Rewrites an expression negating it and using the inverse operator. For example, rewrites:
|
|
Split Declaration |
Splits a simple declaration into several declarations. For example, rewrites: .. code:: cpp
as int *a;
int b;
|
Type name or variable name |
Split if Statement |
Splits an if statement into several statements. For example, rewrites: .. code:: cpp
as if (something) {
and if (somethi
with if (something)
x;
els
|
|
Swap Operands |
Rewrites an expression in the inverse order using the inverse operator. For example, rewrites: .. code:: cpp
as b flipop a
|
|
Convert to Decimal |
Converts an integer literal to decimal representation |
Numeric literal |
Convert to Hexadecimal |
Converts an integer literal to hexadecimal representation |
Numeric literal |
Convert to Octal |
Converts an integer literal to octal representation |
Numeric literal |
Convert to Objective-C String Literal |
Converts a string literal to an Objective-C string literal if the file type is Objective-C(++). For example, rewrites the following strings .. code:: cpp
Latin1Literal(“abcd”) as QLatin1String(“abcd”) |
String literal |
Mark as Translatable |
Marks a string
translatable. For
example, rewrites
eApplication::transla te(“CONTEXT”, “abcd”)
OOP(“GLOBAL”, “abcd”) |
String literal |
Add Definition in … |
Inserts a definition stub for a function declaration either in the header file (inside or outside the class) or in the implementation file. For free functions, inserts the definition after the declaration of the function or in the implementation file. Qualified names are minimized when possible, instead of always being fully expanded. For example, rewrites Class Foo {
void bar();
};
as (inside class) Class Foo {
void bar() {
}
};
as (outside class) Class Foo {
void bar();
};
void Foo::bar()
{
}
as (in implementation file) // Header file
Class Foo {
    void bar();
};
/
|
Function name |
Add |
Inserts the member
function declaration
that matches the
member function
definition into the
class declaration.
The function can be
|
Function name |
Switch with Next/Previous Parameter |
Moves a parameter down or up one position in a parameter list. |
Parameter in the declaration or definition of a function |
Extract Function |
Moves the selected code to a new function and replaces the block of code with a call to the new function. Enter a name for the function in the Extract Function Refactoring dialog. |
Block of code selected |
Extract Constant as Function Parameter |
Replaces the selected
literal and all its
occurrences with the
function parameter
|
Block of code selected |
Add Local Declaration |
Adds the type of an assignee, if the type of the right-hand side of the assignment is known. For example, rewrites .. code:: cpp
as Type a = foo();
where Type is the
return type of
|
Assignee |
Convert to Camel Case |
Converts a symbol
name to camel case,
where elements of the
name are joined
without delimiter
characters and the
initial character of
each element is
capitalized. For
example, rewrites
|
Identifier |
Complete Switch Statement |
Adds all possible
cases to a switch
statement of the type
|
|
Apply Changes |
Keeps function declarations and definitions synchronized by checking for the matching declaration or definition when you edit a function signature and by applying the changes to the matching code. |
Function signature. When this action is available, a light bulb icon appears: |

Add #include for undeclared or forward declared identifier |
Adds an |
Undeclared identifier |
Reformat Pointers or References |
Reformats declarations with pointers or references according to the code style settings for the current project. In case no project is open, the current global code style settings are used. For example, rewrites: char*s;
as char *s;
When applied to selections, all suitable declarations in the selection are rewritten. |
Declarations with pointers or references and selections containing such declarations |
Create Getter and Setter Member Functions |
Creates either both getter and setter member functions for member variables or only a getter or setter. |
Member variable in class definition |
Move Function Definition |
Moves a function definition to the implementation file, outside the class or back to its declaration. For example, rewrites: .. code:: cpp
as class Foo
{
void bar();
};
void Foo::bar() {
// do stuff here
}
|
Function signature |
Move All Function Definitions |
Moves all function definitions to the implementation file or outside the class. For example, rewrites: .. code:: cpp
as class Foo
{
void bar();
void baz();
};
void Foo::bar() {
// do stuff here
}
void Foo::baz() {
// do stuff here
}
|
Class name |
Assign to Local Variable |
Adds a local variable which stores the return value of a function call or a new expression. For example, rewrites: .. code:: cpp
as QString s;
QByteArray l
atin1 = s.toLatin1(); and new Foo;
as Foo
|
Function call or class name |
Insert (Pure) Virtual Functions |
Select an insertion mode:
|
Class or base class name |
Optimize for-Loop |
Rewrites post increment operators as pre increment operators and post decrement operators as pre decrement operators. It also moves other than string or numeric literals and id expressions from the condition of a for loop to its initializer. For example, rewrites: .. code:: cpp
as for
|
|
Escape String Literal as UTF-8 |
Escapes non-ASCII characters in a string literal to hexadecimal escape sequences. String Literals are handled as UTF-8. |
String literal |
Unescape String Literal as UTF-8 |
Unescapes octal or hexadecimal escape sequences in a string literal. String Literals are handled as UTF-8. |
String literal |
Convert to Stack Variable |
Converts the selected pointer to a stack variable. For example, rewrites: .. code:: cpp
ew QByteArray(“foo”);
as QB
This operation is limited to work only within function scope. Also, the coding style for pointers and references is not respected yet. |
Pointer Variable |
Convert to Pointer |
Converts the selected stack variable to a pointer. For example, rewrites: .. code:: cpp
as QByteArray *foo = n
ew QByteArray(“foo”);
This operation is limited to work only within function scope. Also, the coding style for pointers and references is not respected yet. |
Stack Variable |
Beautifying Source Code
You can use the experimental Beautifier plugin to format your source code by using the following external tools:
The Beautifier plugin parses the source code into component structures, such as assignment statements, if blocks, loops, and so on, and formats them as specified in the Beautifier options. You can use a predefined style or define your own style.
To use the Beautifier plugin:
Download and install the tool to use for formatting source code:
You might have to build the tools from sources for some platforms.
Select Help > About Plugins > C++ > Beautifier to enable the plugin.
Restart PVRStudio to be able to use the plugin.
Select Tools > Options > Beautifier to specify settings for beautifying files.
Select the Enable auto format on file save check box to automatically beautify files when you save them using the tool you select in the Tool field.
In the Restrict to MIME types field, define the MIME types of the files to beautify, separated by semicolons. Leave the field empty to apply the tool on all files.
This setting is applied only when automatically beautifying files on save. To restrict the MIME types when selecting the menu item to format the currently open file, specify this option in the tool-specific tab.
Select the Restrict to files contained in the current project check box to only beautify files that belong to the current project.
Select Artistic Style, Clang Format, or Uncrustify to specify settings for the tool you want to use.
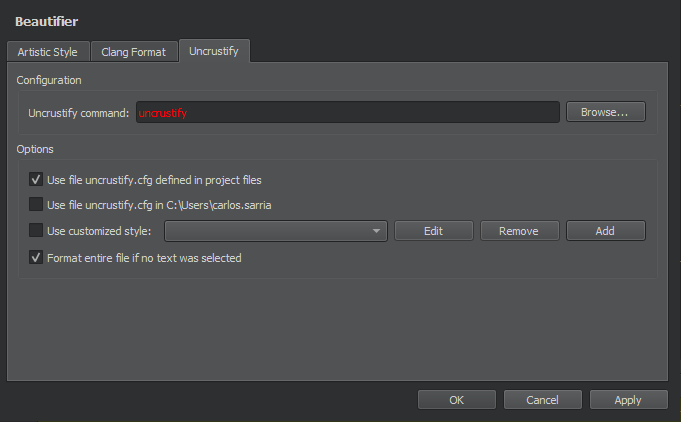
In the Configuration group, specify the path to the tool executable in the Artistic Style command, Clang Format command, or Uncrustify command field.
In the Restrict to MIME types field, define the MIME types of the files to beautify. This setting is applied when you select the menu item to format the currently open file.
In the Options group, select the configuration file that defines the style to use in the source files. If you select several options, they are applied from top down. The available options depend on the tool.
Select the Use specific config file option to use the specified file as the configuration file for the selected tool. This option is available for Artistic Style and Uncrustify.
Select the Use file in $HOME option to use the specified file in the user’s home directory as the configuration file for the selected tool. This option is available for Artistic Style and Uncrustify.
For Clang Format, you can use a predefined style, by selecting the Use predefined style radio button, and then selecting the style to use from the list of available styles.
Select File to load the style configuration from the
.clang-formator_clang-formatfile located in the same directory as the source file or in one of its parent directories.To specify a fallback style to use if the style configuration file is not available, use the Fallback style combo box. Select Default to use the default style. Select None to skip formatting.
Select the Use customized style option, and then Add to define your own style.
Define code formatting in the Add Configuration dialog. It provides syntax highlighting, auto-completion, and context-sensitive help. For these features, you must have the tool installed.
Select Tools > Options > Beautifier > Artistic Style, ClangFormat, or Uncrustify > Format Current File to format the currently open file.
You can create keyboard shortcuts for the functions.
In addition to the Format Current File command, ClangFormat and
Uncrustify provide additional commands. ClangFormat provides the
Format at Cursor command. If you select it when no text is
selected, the syntactic entity under the cursor is formatted. The
Disable Formatting for Selected Text command wraps selected lines
within // clang-format off and // clang-format on. Uncrustify
provides the Format Selected Text command. If you select it when
no text is selected, the whole file is formatted by default. To
disable this behavior, deselect the Format entire file if no text
was selected check box.