User Interface
User Interface
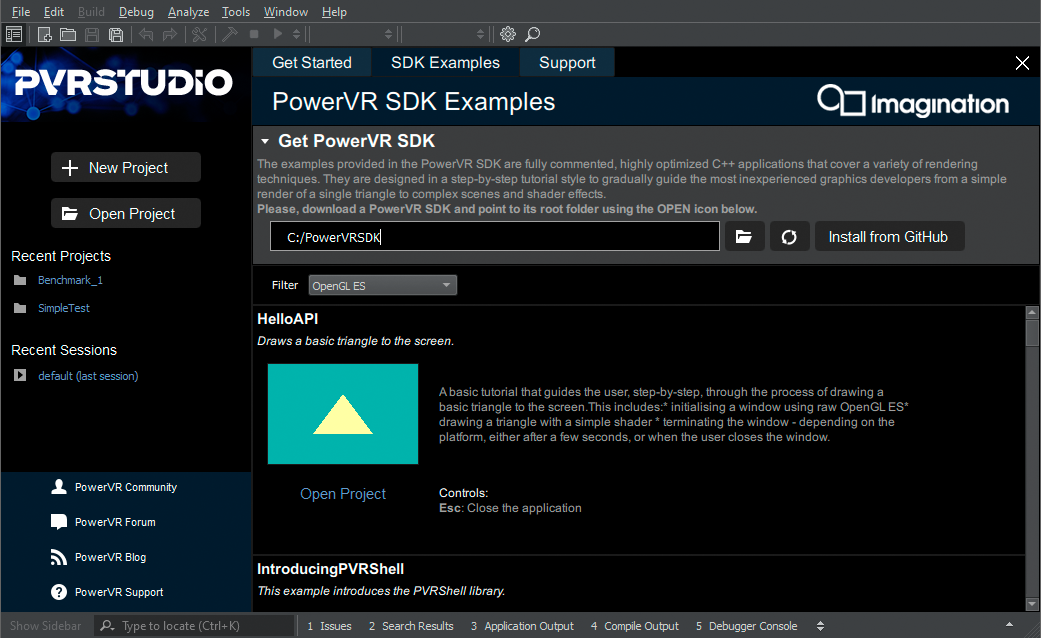
When you start PVRStudio, it opens to the Welcome mode, where you can:
Open recent sessions and projects
Create and open projects
Open tutorials and example projects
Read news from the online community and blogs
PVRStudio caters not only to developers who are used to using the mouse, but also to developers who are more comfortable with the keyboard. A wide range of keyboard and navigation <Searching with the Locator> shortcuts are available to help speed up the process of developing your application.
Useful Features
For a list of useful PVRStudio features described in other parts of the documentation, see Tips and Tricks.
Changing Languages
PVRStudio has been localized into several languages. If the system language is one of the supported languages, it is automatically selected. To change the language, select Tools > Options > Environment and select a language in the Language field. The change takes effect after you restart PVRStudio.
Viewing Images
PVRStudio opens image files in the image viewer.
Use the toolbar buttons or keyboard shortcuts to:
Import PVR, KTX and DDS textures and other common image formats (SVG, PNG, JPG, etc)
Display specific mipmap level
Display specific cubemap face or 3D texture slice
Toggle bilinear
Export images to PNG
Switch between background and outline modes
Zoom in and out
Fit images to screen
Return to original size
Play and pause animated GIF and MNG images
Selecting Modes

The mode selector allows you to quickly switch between tasks such as editing project and source files, designing application UIs, configuring how projects are built and executed, and debugging your applications. To change modes, click the corresponding icon in the toolbar, or use the corresponding keyboard shortcut.
To hide the toolbar and to save space on the display, disable Window > Show Toolbar . You can also increase the size of the toolbar icons in the theme file setting the flag PVRToolBarSmallIcons to false.
You can use PVRStudio in the following modes:
Welcome mode for opening projects. - Edit <Coding> mode for editing project and source files.
Debug mode for inspecting the state of your application while debugging and for using code analysis tools to detect memory leaks and profile C++ code.
Projects mode for configuring project building and execution. This mode is available when a project is open.
Help mode for viewing documentation.
Certain actions in PVRStudio trigger a mode change. Clicking on Debug > Start Debugging > Start Debugging automatically switches to Debug mode.
Browsing Project Contents
A left and right sidebar are available in most PVRStudio modes. The availability of the sidebars and their contents depend on the mode.
In the Edit and Design mode, you can use the sidebars to browse the project contents.
You can select the contents of the sidebars in the sidebar menu:
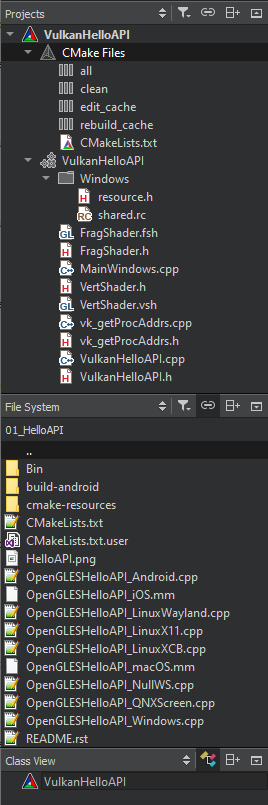
Projects shows a list of projects open in the current session and the project files needed by the build system.
Open Documents shows currently open files.
Bookmarks shows all bookmarks for the current session.
File System shows all files in the currently selected directory.
Git Branches shows the local and remote brances for the project in the Git version control system. For more information, see Working with Branches.
Outline shows an overview of defined types and other symbols, as well as their properties and hierarchy in a source file.
The following views display additional information about C++ code:
Class View shows the class hierarchy of the currently open projects.
Tests lists autotests in the project. For more information, see Running Autotests <Running Autotests>.
Type Hierarchy shows the base classes of a class.
Include Hierarchy shows which files are included in the current file and which files include the current file.
You can change the view of the sidebars in the following ways:
To toggle the left sidebar, click image:: images/leftsidebaricon.png (Hide Left Sidebar/Show Left Sidebar) or press Alt+0 (Cmd+0 on macOS). To toggle the right sidebar, click image:: images/rightsidebaricon.png (Hide Right Sidebar/Show Right Sidebar) or press Alt+Shift+0 (Cmd+Shift+0 on macOS).
To split a sidebar, click image:: images/splitbutton_horizontal.png (Split). Select new content to view in the split view.
To close a sidebar view, click image:: images/splitbutton_closetop.png (Close).
The additional options in each view are described in the following sections.
In some views, right-clicking opens a context menu that contains functions for managing the objects listed in the view.
Viewing Project Files
The sidebar displays projects in a project tree. The project tree contains a list of all projects open in the current session. For each project, the tree visualizes the build system structure of the project and lists all files that are part of the project.
Some build systems support adding and removing files to a project in PVRStudio. The faithful display of the project structure allows to specify exactly where a new file should be placed in the build system. If the project is under version control, information from the version control system might be displayed in brackets after the project name. This is currently implemented for Git (the branch name or a tag is displayed) and ClearCase (the view name is displayed). You can use the project tree in the following ways:
To open files that belong to a project, double-click them in the project tree. Files open in the appropriate editor, according to the file type. For example, code source files open in the code editor.
To bring up a context menu containing the actions most commonly needed, right-click an item in the project tree. For example, through the menu of the project root directory you can, among other actions, run and close the project.
To hide the categories and sort project files alphabetically, click image:: images/filtericon.png (Filter Tree) and select Simplify Tree.
To hide source files which are automatically generated by the build system, select Filter Tree > Hide Generated Files.
To hide directories that do not contain any files, select Filter Tree > Hide Empty Directories.
To stop synchronizing the position in the project tree with the file currently opened in the editor, deselect image:: images/linkicon.png (Synchronize with Editor). You can specify a keyboard shortcut to use when synchronization is needed. Select Tools > Options > Environment > Keyboard, and then search for Show in Explorer.
To see the absolute path of a file, move the mouse pointer over the file name.
To move files from one project to another, drag-and-drop them in the project tree. PVRStudio makes the necessary changes to project configuration files.
Files that are not sources or data can be still included into a project’s distribution tarball by adding their paths to the project file. This way they also become known to PVRStudio, so that they are visible in the Projects view and are known to the locator and search. The Projects view contains context menus for managing projects, subprojects, folders, and files. The following functions are available for managing projects and subprojects:
Set a project as the active project.
Execute the Build menu commands.
Create new files. For more information, see Adding Files to Projects.
Add existing files and directories.
Add and remove subprojects.
Search from the selected directory.
Expand or collapse the tree view to show or hide all files and folders.
Close all files in a project.
Close projects. By default, all files in the project are also closed. To keep them open, deselect the Tools > Options > Build & Run > General > Close source files along with project check box.
For managing files and directories, the same functions are available as in the File System view. In addition, you can remove and rename files, as well as compare the selected file with the currently open file in the diff editor. For more information, see Comparing Files.
Viewing the File System
If you cannot see a file in the Projects view, switch to the File System view, which shows all the files in the file system.
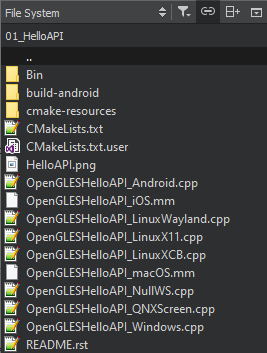
By default, the contents of the directory that contains the file currently active in the editor are displayed. To stop the synchronization, delesect the Synchronize Root Directory with Editor button.
The path to the active file is displayed as bread crumbs. You can move to any directory along the path by clicking it. To hide the bread crumbs, select image:: images/filtericon.png (Options) and then deselect the Show Bread Crumbs check box.
To move to the root directory of the file system, select Computer in the menu (1). Select Home to move to the user’s home directory. Further, you can select a project to move to an open project or Projects to open the Projects view.
By default, folders are separated from files and listed first in the view. To list all items in alphabetic order, select Options and then deselect the Show Folders on Top check box.
To also show hidden files, select Options > Show Hidden Files.
To stop the synchronization with the file currently opened in the editor, deselect Synchronize with Editor.
Use the context menu functions to:
Open files with the default editor or some other editor.
Open a project located in the selected directory.
Show the file or directory in the file explorer.
Open a terminal window in the selected directory or in the directory that contains the file. To specify the terminal to use on Linux and macOS, select Tools > Options > Environment > System.
Search from the selected directory.
View file properties, such as MIME type, default editor, and size.
Create new files. For more information, see Adding Files to Projects.
Rename or remove existing files.
Create new folders.
Compare the selected file with the currently open file in the diff editor. For more information, see Comparing Files.
Display the contents of a particular directory in the view.
Collapse all open folders.
Viewing Open Documents
To see a list of open documents, switch to the Open Documents view. You can use the context-menu to perform some of the functions also available in the File menu and in the context menu in the File System view.
In addition, you can:
Copy the full path of the file or just the filename to the clipboard.
Pin files to ensure they stay at the top of the list and are not closed when Close All is used.
Viewing Defined Types and Symbols
The Outline view shows an overview of defined types and other symbols, as well as their properties and hierarchy in a source file.
To see a complete list of all bindings, select Filter Tree > Show All Bindings.
To stop the synchronization with the type or symbol selected in the editor, deselect Synchronize with Editor.
Viewing the Class Hierarchy
The Class View shows the class hierarchy of the currently open projects. To organize the view by subprojects, click image:: images/pvrstudio-show-subprojects.png (Show Subprojects).
To visit all parts of a namespace, double-click on the namespace item multiple times.
Viewing Type Hierarchy
To view the base classes of a class, right-click the class and select Open Type Hierarchy or press Ctrl+Shift+T.
Viewing Include Hierarchy
To view which files are included in the current file and which files include the current file, right-click in the editor and select Open Include Hierarchy or press Ctrl+Shift+I.
To keep the view synchronized with the file currently opened in the editor, select Synchronize with Editor.
Viewing Output
The task pane in PVRStudio can display one of the following panes:
Issues
Search Results
Application Output
Compile Output
General Messages
Version Control
Test Results
To-Do Entries
Output panes are available in all modes. Click the name of an output pane to open the pane. To maximize an open output pane, click the Maximize Output Pane button or press Alt+9.
To search within the Application Output and Compile Output panes, press Ctrl+F when the pane is active. Enter search criteria in the Find field and click the left and right arrows to search down and up in the pane.
To increase or decrease the output text size, select image:: images/plus.png (Zoom In) or image:: images/minus.png (Zoom Out), or press Ctrl++ or Ctrl+-. Zooming is not supported in all output panes.
To filter the output, enter a string in the Filter field. Filtering is not supported in all output panes.
To open the General Messages and Version Control panes, select Window > Output Panes. To display the To-Do Entries pane, enable the Todo plugin.
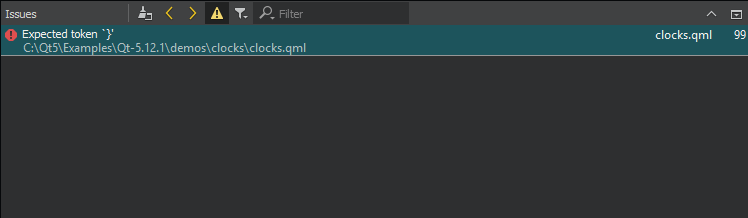
Issues
The Issues pane provides lists of following types of issues:
Build System - Errors and warnings encountered during a build.
Clang Code Model - Errors and warnings from the current editor <Parsing C++ Files with the Clang Code Model>.
Compile - Selected output from the compiler. Open the Compile Output pane for more detailed information.
Debug Information - Lists debug information packages that might be missing.
Debugger - Errors encountered while running the Valgrind code analysis tools.
Debugger Runtime - Errors encountered when starting PVRStudio. For example, information about missing DLLs.
Deployment - Errors encountered between building an application successfully and starting it on a device.
My Tasks - Entries from a task list file (.tasks) generated by code scanning and analysis tools.
Python - Runtime errors and exceptions of Python scripts.
The pane filters out irrelevant output from the build tools and presents the issues in an organized way. To further filter the output by type, select Filter Tree and then select a filter.
Right-clicking on a line brings up a context menu with actions that you can apply to the contents of the line. You can remove a line, copy its contents to the clipboard, or search the Internet for a solution using the contents of the line as search criteria. In addition, you can show a version control annotation view of the line that causes the error message.
To navigate to the corresponding source code, click an issue or select Show in Editor in the context menu. The entry must contain the name of the file where the issue was found.
To view more information about an issue in the Compile Output pane, select Show Output in the context menu.
To jump from one issue to the next or previous one, press F6 and Shift+F6.
By default, the Issues pane is cleared on a new build. To keep the issues from the previous build rounds, deselect Tools > Options > Build & Run > General > Clear issues list on new build.
Search Results
In the Search Results pane, you can search through projects, files on a file system or the currently open files:
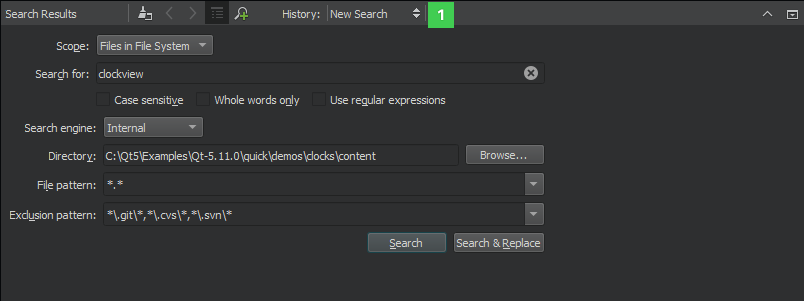
The search results are stored in the search history (1) from which you can select earlier searches.
The figure below shows an example search result for all occurrences of the search string in the specified directory.
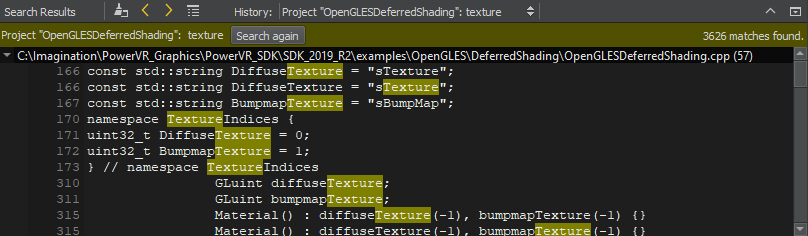
For more information about the different search options, see Finding and Replacing.
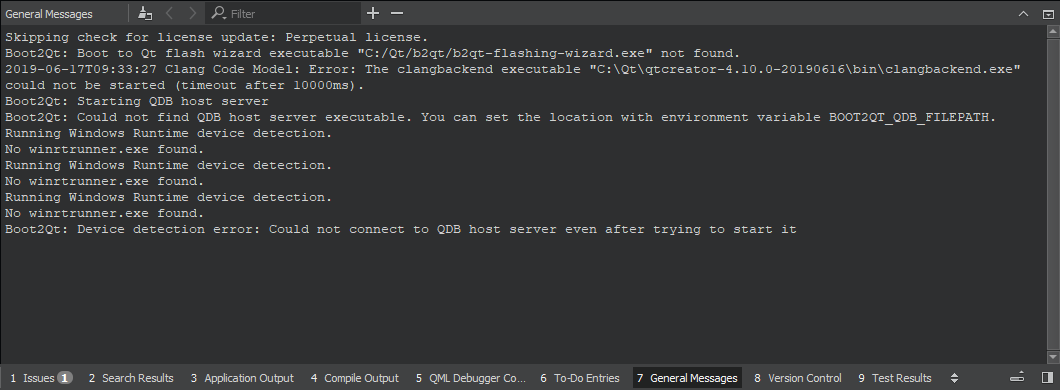
Application Output
The Application Output pane displays the status of a program when it is executed, and the debug output.
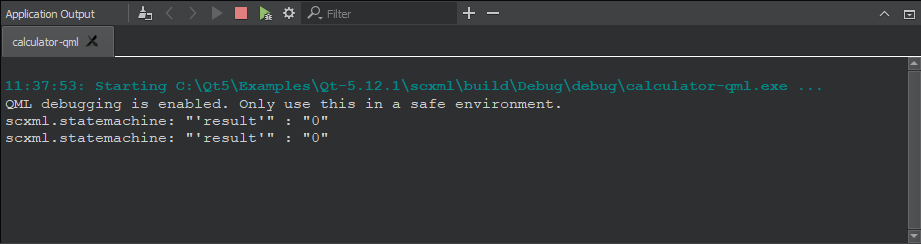
If you specify command line arguments in the run settings that are passed to the application when running it, they are displayed as a part of the application output. For more information, see Specifying Run Settings for Desktop Device Types. Select toolbar buttons to run applications, to attach the debugger to the running application, and to stop running or debugging.
To specify settings for displaying application output, select Tools > Options > Build & Run > Application Output, or click the Open Settings Page button. You can select whether to open the Application Output pane on output when running or debugging applications, to clear old output on a new run, to word-wrap output, and to limit output to the specified number of lines.
Compile Output
The Compile Output pane provides all output from the compiler. The Compile Output is a more detailed version of information displayed in the Issues pane.
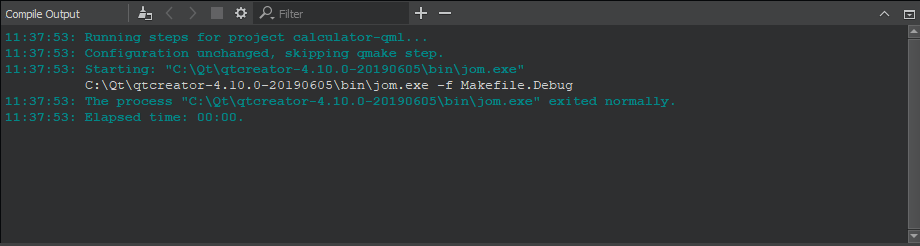
Double-click on a file name in an error message to open the file in the code editor.
Select the Cancel Build button to cancel the build.
To specify whether to open the Compile Output pane on output when building applications, select Tools > Options > Build & Run > Compile Output, and then select the Open pane when building check box. In the Limit output to field, you can specify the maximum amount of build output lines to display in the pane.
You can also reach the options page by clicking the Open Settings Page button.
To copy the output from the pane to the clipboard, select Select All in the context menu, and then select Copy. Save the output as a file if you want to examine it later without having to build the project again. This is useful for large projects that take a long time to build.
Parsing Existing Compile Output
You can use PVRStudio’s output parsers to parse output from builds done outside of PVRStudio or stored from previous build runs. By default, the parsers from the kit selected for the active project are used, but you can select another kit.
To parse compile output:
Select Tools > Parse Build Output.
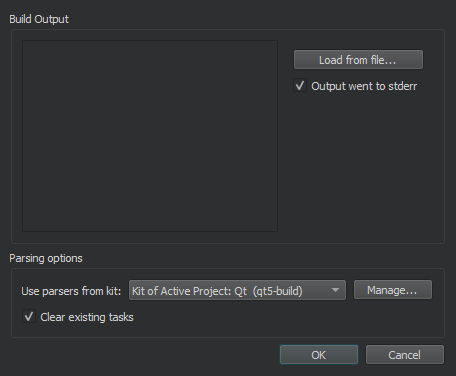
Paste the build output in the Build Output field, or select Load from File to load it from a file.
Deselect the Output went to stderr check box if the parser expects issues on
stdout.In the Use parsers from kit field, select the kit to use for parsing the output. Select Manage to view and modify kit settings.
The parser displays the parsed output in the Issues pane. By default, the pane is cleared before adding the new output. Deselect the Clear existing tasks check box to append the new output to the old output.
Select OK to start parsing.
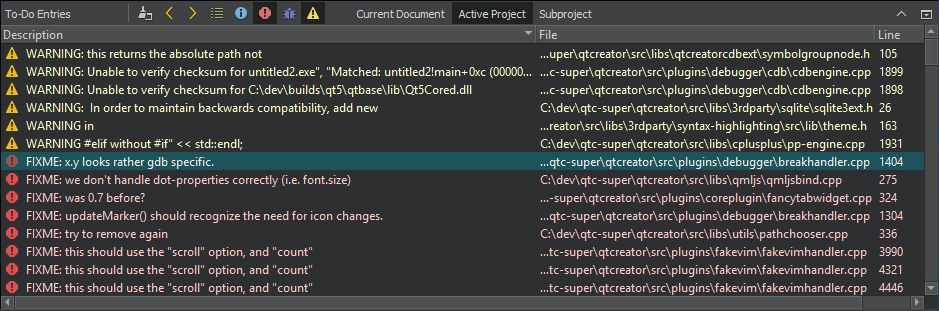
To-Do Entries
The To-Do Entries pane lists the BUG, FIXME, NOTE, TODO, and WARNING keywords from the current file, from all project files, or from a subproject. Click the icons on the toolbar to show only the selected keywords.
To add keywords, select Tools > Options > To-Do > Add. Set an icon and a line background color for the keyword.

To change the icon and line background color of the selected keyword, select Edit.
To remove the selected keyword, select Remove.
To reset the list to predefined keywords, select Reset. All your changes will be permanently lost.
To determine whether the keywords in the whole project, in the current file, or in a subproject are displayed by default, select the appropriate option in the Scanning scope group.
To exclude files from scanning, select Project Settings > To-Do in the Projects mode. Select Add and enter a regular expression that matches the path to files to exclude. Use a forward slash (/) as a separator in the path also on Windows.
The Todo plugin is disabled by default. To enable the plugin, select Help > About Plugins > Utilities > Todo and restart PVRStudio.
In addition, you can open task list files generated by code scanning and analysis tools in the Issues pane. For more information, see Showing Task List Files in Issues Pane.