Managing Projects
Managing Projects
One of the major advantages of PVRStudio is that it allows a team of designers and developers to share a project across different development platforms with a common tool for design, development, and debugging.
-
To set up a project, you first have to decide what kind of an application you want to develop and which graphical API and Operative System your are targeting.
-
The recommended way to set up a project is to use a version control system. Store and edit only project source files and configuration files. Do not store generated files.
-
Installation programs and project wizards create default configurations for PVRStudio and your projects. You can modify the settings in the Projects mode.
-
Items such as open files, breakpoints, and evaluated expressions are stored in sessions. They are not considered to be part of the information shared across platforms.
Creating Projects
Creating a project enables you to:
Group files together
Add custom build steps
Include forms and resource files
Specify settings for running applications
Setting up a new project in PVRStudio is aided by a wizard that guides you step-by-step through the project creation process. The wizards prompt you to enter the settings needed for that particular type of project and create the necessary files for you. You can add your own custom wizards to standardize the way subprojects and classes are added to a project.
Most PVRStudio project wizards enable you to choose the build system to use for building the projects. If you are not presented with a choice, the project is set up to use CMake.
In addition, you can import projects as generic projects that do not use CMake. This enables you to use PVRStudio as a code editor and to fully control the steps and commands used to build the project.
The kits and build and run settings for the installed device types are set up automatically. However, you might need to install and configure some additional software on the devices to be able to connect to them from the development PC.
Selecting the Build System
Most PVRStudio project wizards enable you to choose the build system to use for building the projects. If you are not presented with a choice, the project is set up to use CMake.
CMake is a cross-platform system for build automation that helps simplify the build process for development projects across different platforms. CMake automates the generation of build configurations so that only a few lines of information are needed to create each configuration. To use one of the other supported build systems, you need to set it up.
To change the location of the project directory, and to specify settings for building and running projects, select Tools > Options > Build & Run > General. The CMake tab contains additional settings for CMake. You can find more settings for CMake in Tools > Options > Kits > CMake.
To specify build and run settings for different target platforms, select Projects. For more information on the options you have, see Specifying Build Settings.
Using Project Wizards
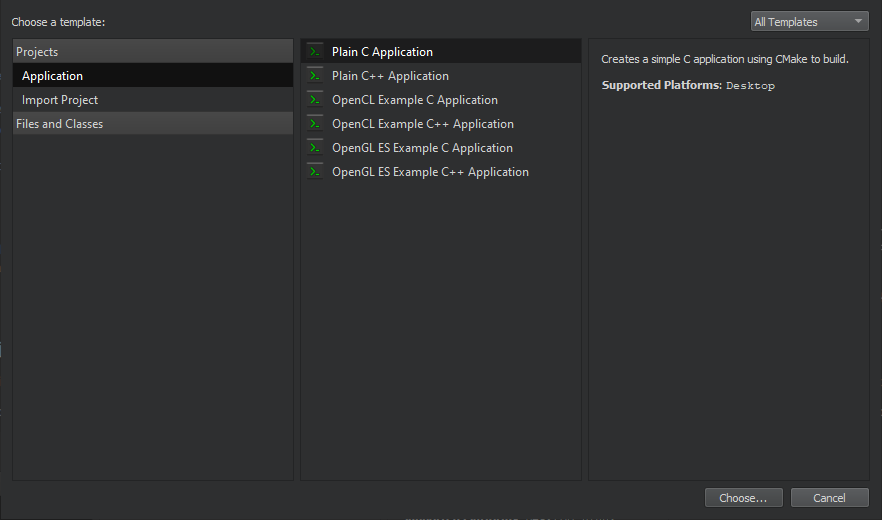
In the first step, you select a template for the project. You can filter templates (1) to view only those that apply to a particular target platform.
Next, you select a location for the project and specify settings for it.
When you have completed the steps, PVRStudio automatically generates the project with required headers, source files, user interface descriptions and project files, as defined by the wizard.
Selecting Project Type
You can use wizards to create following types of projects:
Graphics Applications
OpenCL Example C Application
OpenCL Example C++ Application
OpenGL ES Example C Application
OpenGL ES Example C++ Application
Libraries
C++ Library
Shared or static C++ library
Plain Projects
Plain C or C++ Application
Import Project
Project from version control
Import a project from a supported version control system. For more information on how version control systems are integrated in PVRStudio, see Using Version Control Systems
Import Existing Project
Import an existing project that does not use any of the supported build systems. This enables you to use PVRStudio as a code editor
To create a new project, select File > New File or Project and select the type of your project. The contents of the wizard dialogs depend on the project type and the kits that you select in the Kit Selection dialog. Follow the instructions of the wizard.
Displaying Additional File Types in Projects Pane
PVRStudio determines whether to display files from the project folder
in the Projects pane depending on the file type (.cpp, .h, .qrc,
and so on). To display other types of files, edit the project file.
Add filenames as values of the DISTFILES variable. You can also
use wildcards.
For example, the following code specifies that text files are displayed in the Projects pane:
DISTFILES += *.txt
This also makes the files available in the Locator.
Binding Keyboard Shortcuts to Wizards
If you use a wizard regularly, you can bind a custom keyboard shortcut to it. Triggering this keyboard shortcut will directly open the wizard without the need to navigate to File > New File or Project.
Keyboard shortcuts for wizards can be set in Tools > Options > Environment > Keyboard > Wizard. All wizard actions start with Impl there.
Using Other Build Systems <Using Other Build Systems>
Opening Projects
PVRStudio stores information that it needs to build projects in a .user file. If PVRStudio cannot find the file when you open an existing project, it prompts you to enter the information. If you created the project by using another PVRStudio instance, PVRStudio asks whether you want to use the old settings. The settings are specific to the development environment, and should not be copied from one environment to another. Therefore, we recommend that you click No and enter the information again in the Configure Project tab.
The Configure Project tab displays a list of kits for building and running projects, that are installed on the development PC and configured in Tools > Options > Kits. Select the kits that you want to build and run the project with.
Even if you do not intend to build the project, the C++ code models need a compiler to offer code completion. To specify them, select the Options link, or select Tools > Options > Kits.
Python projects rely on the language server client for code completion, highlighting, and other useful features.
If PVRStudio cannot find an existing build for a particular kit, it starts out from a clean slate, and creates new debug and release build configurations in the specified directory. PVRStudio suggests a name and location for the directory that you can change.
If you have built the project before, PVRStudio can use the existing build configuration to make the exact same build as found in the directory available to PVRStudio. To import a build, specify a directory in the Import Build from section and select Import.
You can edit the build configuration later. For more information, see Editing Build Configurations.
To open a project:
Select File > Open File or Project (Ctrl+O or Cmd+O on macOS) and select the project file for the project to open: CMakeLists.txt (CMake).
In the Configure Project tab, select kits for building and running your project, and click Configure Project.
You can use the following keyboard shortcuts to open projects, depending on the mode you are currently in:
In all modes, select Ctrl+O (Cmd+O on macOS) to open the Open File dialog, where you can select a project file to open a project.
In all modes, except the Help mode, select Ctrl+Shift+O (Cmd+Shift+O on macOS) to open the Load Project dialog, where you can select a project file to open a project.
In the Welcome mode, Projects tab, select Ctrl+Shift+number (Cmd+Shift+number on macOS), where the number is the number of a project in the list of recently opened projects.
PVRStudio parses all the source files in the project and performs a semantic analysis to build up the information that it needs for functions such as navigation and finding usages. A progress bar is displayed during parsing. To show or hide detailed progress information, select Toggle Progress Details (1).

Managing Sessions
When you exit PVRStudio, a snapshot of your current workspace is stored as a session. To restore the session automatically when you start PVRStudio, select File > Sessions > Manage > Restore last session on startup.
When you open or create any of the following items, they automatically become a part of the session:
Projects with their dependencies (including SUBDIRS projects)
Editors
Breakpoints and expressions
Bookmarks
A session is personal, that is, not meant to be shared. It is not supposed to reflect the project structure. It contains personal data, such as bookmarks and breakpoints that are usually not of interest to other developers working on the same projects.
For example, if you work on a project and need to switch to another project for a while, you can clone the current session to save it under a name and create a new session for the other project. Everything that you open after switching to the new session becomes a part of it. When you want to return to working on the first project, switch to the saved session. PVRStudio opens the projects and files that belong to the session.
To manage sessions, select File > Sessions > Manage.
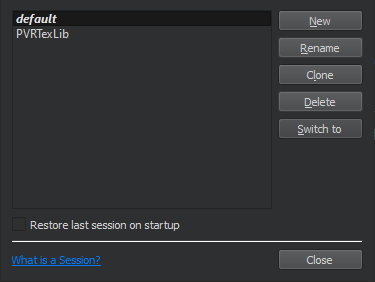
To save a session under a new name, select Clone.
To create a new session:
Select New.
In the Enter the name of the session field, enter a name for the session.
Select Create to create a new empty session or Create and Open to create a session and to switch to it.
To switch between sessions, select Switch to.
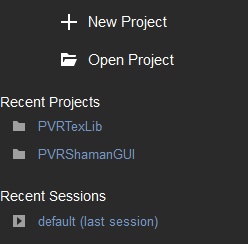
When you launch PVRStudio, a list of existing sessions is displayed in the Welcome mode. To open a session, select it or press Ctrl+Alt+<number>, where <number> is the number of the session to open (available for the first nine sessions).
You can also use the t locator filter to open a session. For more information, see Searching with the
Locator.
To view more information about a session, select the down arrow icon that appears when you move the mouse cursor over the session name. Select actions to clone, rename, and delete sessions.
When you start PVRStudio from the command line, you can give the name of a session as argument and PVRStudio will start with this session.
For more information, see Using Command Line Options.