Writing Code
Coding
Writing Code <Writing Code>
Writing, editing, and navigating in source code are core tasks in application development. Therefore, the code editor is one of the key components of PVRStudio. You can use the code editor in the Edit mode.
Finding <Finding>
Use the incremental and advanced search to search from currently open projects or files on the file system or use the locator to browse through projects, files, classes, functions, documentation and file systems.
Refactoring <Refactoring>
Code refactoring is the process of improving and simplifying code without modifying the existing functionality of an application. You can easily find and rename symbols and apply predefined actions to refactor code.
Beautifying Source Code <Beautifying Source Code>
Beautifying code means applying indentation and style to source code files. You can use the Artistic Style, ClangFormat, or Uncrustify tool to format source files.
Configuring the Editor <Configuring the Editor>
You can change the fonts, colors, highlighting, and indentation. If you are used to the Vim editor, you can even run the main editor in a manner similar to it in the FakeVim mode.
Using Language Servers <Using Language Servers>
The language client provides code completion, highlighting of the symbol under cursor, and jumping to the symbol definition for other programming languages besides C++. In addition, it integrates diagnostics from the language server.
Editing MIME Types <Editing MIME Types>
PVRStudio uses the MIME type of a file to determine which mode and editor to use for opening the file. If your files do not match the predefined MIME types, you can edit the MIME types.
Modeling <Modeling>
You can use the model editor to create Universal Modeling Language (UML) style models with structured and behavioral diagrams that provide different views of your system and store them in XML format.
Editing State Charts <Editing State Charts>
You can use PVRStudio to create applications that embed state machines. A project wizard creates State Chart XML (SCXML) files with boilerplate code that you can edit using an experimental SCXML editor.
Writing Code
The PVRStudio code editor is fully equipped with semantic highlighting, syntax checking, code completion, code indentation, context sensitive help, and in-line error indicators while you are typing.
-
You can use the editor toolbar to navigate between open files and symbols in use. You can also split the view to work on several files simultaneously, add bookmarks, and move between symbol definitions and declarations.
-
PVRStudio enables you to write well formatted code by highlighting code elements and blocks. You can use syntax highlighting also for other types of files than C++.
-
PVRStudio checks for errors when you write code and displays inline error and warning messages. Similarly, it checks the data structure of an instance of a JavaScript object notation (JSON) entity. In addition, you can run static checks on the JavaScript code in your project to find common problems.
-
PVRStudio anticipates what you are going to write and completes code and code snippets for elements, properties, and IDs.
-
PVRStudio indents text and code according to rules that you specify separately for files that contain C++, or Nim (experimental) code and for other text files.
Pasting and Fetching Code Snippets
You can cooperate with other developers by pasting and fetching snippets of code from a server. For example, you might ask colleagues to review a change that you plan to submit to a version control system.
-
When you have a file open in the code editor, you can record a keyboard sequence as a macro. You can then play the macro to repeat the sequence. You can save the latest macro and assign a keyboard shortcut for running it or run it from the locator.
-
You can use a diff editor to compare two versions of a file and view the differences side-by-side in the Edit mode.
Working in Edit Mode
This section describes how to use the Edit mode. For more information about using the sidebar, see Browsing Project Contents.
Using the Editor Toolbar
The editor toolbar is located at the top of the editor view. The editor toolbar is context sensitive and shows items relevant to the file currently open in the editor.

Use the toolbar to navigate between open files and symbols in use. To browse backward or forward through your location history, click image:: images/prev.png (Go Back) and image:: images/next.png (Go Forward).
To go to any open file, select it from the Open files drop-down menu. To open a context menu that contains commands for managing open files, right-click the file name or icon on the toolbar. In addition to the commands also available in the File menu, you can copy the path and name of the current file and the number of the line where the cursor is currently located to the clipboard by selecting Copy Full Path, Copy File Name, or Copy Path and Line Number.
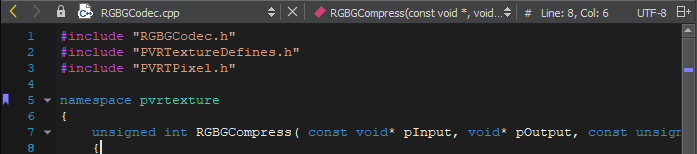
To jump to any symbol used in the current file, select it from the Symbols drop-down menu. By default, the symbols are displayed in the order in which they appear in the file. Right-click the menu title and select Sort Alphabetically to arrange the symbols in alphabetic order.
To jump to a line and column in the current file, select the line and column indicator or press Ctrl+K (or Cmd+K on macOS) to open the locator. Enter the line number and column number in the locator, separated by a colon (:).
Note: Other convenient ways of navigating in PVRStudio are provided by the keyboard shortcuts and the sidebar.
Selecting Parse Context
Code might be interpreted differently in different contexts. A file can be used by different projects or subprojects with different defines, or it can be included in the context of C, C++, Objective-C, or Objective-C++. To change the active parse context, select an available parse context in the Active Parse Context menuf. The menu is visible only when several parse contexts are available. To reset the parse context, right-click on the menu to open a context menu, and then select Clear Preferred Parse Context. If the information needed for parsing the project is still incomplete or incorrect, select Additional Preprocessor Directives to add preprocessor directives.
Changing Text Encoding
To show the file encoding of the current file on the editor toolbar, select Tools > Options > Text Editor > Display > Display file encoding.
To change the text encoding, click it on the toolbar and select new encoding in the Text Encoding dialog:
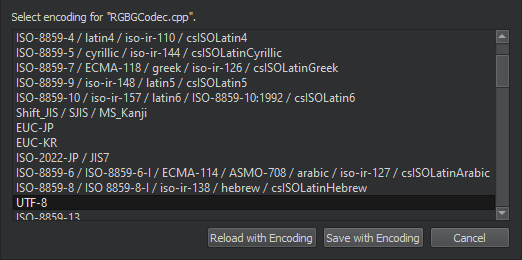
To reload the file with the selected encoding, select Reload with Encoding. To save the file with the new encoding, select Save with Encoding.
Splitting the Editor View
Split the editor view or open the editor in a new window when you want to work on and view multiple files on the same screen or on multiple screens.
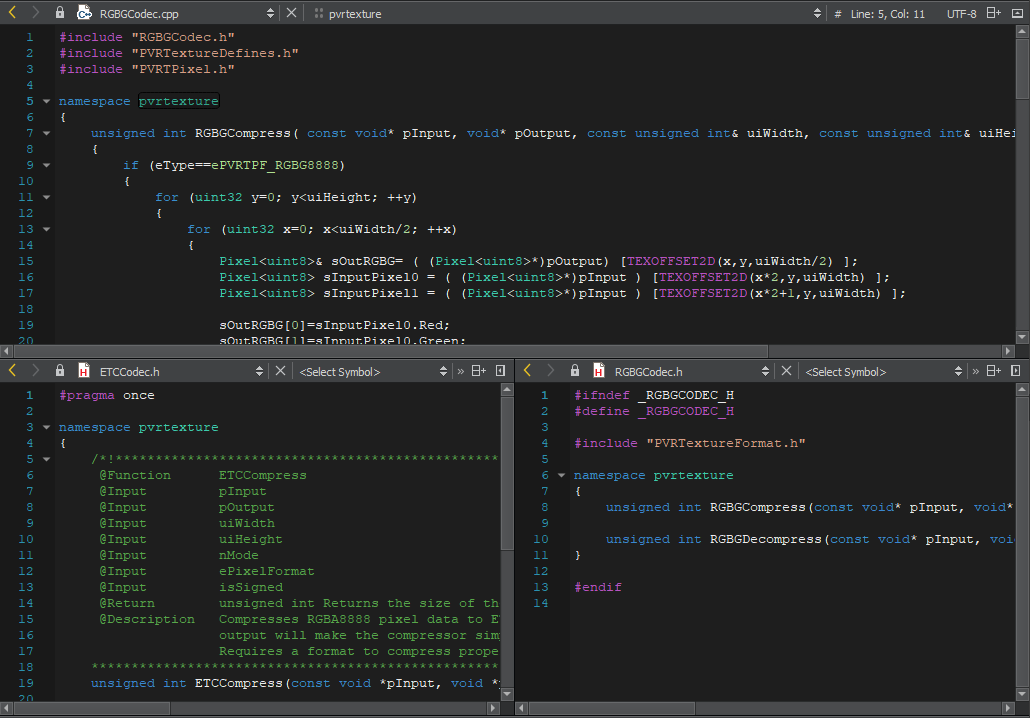
You can view multiple files simultaneously in the following ways:
To split the editor view into a top and bottom view, select Window > Split, press Ctrl+E, 2, or select the image:: images/splitbutton_horizontal.png (Split) button and then select Split.
Split command creates views below the currently active editor view.
To split the editor view into adjacent views, select Window > Split Side by Side, press Ctrl+E, 3, or select Split > Split Side by Side.
Side by side split command creates views to the right of the currently active editor view.
To open the editor in a detached window, press Ctrl+E, 4, or select Window > Open in New Window.
The new window behaves basically in the same way as the editor area in the main window. For example, you can split this window, as well. Documents are opened in the currently active editor window.
To move between split views and detached editor windows, select Window > Go to Next Split or Window or press Ctrl+E, O.
To remove a split view, place the cursor within the view you want to remove and select Window > Remove Current Split, press Ctrl+E, 0, or select the image:: images/splitbutton_closetop.png (Remove Split) button. To remove all but the currently selected split view, select Window > Remove All Splits or press Ctrl+E, 1.
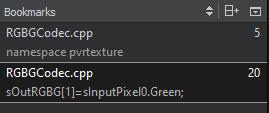
Using Bookmarks
To insert or delete a bookmark:
Right-click the line number and select Toggle Bookmark.
Press Shift and click the left margin at a line.
Press Ctrl+M when the cursor is on a line.
To add a note to a bookmark, right-click the bookmark and select Edit Bookmark. To view the note, move the mouse pointer over the bookmark.
To go to the previous bookmark in the current session, select Tools Bookmarks > Previous Bookmark or press Ctrl+,.
To go to the next bookmark in the current session, select Tools Bookmarks > Previous Bookmark or press Ctrl+..
To use the locator to go to a bookmark, press Ctrl+K (or Cmd+K on macOS) to open the locator. Enter b and a space to display a list of bookmarks. To filter the bookmarks by line number or a text string, enter the number or string after the space. Double-click a bookmark in the list to go to it in the editor. Bookmarks are listed in the Bookmarks view in the sidebar. To move between bookmarks, select the Previous Bookmark or Next Bookmark button or use the keyboard shortcuts.
Moving to Symbol Definition or Declaration
You can move directly to the definition or the declaration of a symbol by holding the Ctrl key and clicking the symbol. If you have multiple splits opened, you can open the link in the next split by holding Ctrl and Alt while clicking the symbol.
To enable this moving function, select Tools > Options > Text Editor > Behavior > Enable mouse navigation.
There are several additional ways of moving between symbol definitions and declarations. All the functions described below are also available from the Tools > C++ menu.
You can select the symbol and press F2, or right-click the symbol and select Follow Symbol Under Cursor to move to its definition or declaration. To follow the symbol in the next split, select Follow Symbol Under Cursor in Next Split. Following symbols is supported for namespaces, classes, functions, variables, include statements, and macros.
To switch between the definition and declaration of a function, place the cursor on either and press Shift+F2 or right-click and select Switch Between Function Declaration/Definition or Open Function Declaration/Definition in Next Split. For example, this allows you to navigate from anywhere within a function body directly to the function declaration.
Links are opened in the same split by default. To open links in the next split, prepend Ctrl+E to the shortcut. For example, press Ctrl+E,F2 to follow the symbol in the next split. If necessary, the view is automatically split. To change the default behavior, select Tools > Options > Text Editor > Display > Always open links in another split. Additional symbols are displayed and switching between definition and declaration is done in another split. If you change the default behavior, the shortcuts for opening link targets in the next split are used to open them in the current split.
To switch between C++ header and source files, right-click anywhere in a file and select Switch Header/Source or Open Corresponding Header/Source in Next Split. You can also press F4 or Ctrl+E,F4, respectively.
Reparsing Externally Changed Files
If source files are modified from outside PVRStudio, the opened files will be reparsed automatically. For all other files, you can use Tools > C++ > Reparse Externally Changed Files to update the code model.
Inspecting the Code Model
When you report a bug that is related to the C++ code model, the PVRStudio developers might ask you to write information about the internal state of the code model into a log file and to deliver the file to them for inspection.
To view information about the C++ code model in the C++ Code Model Inspector dialog and write it to a log file, select Tools > C++ > Inspect C++ Code Model or press Ctrl+Shift+F12.
PVRStudio generates the code model inspection log file in a temporary folder.
PVRStudio underlines semantic errors in olive in the C++ code editor. To check the correct paths for includes that are not resolved or that are resolved to the wrong file, select Project Parts > Header Paths.
Editing GLSL Shaders
This section describes how to use the built-in PowerVR shader compiler to edit and profile vertex and fragment shaders written in GLSL. The editor will identify the type of shader a file is based on its MIME signature. It will compile as-you-type, showing the compiler output and a wealth of profiling data in real time.
Configuring the GLSL Editor
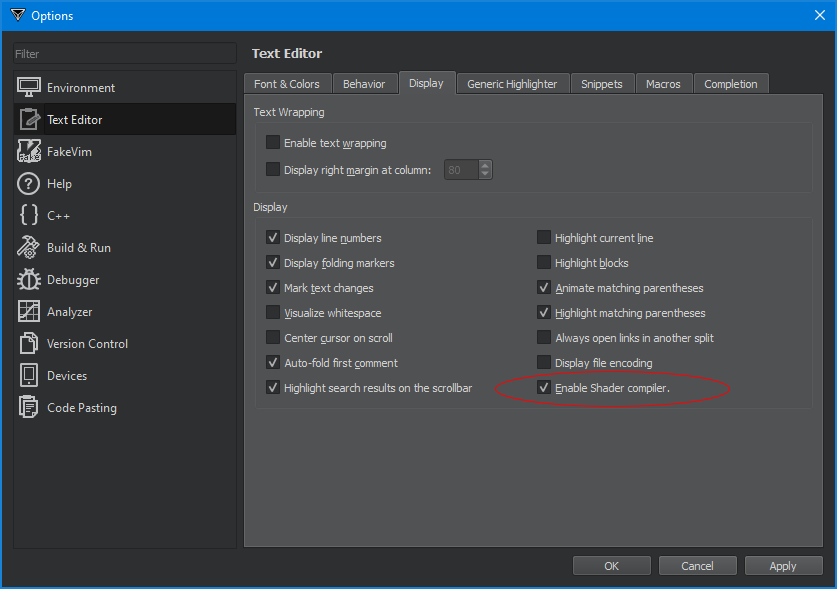
Enabling the GLSL compiler
The compiler is enabled by default, but if you find it too intrusive, it is possible to disable it completely deselecting it in the options: Tools > Options > Text Editor > Display > Enable shader compiler
Note: This option will only be applied when opening a new shader.
Modifying MIME types to enable other file extensions
PVRStudio has set some defaults for identifying shaders based on the file extension. These defaults can be modified and extended to support user defined extensions.
text/x-glsl-frag = *.frag
text/x-glsl-es-frag = *.fsh
text/x-glsl-vert = *.vert
text/x-glsl-es-vert = *.vsh
text/x-glsl-es-geometry= *.gsh
text/x-glsl-es-compute = *.csh
To change these defaults, go to: Tools > Options > Environment > MIME Types
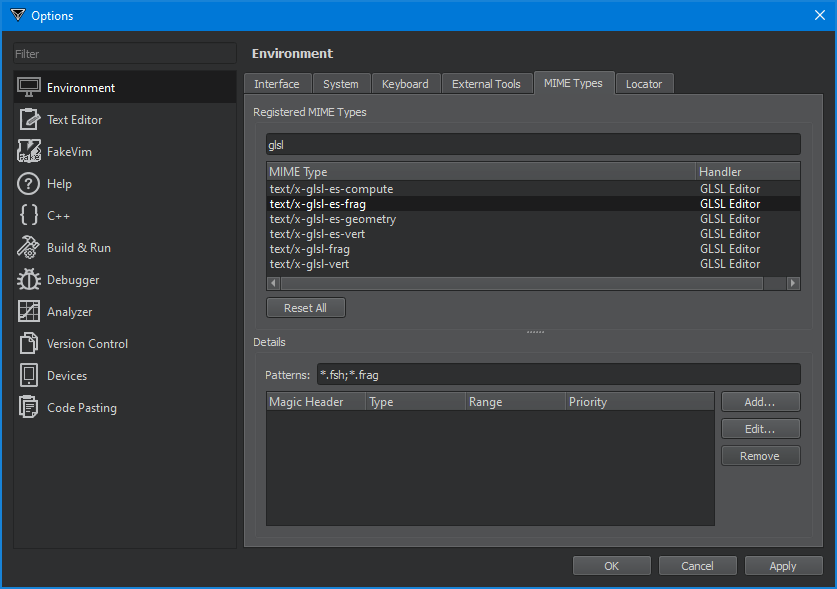
In the Filter box write “glsl” to display the MIME types associated to the GLSL Editor. You can modify the current value in the Patterns box or add more extensions separated by semi-colon (;) Apply these values so they can be used by the GLSL Editor.
Using the GLSL Editor
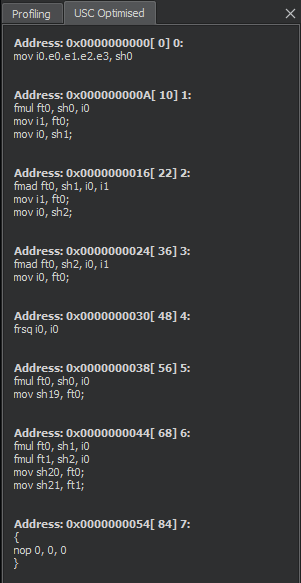
GLSL Editor Toolbar and per-line profiling
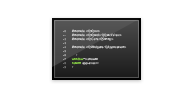
On the left hand of the text, the GLSL Editor will show “cycle” cost per line. This indicates the cost, in GPU clock cycles, for specific lines of the shader allowing for detailed optimisations. A line that does not show any number has no cost or the cost is embedded in a different part of the code. Always try to reduce these numbers to increase performance.
Toolbar
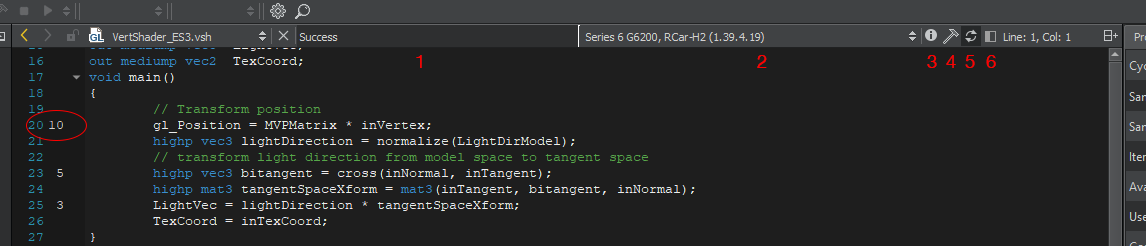
1 Compiler Output: Displays the result of the compilation. Errors will be displayed here. It will show “Success” when the compilation has succeeded.
2 Compiler Selection: Select the compiler for a specific PowerVR GPU. Different cores will have different profiling data. Choose the one you are targeting.
3 Compiler Info: This button will open the on-line PowerVR Instruction Set Reference. This document lists all the assembler (USC) instructions supported by PowerVR GPUs.
4 Compile Now: Use this button to compile when compile-as-you-type is disabled.
5 Compile As You Type Toggle: Enable/disable shader compilation on the fly. Disable it if the compiler takes too long and the edition of the file is affected.
6 Side Panel Toggle: Hide/Show the panel showing statistics and USC disassembly.
GLSL Editor Statistics table
The Statistics Tab shows several metrics to help optimising the shader. Some data, like “Max Parallel Instances” are compiler related and will not change until a different compiler is selected.

Cycle Count = Total number of cycles
Instruction Count = Total number of instructions
ALU Cycle Count = Total number of Arithmetic Logic Unit cycles
ITR Cycle Count = Total number of Iteration Pipeline cycles
SMP Cycle Count = Total number of Sample Pipeline cycles
Max Parallel Instances = Maximum number of Instances of the shader that can run in parallel
Temp Register Count = Total number of Temporary Registers
Input Register Count = Total number of Input Registers
Output Register Count = Total number of Output Registers
Samples Count = Total number of Sample operations
Sampler Count = Total number of Samplers defined
Iterates = Total number of Iterated instructions
Available FLOPS = Total number of available Floating Point Operations
Used FLOPS = Total number of used Floating Point Operations
Complex Ops Count = Number of Complex Operations (more than 1 instruction)
SOP Count = Number of Sum-Of-Products operations
Wait Stalls = Number of cycles stalled by a Wait operation
Index Reg Stalls = Number of cycles stalled by a Index Register fetch operation
PreFeedback Phase Cost = Total number of cycles in the Pre-Feedback Phase
PostFeedback Phase Cost = Total number of cycles in the Post-Feedback Phase
Bank Store Clashes = Total number of Bank Store Clashes
Bank Store Reads = Total number of Bank Store Reads
Bank Store Writes = Total number of Bank Store Writes
GLSL Editor Optimised USC output
The second tab in the side-panel display the optimised USC disassembler which is the code that the GPU will perform. This code is optimised and it will be the one that will run on retail devices. It will look different to the unoptimised one used in the GPU debugger to allow interleaving GLSL instructions. Each group will show a single instruction which might pack one or more operations. Each of these instructions will cost one GPU clock cycle. For a full reference, please refer to the PowerVR Instruction Set Reference (also accessible through the info button in the toolbar):
Semantic Highlighting
PVRStudio understands the C++, GPU Shaders, and JavaScript languages as code, not as plain text. It reads the source code, analyzes it, and highlights it based on the semantic checks that it does for the following code elements:
Types (such as classes, structs, and type definitions)
Local variables
Class fields
Virtual functions
To specify the color scheme to use for semantic highlighting, select Tools > Options > Text Editor > Fonts & Color.
PVRStudio supports syntax highlighting also for other types of files than C++ or JavaScript.
Generic Highlighting
Generic highlighting is provided by KSyntaxHighlighting, which is the syntax highlighting engine for Kate syntax definitions. PVRStudio comes with most of the commonly used syntax files, and you can download additional files. For more information about the definition files, see Working with Syntax Highlighting.
If the editor cannot find the highlight definition for a file that you open for editing, it prompts you to update the highlight definition files. Select Update Definitions to update the files.
To suppress the message for a particular file pattern, select Tools > Options > Text Editor > Generic Highlighter and add the pattern to the Ignored file patterns field.
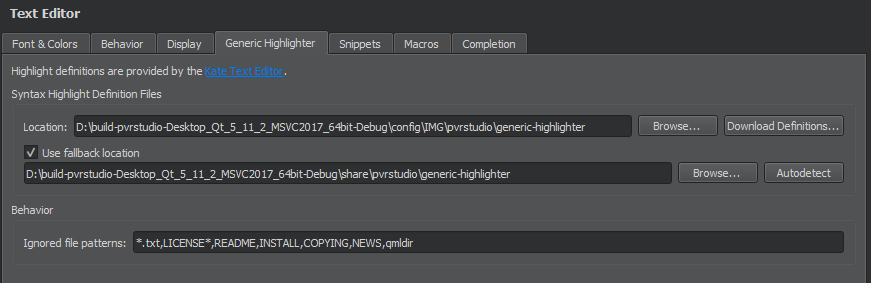
If you have written your own syntax definition files, you can provide an additional definition search path in the User Highlight Definition Files field.
To manually update the highlight definition files, select Update Definitions.
Highlighting and Folding Blocks
Use block highlighting to visually separate parts of the code that belong together. For example, when you place the cursor within the braces, the code enclosed in braces is highlighted. To enable block highlighting, select Tools > Options > Text Editor > Display > Highlight blocks.
Use the folding markers to collapse and expand blocks of code within braces. Click the folding marker to collapse or expand a block. In the figure above, the folding markers are located between the line number and the text pane.
To show the folding markers, select Tools > Options > Text Editor > Display > Display folding markers. This option is enabled by default.
When the cursor is on a brace, the matching brace is animated by default. To turn off the animation and just highlight the block and the braces, select Tools > Options > Text Editor > Display and deselect Animate matching parentheses.
You can use keyboard shortcuts to move within and between blocks. To go to block end, press Ctrl+] and to go to block start, press Ctrl+[. To also select the lines from the cursor position to the end or beginning of the block, press Ctrl+Shift+] and Ctrl+Shift+[, respectively.
To select the current block, press Ctrl+U. A second key press extends the selection to the parent block. To undo the last selection, press Ctrl+Alt+Shift+U. To enable smart block selection, select Tools > Options > Text Editor > Behavior > Enable smart selection changing.
Checking Code Syntax
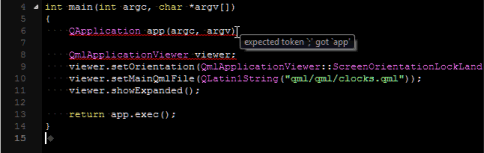
As you write code, PVRStudio checks code syntax. When PVRStudio spots a syntax error in your code it underlines it and shows error details when you move the mouse pointer over the error. Similarly, when you are working on an instance of a JavaScript object notation (JSON) entity, PVRStudio underlines errors in JSON data structure.
In the following screenshot, PVRStudio points out an error, because a semicolon is missing at the end of the line:
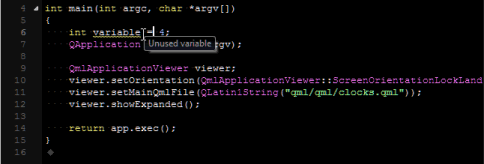
In the following screenshot, PVRStudio issues a warning, because the variable is not used:
To modify the colors used for underlining errors and warnings, select Tools > Options > Text Editor > Fonts & Colors > Copy, and select new colors for Error and Warning.
Specifying Line Annotation Positions
To specify the position where the annotations are displayed, select Tools > Options > Text Editor > Display > Line annotations, and then select whether to display the annotations directly next to the code, aligned to the right of the code, or in the right margin. Showing annotations between lines can be useful if there is usually not enough space to display annotations next to the text.
If you hide the annotations by deselecting the check box, you can move the mouse pointer over an icon to view them.
Completing Code
As you write code, PVRStudio suggests properties, IDs, and code snippets to complete the code. It provides a list of context-sensitive suggestions to the statement currently under your cursor. Press Tab or Enter to accept the selected suggestion and complete the code.
The following image displays suggestions for completing C++ code:

To open the list of suggestions at any time, press Ctrl+Space. If only one option is available, PVRStudio inserts it automatically.
When completion is invoked manually, PVRStudio completes the common prefix of the list of suggestions. This is especially useful for classes with several similarly named members. To disable this functionality, uncheck Autocomplete common prefix in the code completion preferences. Select Tools > Options > Text Editor > Completion.
By default, code completion does not consider case. To apply full or first-letter case-sensitivity, select Full or First Letter in the Case-sensitivity field.
Summary of Available Types
The following table lists available types for code completion and icon used for each.
Icon Description |
|
|---|---|
image:: images/class.png |
A class |
image:: images/enum.png |
An enum |
image:: images/enumerator.png |
An enumerator (value of an enum) |
image:: images/func.png |
A function |
image:: images/func_priv.png |
A private function |
image:: images/func_prot.png |
A protected function |
image:: images/var.png |
A variable |
image:: images/var_priv.png |
A private variable |
image:: images/var_prot.png |
A protected variable |
image:: images/signal.png |
A signal |
image:: images/slot.png |
A slot |
image:: images/slot_priv.png |
A private slot |
image:: images/slot_prot.png |
A protected slot |
image:: images/keyword.png |
A C++ keyword |
image:: images/snippet.png |
A C++ code snippet |
image:: images/macro.png |
A macro |
image:: images/namespace.png |
A namespace |
Completing Code Snippets
Code snippets can consist of multiple variables that you specify values for. Select an item in the list and press Tab or Enter to complete the code. Press Tab to move between the variables and specify values for them. When you specify a value for a variable, all instances of the variable within the snippet are renamed.
Editing Code Snippets
Code snippets specify code constructs. You can add, modify, and remove snippets in the snippet editor. To open the editor, select Tools > Options > Text Editor > Snippets.
The following image shows built-in C++ code snippets:
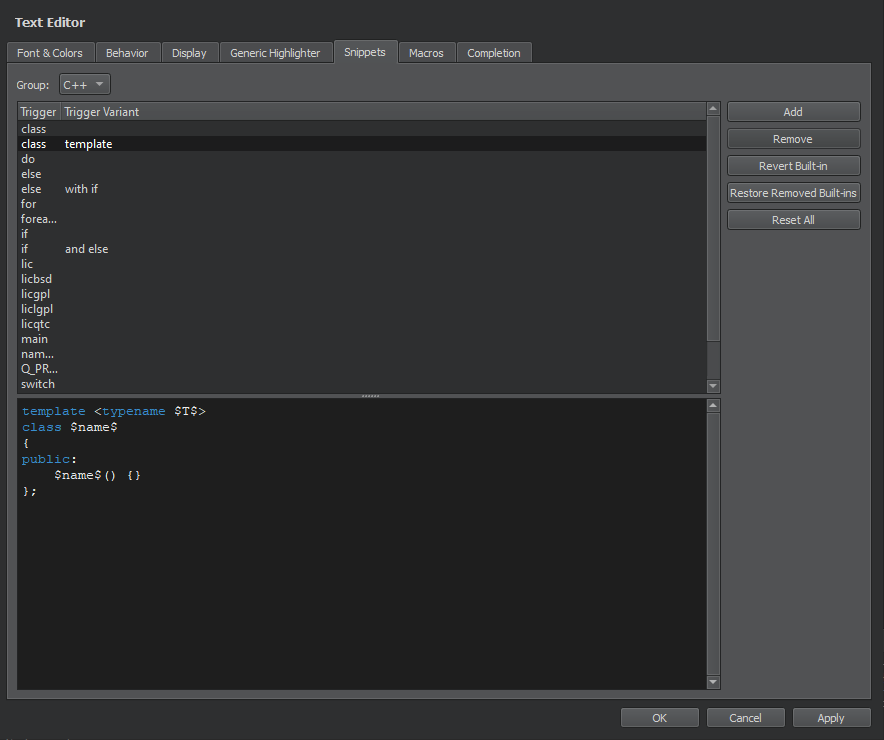
PVRStudio provides you with built-in snippets in the following categories:
Text snippets, which can contain any text string. For example, code comments
C++ code snippets, which specify C++ code constructs
CMake code snippets that you can use when editing
CMakeLists.txtfiles in the CMake editorNim code snippets, which specify Nim code constructs
Adding and Editing Snippets
Select a snippet in the list to edit it in the snippet editor. To add a new snippet, select Add. Specify a trigger and, if the trigger is already in use, an optional variant, which appear in the list of suggestions when you write code. Also specify a text string or C++ code construct in the snippet editor, depending on the snippet category. You can use predefined variables in snippets. The snippet editor provides you with:
Highlighting
Indentation
Parentheses matching
Basic code completion
Specify the variables for the snippets in the following format:
$variable$
Specify PVRStudio variables in the following format:
%{variable}
For example, the following variable expands to the name of the
current project: %{CurrentProject:Name}.
Use unique variable names within a snippet, because all instances of a variable are renamed when you specify a value for it.
To determine the case of values you enter in snippets, use the following modifiers:
:cconverts the initial letter of the string to upper case -:lconverts the string to lower case:uconverts the string to upper case
For example, add the following line to the class snippet to
specify that the function name is converted to all lower case
characters regardless of how you specify the value of the $name$
variable:
void $name:l$() {}

The snippet editor does not check the syntax of the snippets that you edit or add. However, when you use the snippets, the code editor marks any errors by underlining them in red.
To discard the changes you made to a built-in snippet, select Revert Built-in.
Removing Snippets
Several similar built-in snippets might be provided for different use cases. To make the list of suggestions shorter when you write code, remove the built-in snippets that you do not need. If you need them later, you can restore them.
To remove snippets, select a snippet in the list, and then select Remove. To restore the removed snippets, select Restore Removed Built-ins.
Resetting Snippets
To remove all added snippets and to restore all removed snippets, select Reset All.
Note: If you now select OK or Apply, you permanently lose all your own snippets.
Indenting Text or Code
When you type text or code, it is indented automatically according to the selected text editor or code style options. Select a block to indent it when you press Tab. Press Shift+Tab to decrease the indentation. You can disable automatic indentation.
You can specify indentation for:
C++ files
Other text files
You can also specify indentation separately for each project. You can specify several sets of code style settings and easily switch between them. In addition, you can import and export code style settings.
Indenting C++ Files
To specify indentation settings for the C++ editor:
Select Tools > Options > C++.
In the Current settings field, select the settings to modify and click Copy.
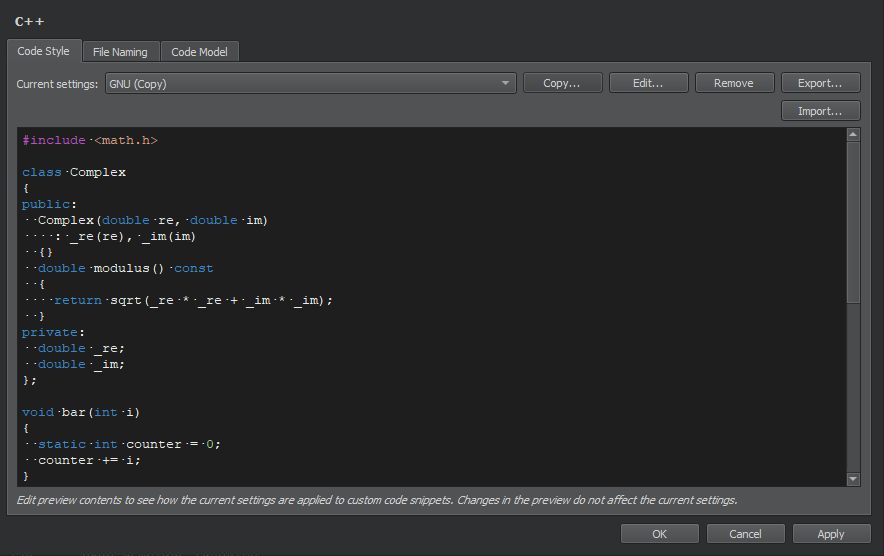
Give a name to the settings and click OK.
Click Edit to specify code style settings for the project.
You can specify how to:
Interpret the Tab and Backspace key presses.
Indent the contents of classes, functions, blocks, and namespaces.
Indent braces in classes, namespaces, enums, functions, and blocks.
Control switch statements and their contents.
Align continuation lines.
Bind pointers (*) and references (&) in types and declarations to identifiers, type names, or left or right
constorvolatilekeywords.Name getter functions.
You can use the live preview to see how the options change the indentation.
To specify different settings for a particular project, select Projects > Code Style Settings.
Indenting Other Text Files
To specify indentation settings for text files that do not contain C++ or other code (such as Python code files), select Tools > Options > Text Editor > Behavior.
To specify different settings for a particular project, select Projects > Editor.
You can specify how to interpret the Tab and Backspace key presses and how to align continuation lines.
Specifying Tab Settings
You can specify tab settings at the following levels:
For all C++ files
For all other text files
For C++ files in a project
For other text files in a project
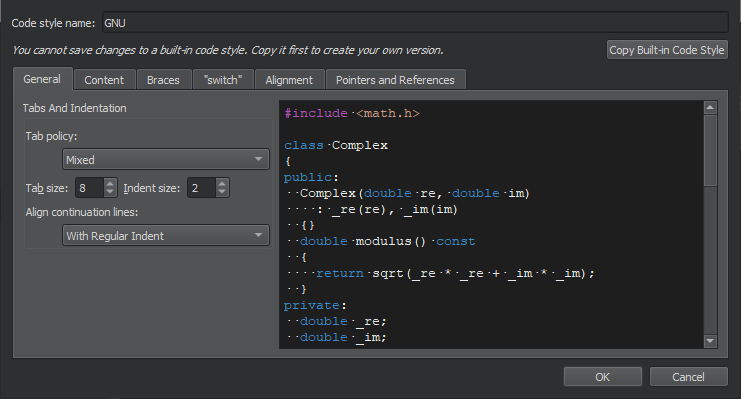
Specifying Tabs and Indentation
You can specify tab policy and tab size in the Tabs and Indentation group. In the Tab policy field, select whether to use only spaces or only tabs for indentation, or to use a mixture of them.
By default, the tab length in code editor is 8 spaces and the indent size is 4 spaces. You can specify the tab length and indent size separately for each project and for different types of files.
You can have continuation lines aligned with the previous line. In the Align continuation lines field, select Not at all to disable automatic alignment and indent continuation lines to the logical depth. To always use spaces for alignment, select With Spaces. To follow the Tab policy, select With Regular Indent.
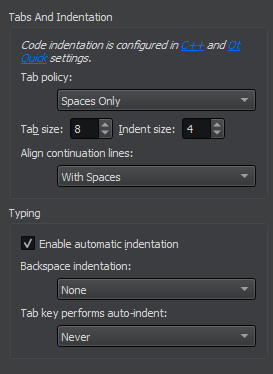
Specifying Typing Options
When you type text or code, it is indented automatically according to the selected text editor or code style options. To specify typing options, select Tools > Options > Text Editor > Behavior > Typing.
To disable automatic indentation, deselect the Enable automatic indentation check box.
You can specify how the indentation is decreased when you press Backspace in the Backspace indentation field. To go back one space at a time, select None. To decrease indentation in leading white space by one level, select Follows Previous Indents. To move back one tab length if the character to the left of the cursor is a space, select Unindents.
You can specify whether the Tab key automatically indents text when you press it. To automatically indent text, select Always in the Tab key performs auto-indent field. To only indent text when the cursor is located within leading white space, select In Leading White Space.
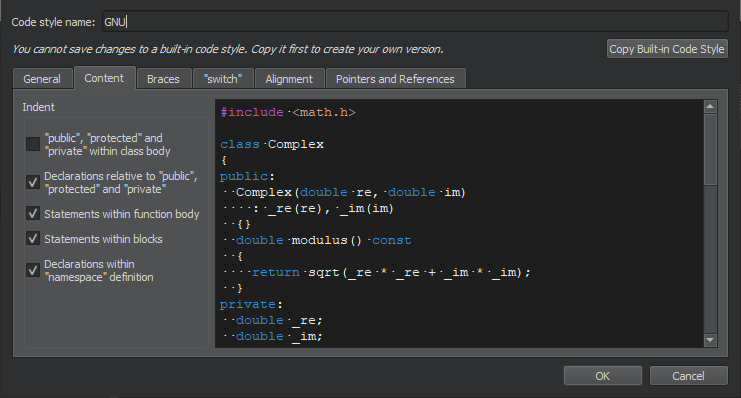
Specifying Settings for Content
You can indent public, protected, and private statements and declarations related to them within classes.
You can also indent statements within functions and blocks and declarations within namespaces.
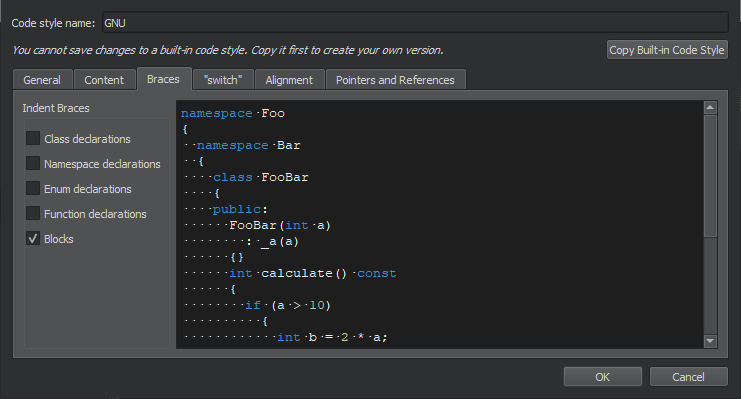
Specifying Settings for Braces
You can indent class, namespace, enum and function declarations and code blocks.
Specifying Settings for Switch Statements
You can indent case or default statements, or statements or blocks related to them within switch statements.

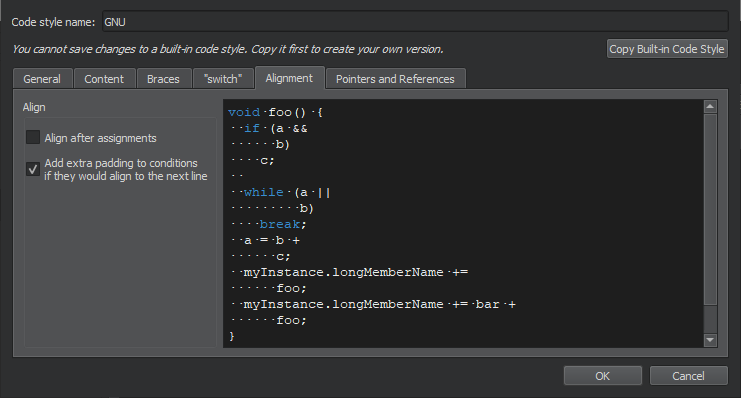
Specifying Alignment
To align continuation lines to tokens after assignments, such as
= or +=, select the Align after assignments check box.
You can specify additional settings for aligning continuation lines
in the General tab.
You can also add spaces to conditional statements, so that they are
not aligned with the following line. Usually, this only affects
if statements.
Binding Pointers and References
To bind pointers (*) and references (&) in types and declarations to identifiers, type names, or left or right const
or volatile keywords, select the check boxes in the Pointers
and References tab.
The * and & characters are automatically bound to identifiers
of pointers to functions and pointers to arrays.

Pasting and Fetching Code Snippets
In PVRStudio, you can paste snippets of code to a server or fetch snippets of code from the server. To paste and fetch snippets of code, PVRStudio uses the following:
Pastebin.Com
Pastecode.Xyz
Shared network drives
Specifying Settings for Code Pasting
To specify settings for the code pasting service:
Select Tools > Options > Code Pasting.
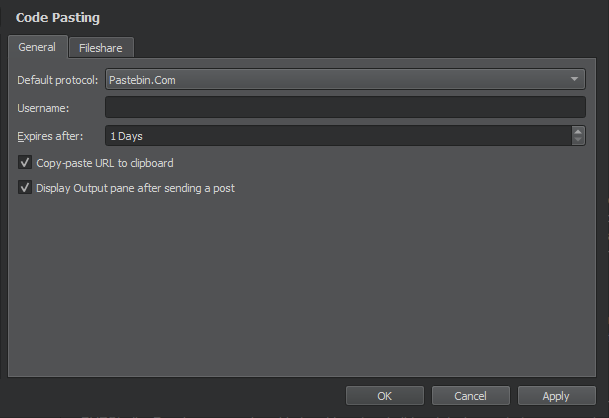
In the Default protocol field, select a code pasting service to use by default.
In the Username field, enter your username.
In the Expires after field, specify the time to keep the pasted snippet on the server.
Select the Copy-paste URL to clipboard check box to copy the URL of the post on the code pasting service to the clipboard when you paste a post.
Select the Display Output pane after sending a post check box to display the URL in the General Messages output pane when you paste a post.
Select Fileshare to specify the path to a shared network drive. The code snippets are copied to the drive as simple files. You have to delete obsolete files from the drive manually.
Using Code Pasting Services
To paste a snippet of code onto the server, select Tools > Code Pasting > Paste Snippet or press Alt+C,Alt+P. By default, PVRStudio copies the URL of the snippet to the clipboard and displays the URL in the General Messages output pane.
To paste any content that you copied to the clipboard, select Tools > Code Pasting > Paste Snippet.
To paste content from the diff editor, right-click a chunk and select Send Chunk to CodePaster in the context menu.
To fetch a snippet of code from the server, select Tools > Code Pasting > Fetch Snippet or press Alt+C,Alt+F. Select the snippet to fetch from the list.
To fetch the content stored at an URL, select Tools > Code Pasting > Fetch from URL.
For example, you might ask colleagues to review a change that you plan to submit to a version control system. If you use the Git version control system, you can create a diff view by selecting Tools > Git > Local Repository > Diff. You can then upload its contents to the server by selecting Tools > Code Pasting > Paste Snippet. The reviewers can retrieve the code snippet by selecting Tools > Code Pasting > Fetch Snippet. If they have the project currently opened in PVRStudio, they can apply and test the change by choosing Tools > Git > Local Repository > Patch > Apply from Editor.
Using Text Editing Macros
To record a text editing macro, select Tools > Text Editing Macros > Record Macro or press Alt+(. To stop recording, select Tools > Text Editing Macros > Stop Recording Macro or press Alt+).
Note: The macro recorder does not support code completion.
To play the last macro, select Tools > Text Editing Macros > Play Last Macro or press Alt+R.
To save the last macro, select Tools > Text Editing Macros > Save Last Macro.
To assign a keyboard shortcut to a text editing macro, select Tools > Options > Environment > Keyboard. For more information, see Configuring Keyboard Shortcuts.
You can also use the rm locator filter to run a macro. For more information, see Searching with the
Locator.
To view and remove saved macros, select Tools > Options > Text Editor > Macros.
Comparing Files
You can use a diff editor to display unsaved changes in the current file or all open files or to compare any two text files that can be either versions of the same file or arbitrary files.
To view unsaved changes in the current file, select Tools > Diff > Diff Current File.
To view unsaved changes in all open files, select Tools > Diff > Diff Open Files.
To compare two files:
Select Tools > Diff > Diff External Files.
Select two files to compare.
Viewing the Changes
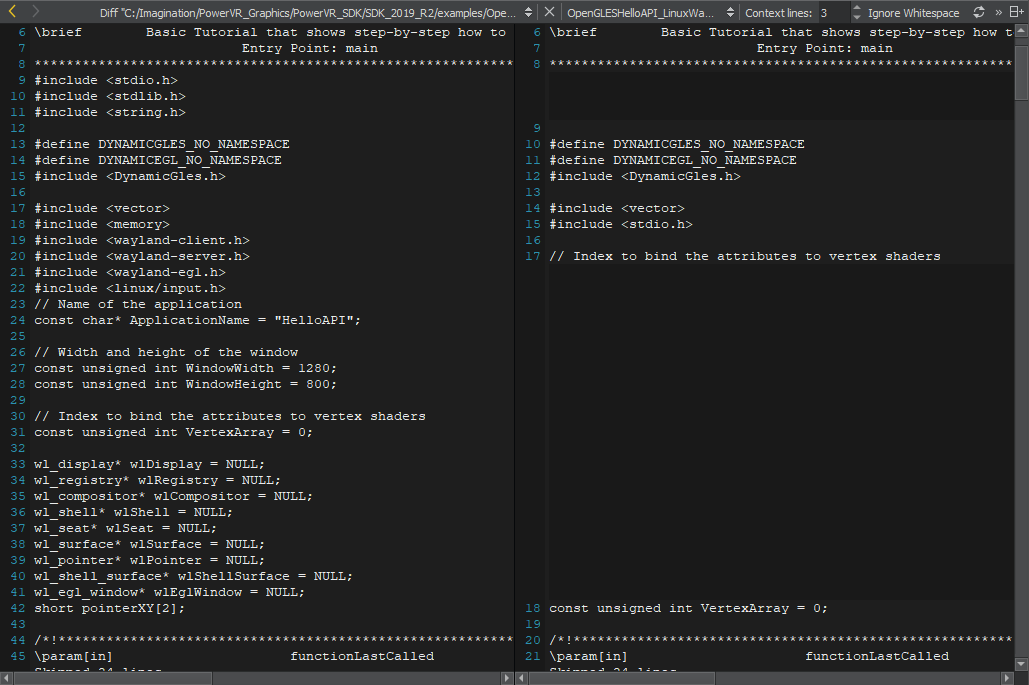
The changes are displayed in the Edit mode. Color coding is used to mark changed lines. By default, light red indicates lines that contain removed text (painted a darker red) in the left pane and light green indicates lines that contain added text (painted a darker green) in the right pane.
To revert the changes, right-click added text and then select Revert Chunk in the context menu. To apply the changes, select removed text and then select Apply Chunk.
To view the differences in a unified view where changed rows are placed below each other, select image:: images/unifieddiff.png (Switch to Unified Diff Editor).
To switch back to the side-by-side view, select image:: images/sidebysidediff.png (Switch to Side by Side Diff Editor).
To only show text changes, select Ignore Whitespace.
To expand the context for the changes, set the number of unchanged lines to show in Context lines.
By default, the horizontal scroll bars in the left and right pane are synchronized. To use them independently of each other, select the image:: images/linkicon.png (Synchronize Horizontal Scroll Bars) button.
If the files change outside PVRStudio, select image:: images/reload_gray.png (Reload Editor) to compare them again and to show the results.
To send a chunk of changes to a code pasting service, select Send Chunk to CodePaster in the context menu.
Changing the Colors
To change the default colors, select Tools > Options > Text Editor > Font & Colors. Create your own color scheme and select new colors for the following options:
Diff File Line sets the color of the line that shows the path and filename of the changed file.
Diff Context Line sets the color of the line that shows the number of hidden lines between changed lines.
Diff Source Line sets the color of lines that contain removed text.
Diff Source Character sets the color that indicates removed characters.
Diff Destination Line sets the color of lines that contain added text.
Diff Destination Character sets the color that indicates added characters.