Configuring Projects
Configuring Projects
When you install a kit for a target platform, such as Android, the build and run settings for the development targets might be set up automatically in PVRStudio.
When you open a project for the first time, the Configure Projects view is displayed to let you select a set of kits <glossary-buildandrun-kit> that you want to use to build and run your project. At least one kit must be active for you to be able to build and run the project. For more information about selecting the initial kit, see Opening Projects.
To maintain the list of active kits for a currently open project, switch to the Projects mode by pressing Ctrl+5.
Activating Kits for a Project
All kits compatible with your project are listed in the Build & Run section of the toolbar. To activate one or more disabled kits, click them.
The list displays kits that are configured in Tools > Options > Kits. If the kit configuration is not suitable for the project type, warning and error icons are displayed. To view the warning and error messages, move the mouse pointer over the kit name.
To modify kit configuration or to add kits to the list, select Manage Kits. For more information about managing kits, see Adding Kits.
Each kit consists of a set of values that define one environment, such as a device and compiler. For more information, see Adding Compilers <Adding Compilers>, and `Adding Debuggers <Adding Debuggers>.
To copy the build and run settings for a kit to another kit, select Copy Steps from Other Kit in the context menu.
To deactivate a kit, select Disable Kit for Project in the context menu.
Note: Deactivating a kit removes all custom build and run settings for the kit.
To import an existing build for the project, select Import Existing Build.
Specifying Settings
To specify build or run settings for a kit, select Build or Run below the kit. For more information, see Specifying Build Settings and Specifying Run Settings.
In addition, you can modify the following global settings for each project:
Editor Code Style <Specifying Code Style Settings>
Dependencies To-Do <Viewing Output> (experimental)
If you have multiple projects open in PVRStudio, select the project to configure in the list of projects.
Adding Kits
PVRStudio groups settings used for building and running projects as kits to make cross-platform and cross-configuration development easier. Each kit consists of a set of values that define one environment, such as a device, compiler, and debugger command to use, and some metadata, such as an icon and a name for the kit. Once you have defined kits, you can select them to build and run projects.
PVRStudio supports development for the desktop and for the following types of devices:
Android Device
Generic Linux Device
QNX Device
Windows Runtime (local)
Filtering Kit Settings
Typically, only a subset of the kit settings is relevant for a particular setup. Therefore, PVRStudio plugins register sets of relevant settings that you can view and modify in Tools > Options > Kits >. For example, if you use CMake to build all your projects.
To hide and show settings in the Kits tab for the current kit, select Settings Filter. To view and modify the settings displayed when you add a new kit, select Default Settings Filter.
Specifying Kit Settings
To add kits:
Select Tools > Options > Kits > Add.

To clone the selected kit, select Clone.
In the Name column, enter a name for the kit.
Select the image:: images/pvrstudio-desktopdevice-button.png button to select an image to use as an icon for the kit.
In the File system name field, enter a name for the kit to use as a part of directory names. This value is used for the CurrentKit:FileSystemName variable, which determines the name of the shadow build directory, for example.
In the Device type field, select the type of the device.
Double-click the icon next to the field to select the image that is displayed in the kit selector for this kit. You can use any image in a supported file format (for example, PNG). The image is scaled to the size 64x64 pixels. For example, using the compiler logo as an icon allows you to easily see, which compiler is used to build the project for the selected kit.
In the Device field, select a device.
In the Sysroot field, specify the directory where the device image is located. If you are not cross-compiling, leave this field empty.
In the Compiler field, select the C or C++ compiler that you use to build the project. You can add compilers to the list if they are installed on the development PC, but were not detected automatically. For more information, see Adding Compilers. This setting is used to tell the code model which compiler is used. If your project type and build tool support it, PVRStudio also tells the build tool to use this compiler for building the project.
In the Environment field, select Change to modify environment variable values for build environments in the Edit Environment Changes dialog. For more information about how to add and remove variable values, see Batch Editing.
Select the Force UTF-8 MSVC compiler output check box to either switch the language of MSVC to English or to keep the language setting and just force UTF-8 output, depending on the MSVC compiler used.
In the Debugger field, select the debugger to debug the project on the target platform. PVRStudio automatically detects available debuggers and displays a suitable debugger in the field. You can add debuggers to the list. For more information, see Adding Debuggers.
For Android kits, the Android GDB server field will display the path to GDB server executable.
In the CMake Tool field, select the CMake tool to use for building the project. Select Manage to add installed CMake tools to the list. For more information, see Adding CMake Tools.
In the CMake generator field, select Change to edit the CMake Generator to use for producing project files. Only the generators with names beginning with the string CodeBlocks produce all the necessary data for the PVRStudio code model. PVRStudio displays a warning if you select a generator that is not supported.
In the CMake configuration field, select Change to edit the variables of the CMake configuration for the kit.
PVRStudio uses the default kit if it does not have enough information to choose the kit to use. To set the selected kit as the default kit, select Make Default.
Adding Compilers
In PVRStudio, a kit specifies the compiler and other necessary tools for building an application for and running it on a particular platform.
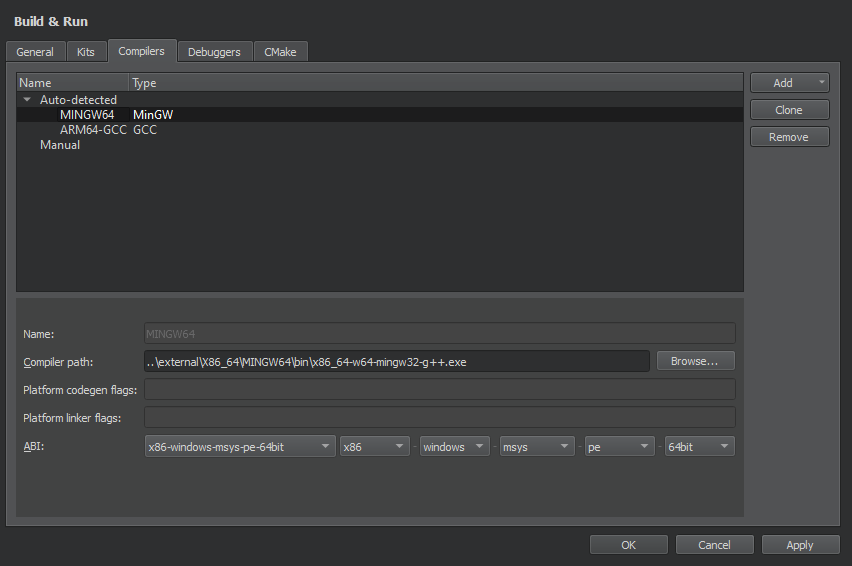
PVRStudio automatically detects the compilers that are registered by your system or by an installer and lists them in Tools > Options > Kits > Compilers:
You can add the following compilers to build applications by using other compilers or by using additional versions of the automatically detected compilers:
GNU Compiler Collection (GCC) is a compiler for Linux and macOS.
MinGW (Minimalist GNU for Windows) is a native software port of GCC and GNU Binutils for use in the development of native Microsoft Windows applications on Windows. MinGW is distributed together with PVRStudio for Windows.
Linux ICC (Intel C++ Compiler) is a group of C and C++ compilers for Linux.
Clang is a C, C++, Objective C, and Objective C++ front-end for the LLVM compiler for Windows, Linux, and macOS.
clang-cl is an alternative command-line interface to Clang that is compatible with the Visual C++ compiler,
cl.exe.QCC is the interface for compiling C++ applications for QNX.
Redetecting Compilers
When PVRStudio finds an x86_64 GCC compiler, it sets up an instance for the native x86_64 target. If you plan to create also 32-bit x86 binaries without using a dedicated cross-compiler, select Auto-detection Settings > Detect x86_64 GCC compilers as x86_64 and x86. Then select Re-detect to refresh the list of automatically detected compilers.
To remove manually added compilers, select Remove or Remove All.
Specifying Compiler Settings
To build an application using GCC, MinGW, Clang, or QCC, specify the path to the directory where the compiler is located and select the application binary interface (ABI) version from the list of available versions. You can also create a custom ABI definition. For QCC, also specify the path to the QNX Software Development Platform (SDP).
To enable Microsoft Visual C++ Compilers (MSVC) and clang-cl to find
system headers, libraries, and the linker, PVRStudio executes them
inside a command prompt where the environment has been set up using
vcvarsall.bat. For these compilers, you also specify the path to
the script that sets up the command prompt.
You specify the compiler to use for each kit in Tools > Options > Kits.
To add C or C++ compilers:
Select Tools > Options > Kits > Compilers > Add, then select a compiler in the list, and then select C or C++ to add a C or C++ compiler.
To clone the selected compiler, select Clone.
In the Name field, enter a name for the compiler to identify it in PVRStudio.
In the Compiler path field, enter the path to the directory where the compiler is located.
In the Platform codegen flags field, check the flags passed to the compiler that specify the architecture on the target platform.
The other settings to specify depend on the compiler.
In the ABI field, provide an identification for the target architecture. This is used to warn about ABI mismatches within the kits.
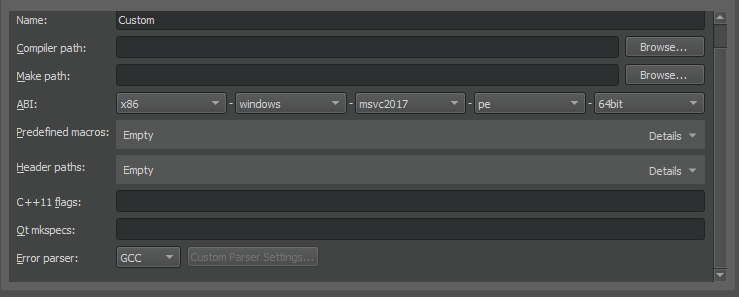
Adding Custom Compilers
To add a compiler that is not listed above or a remote compiler, use the Custom option and specify the paths to the directories where the compiler and make tool are located and options for the compiler.
To add other compilers:
Select Tools > Options > Kits > Compilers > Add > Custom > C or C++.
In the Name field, enter a name for the compiler.
In the Compiler path field, enter the path to the directory where the compiler is located.
In the Make path field, enter the path to the directory where the make tool is located.
In the ABI field, specify the ABI version.
In the Predefined macros field, specify the macros that the compiler enables by default. Specify each macro on a separate line, in the following format: MACRO[=value].
In the Header paths field, specify the paths to directories that the compiler checks for headers. Specify each path on a separate line.
In the C++11 flags field, specify the flags that turn on C++11 support in the compiler.
In the Error parser field, select the error parser to use. Select Custom, and then select Customer Parser Settings to specify settings for a custom parser:
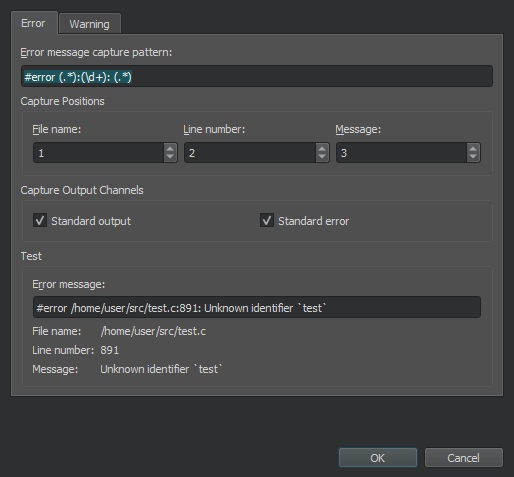
The custom error parser enables you to capture errors and warnings separately. You can configure the error parser in the Error tab and the warning parser in the Warning tab:
In the Error message capture pattern field, specify a regular expression to define what is an error. The custom parser matches the compile output line by line against the regular expression and displays errors in the Issues output pane. Create regular expression groups that contain the file name, line number and error message.
In the Capture Positions field, map the regular expression groups to File name, Line number, and Message.
In the Capture Output Channels field, specify whether messages from standard output, standard error, or both channels should be captured.
In the Test group, you can test how the message that you enter in the Error message field is matched when using the current settings.
Troubleshooting MinGW Compilation Errors
If error messages displayed in the Compile Output pane contain
paths where slashes are missing (for example, C:QtSDK), check
your PATH variable. At the command line, enter the following
commands:
where sh.exe
where make.exe
where mingw32-make.exe
If these commands show paths, they have been added to the global PATH variable during the installation of a tool chain based on Cygwin or MinGW, even though this is against Windows conventions.
To keep working with the third-party tool chain, create a new shell link that adds the required paths (as Visual Studio do). The shell link must point to cmd.exe, as illustrated by the following example:
C:\Windows\System32\cmd.exe /K C:\path_to\myenv.bat
where the /K parameter carries out the command specified in the bat file.
Create the myenv.bat file at path_to, which should be in a convenient location. In the file, specify the paths to the tool chains. For example,
set PATH=C:\path1;C:\path2;%PATH%
where path1 and path2 are paths to the tool chains.
Finally, remove the paths from the global PATH, reboot the computer,
and run the where commands again to verify that the global PATH
is now clean.
You can use the shell link to run the tools in the third-party tool chains.
Adding Debuggers
The PVRStudio debugger plugin acts as an interface between the PVRStudio core and external native debuggers such as the GNU Symbolic Debugger (GDB), the Microsoft Console Debugger (CDB), and the debugger of the low level virtual machine (LLVM) project, LLDB.
The debugger plugin automatically selects a suitable native debugger for each kit from the ones found on your system. To override this choice, select Tools > Options > Kits.
To add debuggers:
Select Tools > Options > Kits > Debuggers > Add.
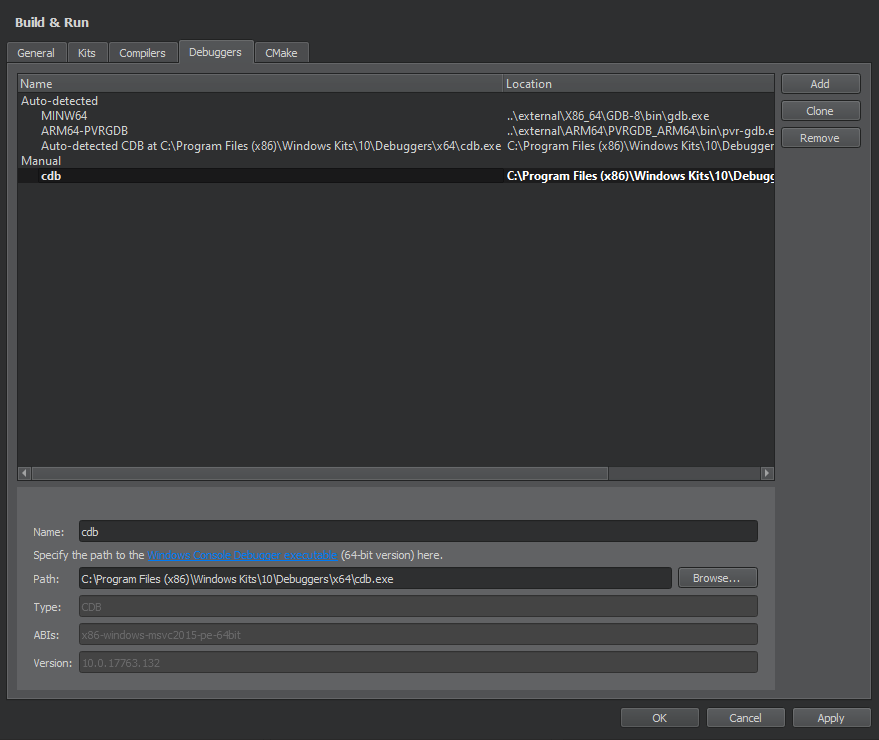
In the Name field, give a descriptive name for the debugger.
In the Path field, specify the path to the debugger binary:
For CDB (Windows only), specify the path to the Windows Console Debugger executable.
For GDB, specify the path to the GDB executable. The executable must be built with Python scripting support enabled.
For LLDB (experimental), specify the path to the LLDB executable.
PVRStudio attempts to identify the type and version of the debugger and shows them in the Type and Version fields. In addition, PVRStudio shows the ABI version that will be used on embedded devices in the ABIs field.
In the Working directory field, specify the working directory of the application process. If the application is run locally, the working directory defaults to the build directory. If the application is run remotely on a device, the value depends on the shell or the device. Usually, you can leave this field empty.
To remove the selected manually added debugger, select Remove. The debugger is removed from the list when you select Apply. Until then, you can cancel the deletion by clicking Restore.
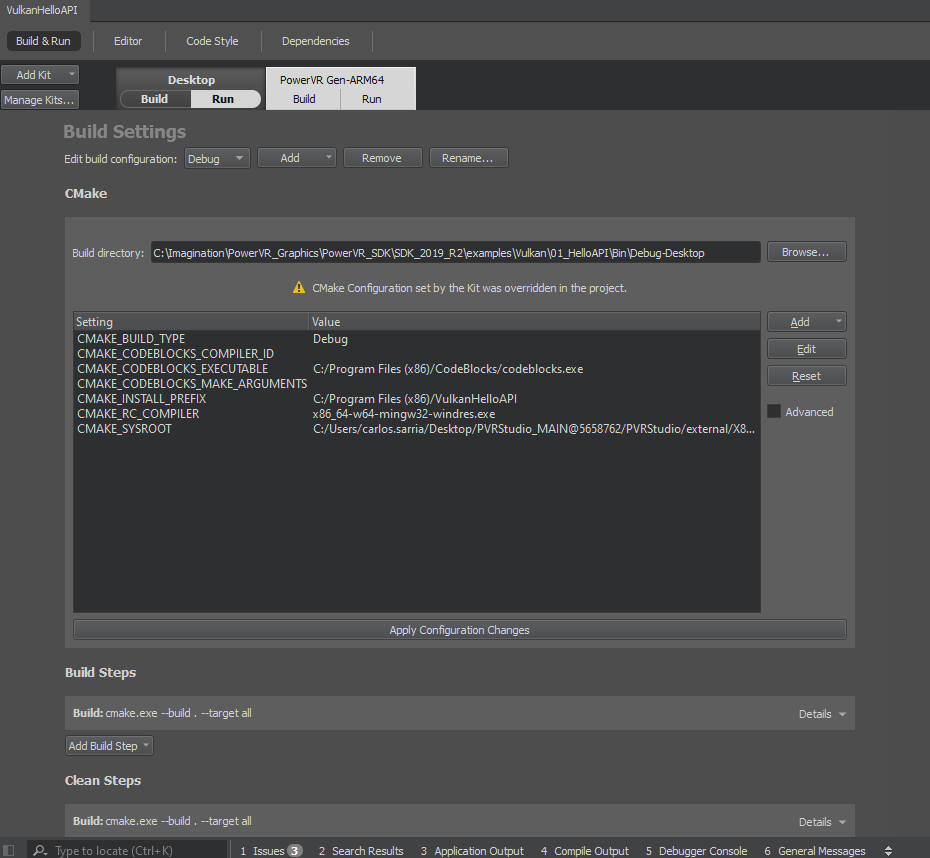
Specifying Build Settings
Different build configurations allow you to quickly switch between different build settings. By default, PVRStudio creates debug and release build configurations. The profile build configuration is also selectable in the configuration. A debug build contains additional debug symbols that you need for debugging the application but that you can leave out from the release version. Generally, you use the debug configuration for testing and the release configuration for creating the final installation file. A profile configuration is an optimized release build that is delivered with separate debug information. It is best suited for analyzing applications.
You specify build settings in the Projects mode. To add a new build configuration, click Add and select the type of configuration you would like to add. You can add as many build configurations as you need.
To delete the build configuration currently selected, click Remove.
Editing Build Configurations
Select the build configuration to edit in the Edit build configuration field.
Build Configuration
By default, PVRStudio builds projects in a separate directory from the source directory, as shadow builds. This keeps the files generated for each build and run kit separate. If you only build and run with a single kit, you can deselect the Shadow build checkbox.
To make in-source builds the default option for all projects, select Tools > Options > Build & Run > General, and enter a period (.) in the Default build directory field.
You can create separate versions of project files to keep platform-dependent code separate.
CMake Build Configuration
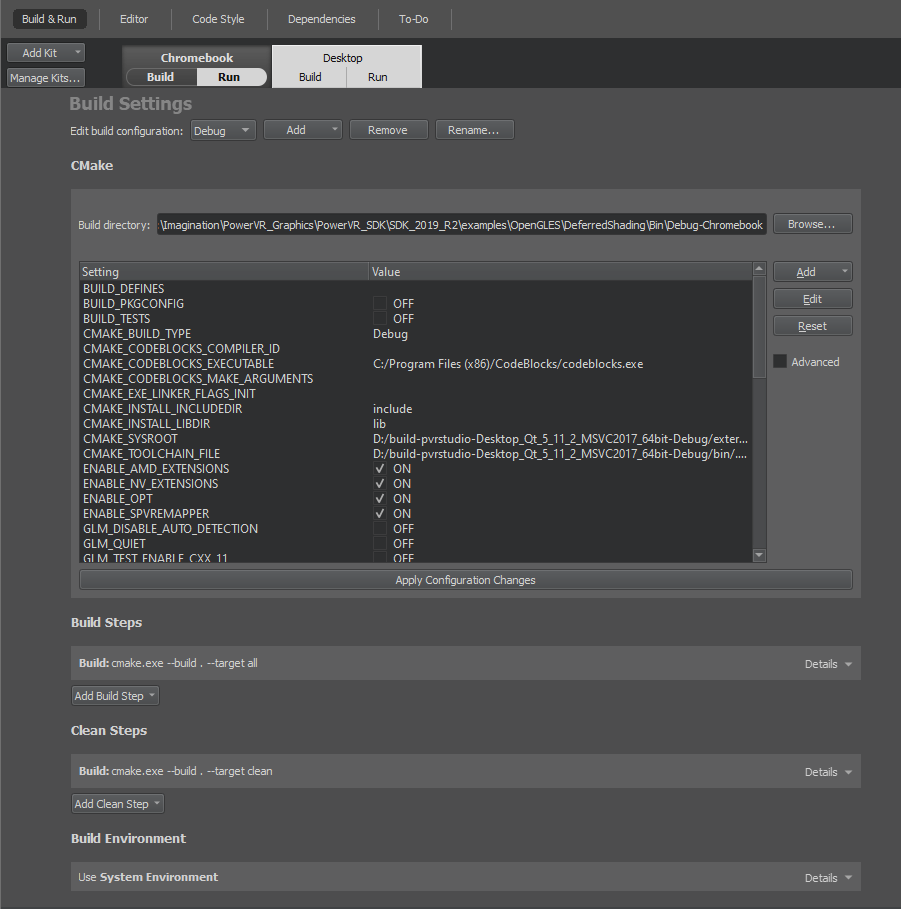
Setting names with a common prefix (up to the first underscore character) are grouped under the prefix. To view all settings, select the Advanced check box.
To add build settings, select Add, and then select the type of the setting that you are adding: Boolean, String, Directory, or File.
To change the type of the selected setting, select Force to bool, Force to file, Force to directory, or Force to string.
To modify the value of a build setting, double-click it, or select it, and then select Edit. To save the changes, select Apply Configuration Changes. Keep in mind that a configuration change might trigger a follow-up configuration change.
To remove a setting, select Unset.
To reset the changes that you made, select Reset.
Starting External Processes
PVRStudio executes external processes to accomplish tasks such as building and running applications. To execute the processes, PVRStudio uses shell commands that are native to the system. It constructs the commands from an executable name and optional command line arguments.
The executable name is specified in the executable fields: CMake, Command, or Executable. It is either derived from the project or specified manually. When you specify executables manually, you can reference environment variables and PVRStudio variables. However, no quoting rules apply.
You can specify command-line arguments in the arguments fields: Additional arguments, Command arguments, Make arguments, Arguments, Default Arguments, or Extra arguments. You can create shell command lines that can contain redirection and other advanced constructs. However, some more complex use cases, such as piping test data into the application being tested or grouping commands, are not supported because the value of the Executable field is always placed first when constructing the command.
Using Environment Variables
You can use any environment variables as values in the fields. For a list of variable names, click Build Environment > Details in the Build Settings. Environment variables are referenced using the native syntax: $VARNAME or ${VARNAME} on Unix and %VARNAME% on Windows.
Using Variables
You can use PVRStudio variables in arguments, executable paths, and working directories. The variables take care of quoting their expansions, so you do not need to put them in quotes. Select the image:: images/replace.png (Variables) button in a field to select from a list of variables that are available in a particular context.
The following syntax enables you to use environment variables as PVRStudio variables: %{Env:VARNAME}.
PVRStudio uses pattern substitution when expanding variable names. To replace the first match of pattern within variable with replacement, use:
%{variable/pattern/replacement}
To replace all matches of pattern within variable with replacement, use:
%{variable//pattern/replacement}
The pattern can be a regular expression and the replacement can
contain backreferences. For example, if %{variable} is my123var, then %{variable/(..)(\d+)/\2\1} is expanded to
123myvar.
Instead of the forward slash, you can also use the pound sign (#)
as the substitution character. This can be helpful if the value is
supposed to be a file path, in which case forward slashes might get
translated to backslashes on Windows hosts.
To use the default value if the variable is not set, use:
%{variable:-default}
Build Steps
In Build Steps you can change the settings for the build system selected for building the project:.
Build Steps
PVRStudio builds projects by running the make or nmake
command.
To override the shell command that PVRStudio constructs by default, disable or remove the build step and add a custom build step that specifies another shell command.
By default, PVRStudio uses all the CPU cores available to achieve maximum build parallelization. On Linux and macOS, you can specify the number of parallel jobs to use for building in the Parallel jobs field. Select the Override MAKEFLAGS check box to override existing MAKEFLAGS variables.
To generate debug symbols also for applications compiled in release mode, select the Generate separate debug info check box. For more information, see Using the Performance Analyzer.
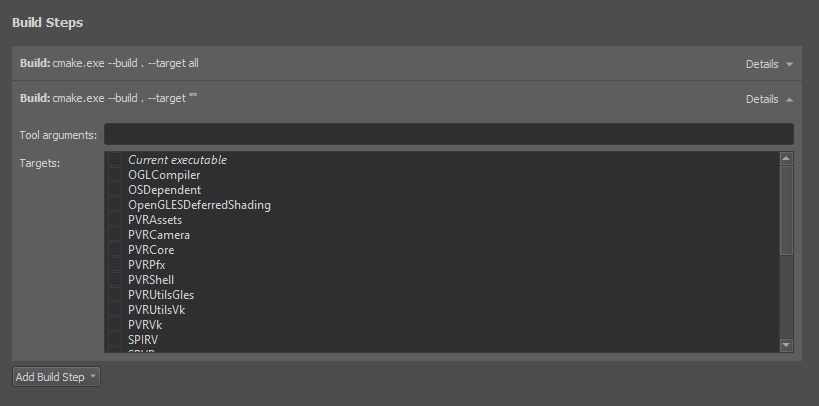
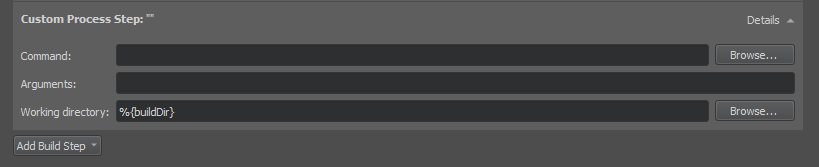
Adding Custom Build Steps
To add custom steps to the build settings, select Add Build Step > Custom Process Step.
By default, custom steps are enabled. To disable a custom step, select the image:: images/buildstepdisable.png (Disable) button.
Executing Custom Commands
To execute custom commands when building for embedded devices, select Add Build Step > Custom Remote Command (via adb shell) (commercial only) and enter the command to execute.
Clean Steps
You can use the cleaning process to remove intermediate files. This process might help you to fix obscure issues during the process of building a project.

You can define the cleaning steps for your builds in the Clean Steps.
To add a clean step using make or a custom process, click Add Clean Step and select the type of step you want to add.
By default, custom steps are enabled. To disable a custom step, select the Disable button.
To remove a clean step, click Remove Item.
To change the order of steps, click image:: images/arrowup.png (Move Up) and image:: images/arrowdown.png (Move Down).
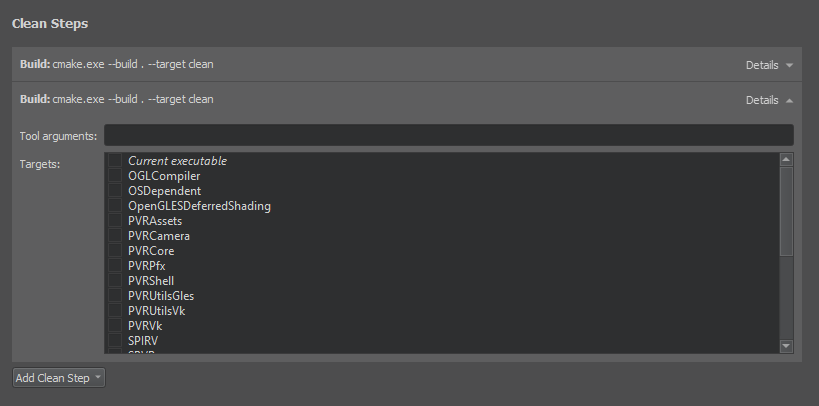
CMake Clean Steps
When building with CMake, you can add arguments and targets for the clean command in Clean Steps.
The build errors and warnings are parsed and displayed in the Issues output pane.
Build Environment
You can specify the environment you want to use for building in the Build Environment section. By default, the environment in which PVRStudio was started is used and modified to include the Qt version. Depending on the selected Qt version, PVRStudio automatically sets the necessary environment variables. You can edit existing environment variables or add, reset and unset new variables based on your project requirements.
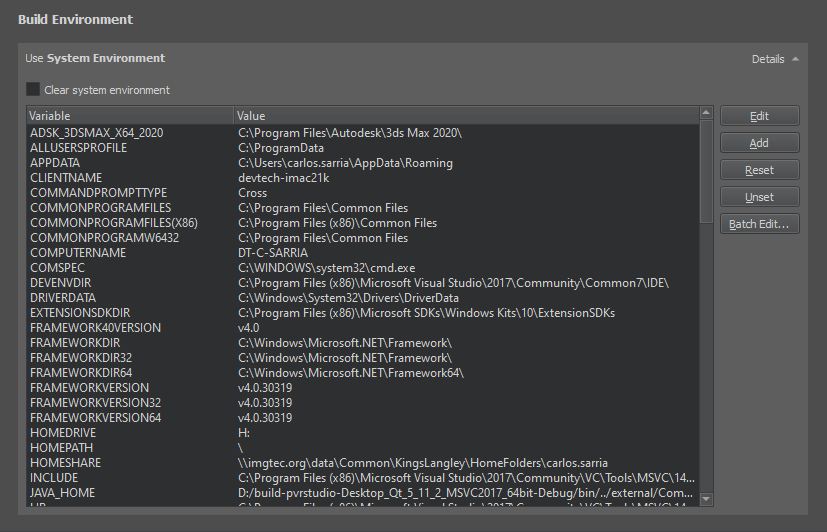
Note: The changes are stored in the local project specific user file. Therefore, they are not suitable for sharing between developers or development PCs. To share settings, incorporate them into the build system.
Batch Editing
To modify environment variable values for build or run environments, select Batch Edit in the build or run settings and enter environment variables in the Edit Environment dialog.
To remove a variable value from the environment, enter the variable
name. For example, TEST sets the value of the TEST variable
empty when building or running the project.
To add a variable value to the environment, enter the variable name
and value, separated by the equals sign. For example, the following
line prepends the /opt/bin folder to the existing PATH:
On Windows:
PATH=C:\opt\bin;${PATH}- On Linux:PATH=/opt/bin:${PATH}
To add or remove several variables, place them on separate lines. The order is important. If you remove a value on a line, you cannot refer to it on the following lines. However, you can remove a value after you have referred to it on an earlier line.
Clearing the System Environment
To build with a clean system environment, select the Clear system environment check box. PVRStudio discards the current environment, and populates a clean system environment with the environment variables that the compilers and tools need. Therefore, the environment is never totally empty, even after you clear it.
Specifying Run Settings
The run settings to specify depend on the type of the project and on the kit that you build and run the project with.
PVRStudio automatically creates run configurations for your project. To view and modify them, select Projects > Build & Run > Run.
The available run configurations are listed in the Run configuration field. To add run configurations for a project, select Add. To remove the current run configuration, select Remove. To rename the current run configuration, select Rename.
To prevent PVRStudio from automatically creating run configurations, select Tools > Options > Build & Run, and then deselect the Create suitable run configurations automatically check box.
PVRStudio automatically adds run configurations for all targets
specified in the CMake project file, CMakeLists.txt.
Selecting the Run Environment
PVRStudio automatically selects the environment used for running the application based on the device type. You can edit the environment or select another environment in the Run Environment section.
You can edit existing environment variables or add, reset and unset new variables.
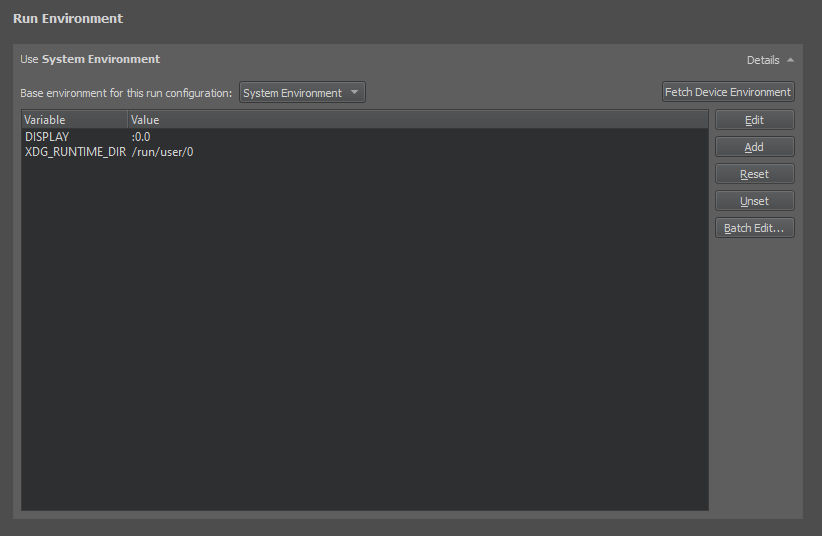
When running on the desktop, the Build Environment is used by default, but you can also use the System Environment without the additions made to the build environment. For more information, see Build Environment.
To run in a clean system environment, select Clean Environment.
When running on a mobile device connected to the development host, PVRStudio fetches information about the Device Environment from the device. Usually, it does not make sense to edit the device environment.
To modify the environment variable values for the run environment, select Batch Edit. For more information, see Batch Editing.
Specifying a Custom Executable to Run
If you use CMake or the generic project type in PVRStudio, or want to run a custom desktop executable, create a Custom Executable run configuration for your project. For example, when working on a library, you can run a test application that links against the library.
Specify the executable to run, command line arguments, working directory, and environment variables to use.
Specifying Editor Settings
PVRStudio uses the MIME type of the file to determine which mode and editor to use for opening the file. For example, PVRStudio opens .txt files in Edit mode in the text editor.
You can configure the text editor according to your needs. You can specify editor behavior either globally for all projects or separately for each project. To specify global editor behavior, select Tools > Options > Text Editor > Behavior.
To configure the text editor behavior for the current project:
Select Projects > Project Settings > Editor.
In the Editor settings field, select Custom.
Specify text editor settings for the project.
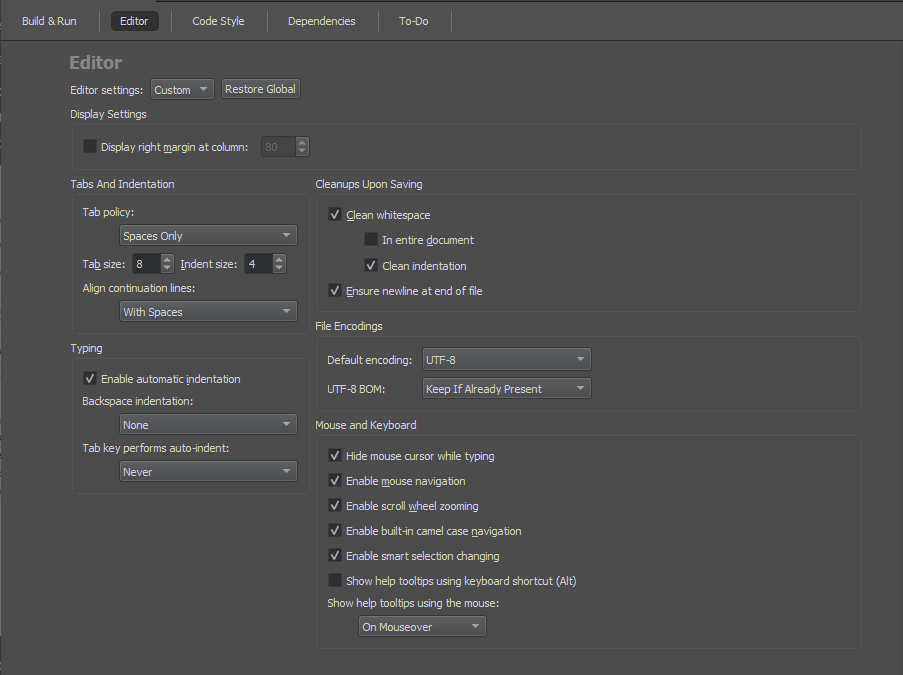
Click Restore Global to revert to the global settings.
For more information about the settings, see:
Specifying Code Style Settings
PVRStudio uses the MIME type of the file to determine which mode and editor to use for opening the file. PVRStudio opens C++ files in Edit mode in the C++ code editor and image files in the image viewer.
You can configure the code style according to your needs. You can specify code style either globally for all projects or separately for each project. You can specify several sets of code style settings and easily switch between them. In addition, you can import and export code style settings.
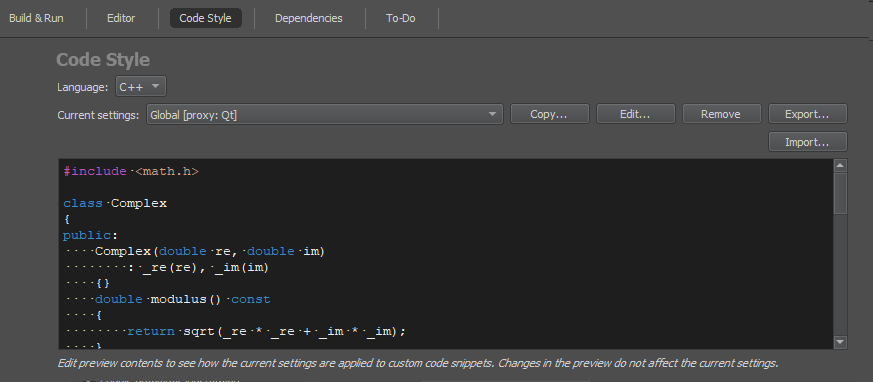
To specify global code style settings sets for C++ files, select Tools > Options > C++.
To configure the editor behavior for the current project:
Select Projects > Project Settings > Code Style.
In the Language field, select C++, or Nim.
In the Current settings field, select the settings to modify and click Copy.
Give a name to the settings and click OK.
Click Edit to specify code style settings for the project.
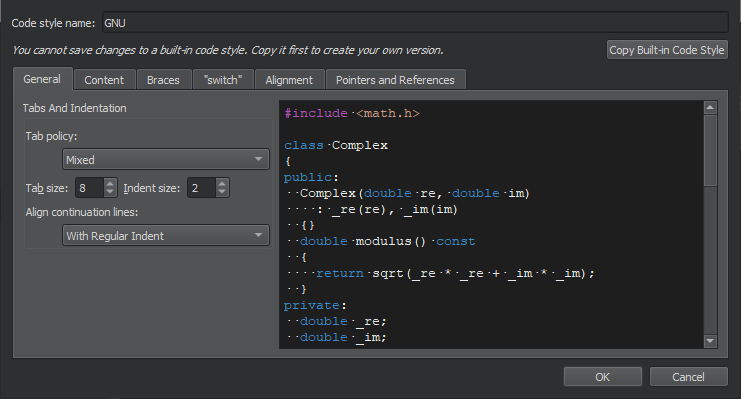
For more information about the settings, see Indenting Text or Code.
Specifying Dependencies
If you have multiple projects loaded in a session, you can define the order in which they are built. For example, if project A depends on project B, project B must be built first.
Note: The build order is stored as a property of a session, not a project. You must open the session for these settings to take effect. For more information, see Managing Sessions.
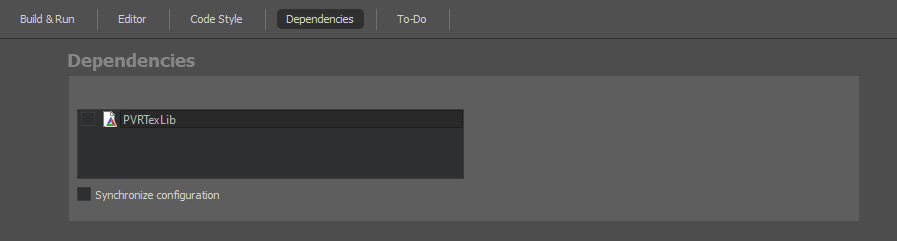
To define the build order of projects within a session:
Select Projects > Project Settings > Dependencies.
Select projects that must be built before the current project is built.
Select the Synchronize configuration check box to use the same kit as well as the same build and deploy configuration to build and deploy all dependent projects loaded in a session.
PVRStudio calculates the build order based on the dependencies that you specify for the projects loaded in the session.
Note: You cannot use this view to specify subprojects for projects. For more information on how to add subprojects, see Adding Subprojects to Projects.