Finding
Finding
-
The incremental search highlights the matching strings in the window while typing and the advanced search enables you to search from currently open projects or files on the file system. You can conduct incremental and advanced searches in parallel.
In addition, you can search for symbols when you want to refactor code.
-
The locator provides one of the easiest ways in PVRStudio to browse through projects, files, classes, functions, documentation and file systems.
Finding and Replacing
To search through the currently open file:
Press Ctrl+F or select Edit > Find/Replace > Find/Replace.
Enter the text you are looking for.
If the text is found, all occurrences are highlighted as you type.
To go to the next occurrence, click image:: images/next.png (Find Next), or press F3. To go to the previous occurrence click image:: images/prev.png (Find Previous), or press Shift+F3.
You can restrict the search in the Find field by selecting one or several search criteria:
To make your search case sensitive, select Case Sensitive.
To search only whole words, select Whole Words Only.
To search using regular expressions, select Use Regular Expressions. Regular expressions used in PVRStudio are modeled on Perl regular expressions. For more information on using regular expressions, see the documentation for the QRegularExpression Class.
Note: If you have selected text before selecting Find/Replace, the search is conducted within the selection.
To replace occurrences of the existing text, enter the new text in the Replace with field.
To replace the selected occurrence and move to the next one, click Find Next or press Ctrl+=.
To replace the selected occurrence and move to the previous one, click Find Previous.
To replace all occurrences in the file, click Replace All.
The Preserve Case when Replacing option can be selected to preserve the case of the original text when replacing. This option is not compatible with the Use Regular Expressions search option, and will thus be disabled when regular expressions are used. When the option is used, the case of the occurrence will be conserved, according to the following rules:
All upper-case occurrences are replaced with the upper-case new text.
All lower-case occurrences are replaced with the lower-case new text.
Capitalized occurrences are replaced with the capitalized new text.
Other occurrences are replaced with the new text as entered.
If an occurrence and the new text have the same prefix or suffix, then the case of the prefix and/or suffix are preserved, and the other rules are applied on the rest of the occurrence only.
The locations of search hits, breakpoints, and bookmarks in your document are highlighted on the editor scroll bar. To turn highlighting off, select Tools > Options > Text Editor > Display > Highlight search results on the scrollbar.
Advanced Search
To search through projects, files on a file system or currently open files:
Press Ctrl+Shift+F or select Edit > Find/Replace > Advanced Find > Open Advanced Find.
Select the scope of your search:
All Projects searches from all currently open projects.
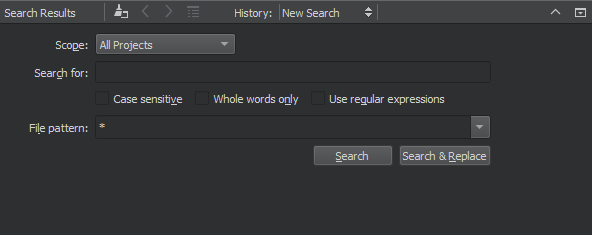
Current Project searches from the project you are currently editing.
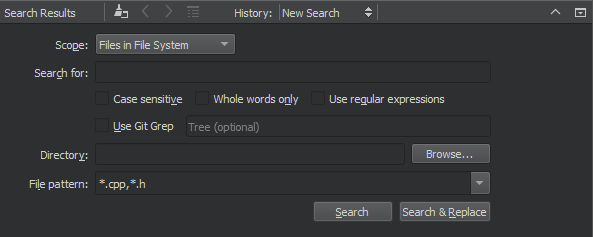
Files in File System recursively searches from the selected directory.
In the Search engine field, select the search engine to use:
Select Internal to use the PVRStudio search engine.
Select Git Grep to use Git to only search tracked files in the Git work tree. To restrict the search to the HEAD, a tag, a local or remote branch, or a commit hash, enter a reference. Leave the field empty to search through the file system.
Select Silver Searcher to use the experimental Silver Searcher plugin. For more information, see Enabling Silver Searcher.
Current File searches only from the current file.
Open Documents searches from all open files.
Clang Query Project explores the Clang abstract syntax tree (AST) using AST matcher expressions. For more information, see Exploring Clang AST.
In the File pattern field, specify file patterns to restrict the search to files that match the pattern. For example, to search for a string only in
.cppand.hfiles, enter*.cpp,*.h.In the Exclusion pattern field, specify file patterns to omit files from the search.
Enter the text you are looking for and click Search.
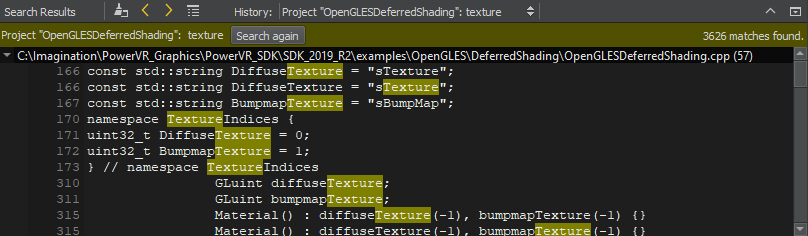
A list of files containing the searched text is displayed in the Search Results pane.
To see all occurrences in a file, double-click the file name in the list.
To go to an occurrence, double-click it.
To repeat the search after you have made changes to the listed files, for example, select Search Again.
The search results are stored in the search history from which you can select earlier searches.
To clear the search results, select the image:: images/clean_pane_small.png (Clear) button.
To start a new search, select the image:: images/pvrstudio-new-search-icon.png (New Search) button.
Note: You can use Advanced Find also to search for symbols.
Enabling Silver Searcher
You can use Silver Searcher as a search engine in PVRStudio if you install Silver Searcher on the development PC and enable the experimental plugin.
To use Silver Searcher:
Download and install Silver Searcher from The Silver Searcher or GitHub.
You might have to build Silver Searcher from sources for some platforms.
Select Help > About Plugins > Utilities > SilverSearcher to enable the plugin.
Restart PVRStudio to be able to use the plugin.
When searching, select Silver Searcher in the Search engine field.
Exploring Clang AST
You can use the experimental Clang Refactoring plugin to explore the Clang AST using AST matcher expressions. For more information about constructing matcher expressions, see AST Matcher Reference.
To explore the AST:
Select Help > About Plugins > C++ > ClangRefactoring to enable the plugin.
Restart PVRStudio to be able to use the plugin.
When searching, select Clang Query Project in the Scope field.
Enter an AST matcher expression in the Search for field.
You can view the results of the query as links to code positions in the Search Results output pane.
Searching with the Locator
You can find the locator in the bottom left of the PVRStudio window.
To activate the locator:
Press Ctrl+K (Cmd+K on macOS).
Select Tools > Locate.
Select Edit > Go to Line.
Click the line and column indicator on the editor toolbar.
To open a file called in the currently open project using the locator:
Activate the locator by pressing Ctrl+K.
Start typing the filename.
Move to the filename in the list and press Enter.
The file opens in the editor.
To move to a line in the file, enter the line number in the locator.
To move directly to a particular line and column in the document when
you open the document, append them to the file name in the locator,
separated by plus signs (+) or colons (:). For example, to open
HelloWorld.cpp to line 41 and column 2, enter:
HelloWorld.cpp:41:2.
If the path to a file is very long, it might not fit into the locator window. To view the full path, press Alt when the filename is selected or use the handle next to the locator window to increase the window width.
It is also possible to enter only a part of a search string. As you
type, the locator shows the occurrences of that string regardless of
where in the name of an component it appears. Some locator filters,
such as colon and m, support fuzzy matching, which means that
you can enter the uppercase letters to locate a symbol when using
camel case or the letters after the underscore when using snake case.
To narrow down the search results, you can use the following wildcard characters:
To match any number of any or no characters, enter
*. - To match a single instance of any character, enter?.
Using Locator Filters
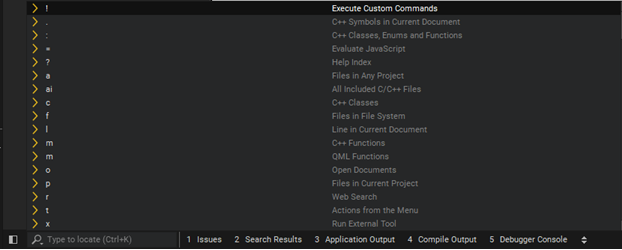
The locator enables you to browse not only files, but any items defined by locator filters. The filters that are available depend on the file type:
Locating any open document (
o) - Locating files anywhere on your file system (f)Locating files belonging to your project (
p), such as source, header, resource, and.uifiles, or to any project (a)Locating bookmarks (:ref:
b). For more information, see Using Bookmarks <Working in Edit Mode>.Locating class (
c), enum, and function (m) definitions in your project or anywhere referenced from your project (:)Locating symbols in the current document (
.)Locating a specific line and column in the document displayed in your editor (
l <line_number>:<column_number>) - Opening help topics, including documentation (?)Performing web searches (
r) - Running text editing macros that you record and save (rm). For more information, see Using Text Editing MacrosExecuting JavaScript (
=), especially useful for calculations. For more information, see Executing JavaScript. - Executing shell commands (!)Executing version control system commands (
git). For more information, see Using Version Control Systems - Triggering menu items from the main menu (t)Running external tools (
x)
To use a specific locator filter, type the assigned prefix followed by Space. The prefix is usually a single character. Then type the search string (typically, a filename or class name) or the command to execute.
You can also double-click a locator filter in the filter list to use it. You can use the up and down arrow keys or the Ctrl+P and Ctrl+N keyboard shortcuts to move up and down the list, and then press Enter to use the selected filter.
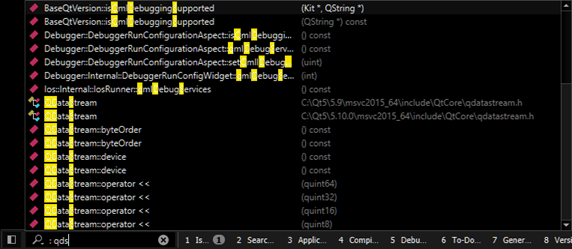
For example, to locate symbols matching QDataStream:
Activate the locator.
Enter a colon (:) followed by a space and the upper case letters in the symbol name (QDataStream):
: qds
The locator lists the results.
Filters locating files also accept paths, such as
tools/*main.cpp. Filters locating class and function definitions also accept namespaces, such as Utils::*View. For example, to
create a new file and open it in the editor, type f followed by
Space, followed by path and file name, and then press Enter.
You can use the filter that triggers menu commands to open sessions.
Enter t yoursess or t sess yoursess to trigger File >
Sessions > yoursessionname.
By default, the following filters are enabled and you do not need to use their prefixes explicitly:
Going to a line and column in the current file (
l). - Going to an open file (o).Going to a file in any open project (
a).
Configuring Locator Filters
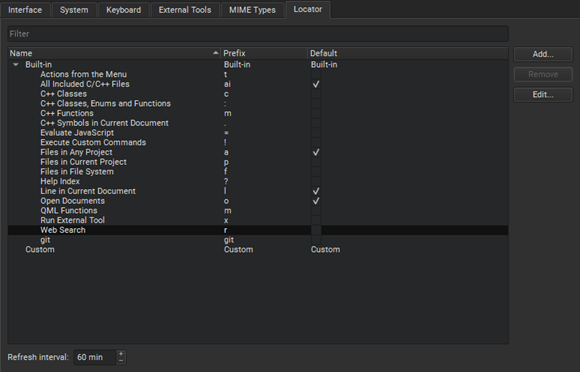
If the default filters do not match your use case, you can check whether you can change them. For all filters, you can change the filter prefix and restrict the search to items that match the filter.
To configure a locator filter:
In the locator, click image:: images/magnifier.png (Options) and select Configure to open the Locator options.
Select a filter, and then select Edit.
Specify the prefix string.
To implicitly include the filter even when not typing a prefix as a part of the search string, select Include by default.
Specify other available options. For more information, see Adding Web Search Engines.
Adding Web Search Engines
You can use the Web Search (r) locator filter to perform web searches. URLs and search commands for Bing, Google, Yahoo! Search, cplusplus.com, and Wikipedia are configured by default.
To find out the format of the search command to use for your favorite
web search engine, perform a search in your browser and copy the
resulting URL to the locator filter configuration. Replace the search
term with the variable %1.
To add URLs and search commands to the list:
Select Tools > Options > Environment > Locator > Web Search (prefix: r) > Edit.
Select Add to add a new entry to the list.
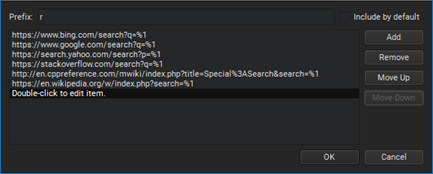
Double-click the new entry to specify a URL and a search command. For example,
http://www.google.com/search?q=%1.Click OK.
Creating Locator Filters
To quickly access files not directly mentioned in your project, you can create your own locator filters. That way you can locate files in a directory structure you have defined.
To create a locator filter:
In the locator, select Options > Configure to open the Locator options.
Click Add.
In the Filter Configuration dialog:
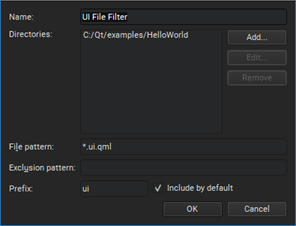
In the Name field, enter a name for your filter.
In the Directories field, select at least one directory. The locator searches directories recursively.
In the File pattern field, specify file patterns to restrict the search to files that match the pattern. Use a comma separated list. For example, to search for all
.cppand.hppfiles, enter*.cpp,*.hppIn the Exclusion pattern field, specify file patterns to omit files from the search.
In the Prefix field, specify the prefix string.
To implicitly include the filter even when not typing a prefix as a part of the search string, select Include by default.
Click OK.
Configuring Locator Cache
The locator searches the files matching your file pattern in the directories you have selected and caches that information. The cache for all default filters is updated as you write your code. By default, PVRStudio updates the filters created by you once an hour.
To update the cached information manually, select Options > Refresh in the locator.
To set a new cache update time:
Select Tools > Options > Environment > Locator.
In Refresh interval, define new time in minutes.
Executing JavaScript
The locator provides access to a JavaScript interpreter, that can be used to perform calculations.
Beside simple mathematical operations, like ((1 + 2) * 3), the following built-in functions exist:
Function |
Purpose |
|---|---|
abs(x) |
Returns the absolute value of x |
acos(x) |
Returns the arccosine of x, in radians |
asin(x) |
Returns the arcsine of x, in radians |
atan(x) |
Returns the arctangent of x, in radians |
atan2(x, y) |
Returns the arctangent of the quotient of its arguments |
bin(x) |
Returns the binary representation of x |
ceil(x) |
Returns the value of x rounded up to the next integer |
cos(x) |
Returns the cosine of x (x is in radians) |
exp(x) |
Returns the value of E to the power of x |
e() |
Returns Euler’s number E (2.71828…) |
floor(x) |
Returns the value of x rounded down to the next integer |
hex(x) |
Returns the hexadecimal representation of x |
log(x) |
Returns the natural logarithm (base E) of x |
max([value1[, value2[, …]]]) |
Returns the highest value of the given numbers |
min([value1[, value2[, …]]]) |
Returns the lowest value of the given numbers |
oct(x) |
Returns the octal representation of x |
pi() |
Returns PI (3.14159…) |
pow(x, y) |
Returns the value of x to the power of y |
random() |
Returns a random number between 0 and 1 |
round(x) |
Returns the value of x rounded to the next integer |
sin(x) |
Returns the sine of x (x is in radians) |
sqrt(x) |
Returns the square root of x |
tan(x) |
Returns the tangent of x (x is in radians) |