Build Instructions#
The following provides instructions for building the PowerVR SDK for Android, Windows and Linux. When you want to build the SDK, you can either build the framework and all of the examples, or you can build a standalone example. Builds are provided by either a CMakeLists.txt file or a build-android folder.
It is recommended that you use the top level CMakeLists.txt or build-android system to build all of the examples at the same time. This prevents you from building the framework multiple times. Each example has its own build-android folder and CMakeLists.txt, and the instructions for building a standalone example are identical to building the entire SDK.
Downloading the repository#
The SDK is hosted on github, which means you can choose to either pull a local copy of the repository through git, or you can download the source directly as a .zip package. If you choose to use git, use the following command:
# Open the location you want to store the SDK in a terminal
# Then clone the repo:
git clone https://github.com/powervr-graphics/Native_SDK.git
Repository Dependencies#
Other than the platform-specific build tools which will be specified below, the SDK satisfies all of its own required dependencies. (either by distributing them internally, or cloning them automatically through git submodules).
Platform Setup#
The SDK creates build systems through CMake, which means you must have two things to build the SDK: CMake, and the build tool you target. Android is a special case as it has its own package management built in.
However, if you are targeting Linux or Windows, it is recommended that you add CMake to your path, so you can use it on the command line. We’ll go over this later.
Android Setup#
Download and install the Android SDK or command-line only Android build tools
Through the Android SDK Manager, either via Android Studio or command-line SDK manager, install the following packages:
Android NDK bundle, recommended version 20.0.5594570
The Android SDK Platform package for API level 29 (used as our targetSdkVersion)
The Android SDK Build-Tools version 29 (used as our compileSdkVersion)
CMake version 3.10.2
LLDB [optional] - only required for on-device debugging
If you plan on using gradleW from the command-line, make sure that the environment variable
JavaHomepoints to a valid Java JDK directory
Windows Setup#
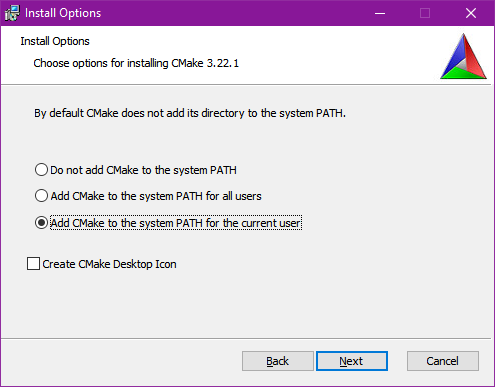
Download and install CMake, ensuring that you select one of the Add CMake to the system PATH options:
Download and install Visual Studio. Note:
Versions known to be supported are: 2017, 2019, 2022
Community Versions should suffice
The SDK has been built and tested on Windows 10, using Visual studio versions 2019 and 2022 and MinGW as well.
Other versions of Windows may also work
Other Windows-based build systems may also work
Linux Setup#
Ensure system installed packages include
build-tools,make,cmake, and your window system’s dev libraries.This may include X11 packages, Wayland packages, libc++, libdl and other libraries depending on the build configuration.
The SDK has been built and tested on Ubuntu 18.04 LTS and Ubuntu 20.04 LTS versions. Other Linux distributions may also work, but adaptions to the SDK should be pretty straight forward
If using Wayland, ensure that XDG_RUNTIME_DIR has been set. For example:
export XDG_RUNTIME_DIR=/tmp/wayland
Build#
Now that your system has all the build dependencies, we’ll cover how to build for the different platforms.
Android#
Android uses its own build system called Gradle. Instead of calling CMake directly, Gradle makes use of CMake as appropriate internally.
Command line#
Building from the command-line is very easy. We provide gradle wrappers, which are used to avoid downloading and installing gradle. The wrapper is a small script located in the corresponding build-android that you are trying to build.
The wrapper will automatically download the required gradle version and run it. (Note: Using the wrapper is optional; if you already have gradle installed, you can use that instead).
To build from command-line navigate to the build-android folder and run the gradle wrapper:
# Gradle builds have the following signature :
# gradlew assemble[Debug/Release] [parameters]

# An example of a debug build would be as follows :
gradlew assembleDebug -PANDROID_ABIS=arm64-v8a
Android Studio#
Most Android developers will be familiar with Android Studio, which provides tools to build, run and debug apps on Android. However, in order to import the SDK into Android Studio, the dependencies must first be downloaded. The easiest way to do that is to build the project on command-line beforehand, and allow our build scripts to do all the work.
Once the dependencies have been downloaded, the SDK can then be opened in android studio by using the import project dialog, and selecting the desired build-android folder for the entire SDK, a particular example or a framework module.
Windows#
The easiest way to make use of the SDK on windows is to use CMake to produce a Visual Studio project. Inside of this project you can then select the build type, and which example to run on completion.
The first step is to open the SDK in a terminal:
Navigate to your local copy of the SDK inside file manager.
Ensure that you have Windows Terminal installed from the windows store.
Hover your mouse over an empty section of the file explorer.
Hold shift, and then right click for an extended context menu.

Select Open in Windows Terminal.
Enter the following commands to generate a Visual Studio Project in Native-SDK/build:
mkdir build
cd build
cmake ..
Once you’ve opened the Visual Studio project, you can right click on an example and select Set as startup project. The example will build and run just like any other Visual Studio project.
Linux#
The main difference Linux has over other target operating systems is that it can have different windowing systems. As a result we need to tell PVRShell which windowing system it should be built for. This can be done when configuring the project in CMake by setting the PVR_WINDOW_SYSTEM CMake variable. We’ll cover all of the build options later on.
Linux building starts the same way that windows does, by opening a terminal in your local copy of Native-SDK, and entering the following build commands:
mkdir build
cd build
# Assuming you're targetting XCB
cmake .. -DPVR_WINDOW_SYSTEM=XCB

# Once Cmake has finished configuring, we can build
cmake --build .
PVR_WINDOW_SYSTEM can take the following values: Wayland, NullWS, X11, XCB, Screen.
Build Options#
Several options can be used to customise the build of the SDK or to control which modules/examples are built. Some of these options are binary enable/disable whilst others require the use of strings as inputs.
The following build options can be passed to CMake via the command line using the -D[PARAM_NAME]=[PARAM_VALUE] syntax. Alternatively, these parameters can be configured using the CMake GUI.
Option |
Platform |
Default |
Description |
|---|---|---|---|
|
All |
|
The build variant. Supported values: [Debug, Release, MinSizeRel, RelWithDebInfo]. |
|
All |
|
Determines whether the PowerVR SDK examples are built. |
|
All |
|
Determines whether the PowerVR SDK framework modules are built. |
|
All |
|
Pass this parameter if both Vulkan and OpenGL examples are downloaded but, for whatever reason, only a solution for the OpenGL ES ones are required. |
|
All |
|
Pass this parameter if both Vulkan and OpenGL examples are downloaded but, for whatever reason, only a solution for the Vulkan ones is required. |
|
Linux/QNX |
|
Can be used to control the windowing system used. Supported values: [NullWS, X11, Wayland, Screen]. Usually, desktop Linux systems will be running an X11/XCB or using a Wayland server. Development platforms often use a NullWS system which is where the GPU renders to the screen directly without using a windowing system. Screen is commonly used on QNX. |
|
All |
|
This parameter can be used to provide a directory containing a glslangValidator binary which will be used instead of rebuilding it from source. |
|
All |
|
This parameter can be used to avoid building the dependencies for the current module or example on which this option was used. The dependencies will instead be found using cmake’s find_package logic. This parameter should not generally be used and is primarily used for optimising android builds. |
The following options can be passed via gradlew command line using the -P[PARAM_NAME]=[PARAM_VALUE] syntax.
Option |
Default |
Description |
|---|---|---|
|
|
Provide a path to an android keystore file used for signing a release built Android apk. |
|
|
Provide a password for a given android keystore file used for signing a release built Android apk. |
|
|
Provide an alias for a given android keystore file used for signing a release built Android apk. |
|
|
Provide the password for a key in the given android keystore file used for signing a release built Android apk. |
|
|
Disable signing of release built Android apks. |
|
|
Specify the target architectures which will be built. |
Advanced Android#
Android can have a pretty complicated build system, so we’ve provided some extra information here, in case you get stuck.
Troubleshooting#
Unfortunately things can’t go perfectly every time. We’ve got some frequent things for you to test, and hopefully this will resolve the problem you are experiencing.
The minimum required version of CMake to build the SDK is 3.18.0. Ubuntu 20.04 is installed with CMake 3.10.4 so to build with a more recent version there are two options. Either build and install CMake 3.18.0 from the source code or download and extract the precompiled binaries for your platform. To override the CMake version used to build the SDK, simply add a local.properties file to the build-android folder and point CMake to your installation of version 3.18.0 by adding the following line: cmake.dir=[path-to-cmake-binaries]
Sometimes the build system might have a problem finding the correct Android SDK, if there are multiple ones installed. to resolve this, open the build-android folder you are tying to build. Create a local.properties file, and add the line sdk.dir=[path-to-the-ANDROID-sdk], or add an environment variable ANDROID_HOME=[path-to-the-ANDROID-sdk].
Gradle Properties#
There are a few different properties that can/need to be configured. These can be set up in different places:
A
gradle.propertiesfile in each example or framework module configures properties for that project.A global
gradle.propertiesfile in theGRADLE_USER_HOMEdirectory. This is not provided, but it is very convenient to globally override all the SDK options. For example - key signing, or for changing the target Android ABI for the whole SDK.Individual properties can be passed as command-line parameters, by passing
-P[PARAM_NAME]=[PARAM_VALUE]to the command-line.
Android ABIs#
By default, every example’s gradle.properties file has an ANDROID_ABIS=x86,x86_64,armeabi-v7a,arm64-v8a entry. This creates an apk that targets those architectures.
During development it is often preferable to build only for a single platform’s architecture to decrease build times. To change the architectures which are built, there are several options:
Change the properties in each required project ’s gradle.properties file.
Add a corresponding line to the global
gradle.propertiesfile. This overrides per-project properties.Build with, for example,
gradlew assembleDebug -PANDROID_ABIS=armeabi-v7a. This overrides bothgradle.propertiesfiles.
APK Signing#
The provided Gradle scripts have provision for signing the release apks. This is achieved by setting properties in your apks. We recommend that if you set up your own keystore, add your usernames and key aliases to a global gradle.properties, and pass the passwords through the command-line.
The following properties must be set either per project in per-project gradle.properties, or globally in system-wide gradle.properties or through the command-line with -PNOSIGN:
KEYSTORE=[Path-to-keystore-file]KEYSTORE_PASSWORD=[Password-to-keystore]KEY_ALIAS=[Alias-to-signing-key]KEY_PASSWORD=[Password-to-signing]
If the release apks do not need to be signed, pass the parameter NOSIGN with any value to disable signing:
NOSIGN=[1]
Cross Compilation#
CMake uses toolchain files for cross-compiling. These are usually not necessary when targeting the machine that is being built on, also known as native or host compilation. For cross-compiling, The SDK includes a number of CMake toolchain files in [path-to-sdk]/cmake/toolchains. Alternatively these toolchain files can be used as a reference for making other toolchain files. Toolchains are passed directly to the CMake command-line: cmake ../.. -DCMAKE_TOOLCHAIN_FILE=[path-to-sdk]/cmake/toolchains/Linux-gcc-armv8.cmake.
The SDK provides toolchain files for the following architectures/platforms:
iOS
Linux
armv7
armv7hf
armv8
mips_32
mips_64
x86_32
x86_64
QNX
aarch64le
armle-v7
x86_32
x86_64